Lion Brand
Notebook
®
Home
Categories
Crocheting
Knitting
Patterns
Free Patterns
Pattern Recommendations
Charity
Community
Crafts & Home Decor
Fashion & Style
Fiber Arts & Artists
Fiction
Tips & How To
Tutorials
Wellness
Yarns
Shop Yarns, Patterns & Kits
TRON
Home
Categories
Crocheting
Knitting
Patterns
Charity
Community
Crafts & Home Decor
Fashion & Style
Fiber Arts & Artists
Fiction
Tips & How To
Tutorials
Wellness
Yarns
Shop Yarns, Patterns & Kits
Archive Page
Month: April 2012
Select Month
July 2025 (2)
April 2025 (1)
March 2025 (1)
January 2025 (1)
September 2021 (1)
August 2021 (1)
July 2021 (1)
May 2021 (1)
March 2021 (2)
February 2021 (2)
December 2020 (3)
November 2020 (9)
October 2020 (2)
September 2020 (1)
August 2020 (2)
June 2020 (2)
April 2020 (7)
March 2020 (7)
February 2020 (5)
January 2020 (6)
December 2019 (6)
November 2019 (4)
October 2019 (6)
September 2019 (8)
August 2019 (10)
July 2019 (11)
June 2019 (4)
May 2019 (12)
April 2019 (17)
March 2019 (15)
February 2019 (15)
January 2019 (1)
December 2018 (7)
November 2018 (12)
October 2018 (9)
September 2018 (9)
August 2018 (14)
July 2018 (11)
June 2018 (8)
May 2018 (22)
April 2018 (23)
March 2018 (19)
February 2018 (21)
January 2018 (23)
December 2017 (17)
November 2017 (14)
October 2017 (11)
September 2017 (14)
August 2017 (9)
July 2017 (22)
June 2017 (22)
May 2017 (27)
April 2017 (29)
March 2017 (30)
February 2017 (28)
January 2017 (31)
December 2016 (25)
November 2016 (41)
October 2016 (31)
September 2016 (40)
August 2016 (34)
July 2016 (30)
June 2016 (27)
May 2016 (31)
April 2016 (30)
March 2016 (30)
February 2016 (21)
January 2016 (24)
December 2015 (30)
November 2015 (36)
October 2015 (45)
September 2015 (31)
August 2015 (31)
July 2015 (39)
June 2015 (36)
May 2015 (36)
April 2015 (36)
March 2015 (33)
February 2015 (35)
January 2015 (33)
December 2014 (31)
November 2014 (33)
October 2014 (35)
September 2014 (32)
August 2014 (31)
July 2014 (31)
June 2014 (30)
May 2014 (30)
April 2014 (29)
March 2014 (28)
February 2014 (20)
January 2014 (19)
December 2013 (21)
November 2013 (27)
October 2013 (29)
September 2013 (21)
August 2013 (24)
July 2013 (16)
June 2013 (23)
May 2013 (22)
April 2013 (17)
March 2013 (21)
February 2013 (25)
January 2013 (20)
December 2012 (12)
November 2012 (18)
October 2012 (16)
September 2012 (16)
August 2012 (19)
July 2012 (17)
June 2012 (16)
May 2012 (18)
April 2012 (18)
March 2012 (18)
February 2012 (16)
January 2012 (17)
December 2011 (18)
November 2011 (24)
October 2011 (22)
September 2011 (18)
August 2011 (23)
July 2011 (20)
June 2011 (20)
May 2011 (16)
April 2011 (17)
March 2011 (12)
February 2011 (15)
January 2011 (17)
December 2010 (17)
November 2010 (13)
October 2010 (15)
September 2010 (15)
August 2010 (18)
July 2010 (16)
June 2010 (19)
May 2010 (13)
April 2010 (21)
March 2010 (25)
February 2010 (22)
January 2010 (21)
December 2009 (18)
November 2009 (22)
October 2009 (19)
September 2009 (20)
August 2009 (15)
July 2009 (22)
June 2009 (28)
May 2009 (18)
April 2009 (23)
March 2009 (28)
February 2009 (12)
January 2009 (22)
December 2008 (17)
November 2008 (19)
October 2008 (19)
September 2008 (15)
August 2008 (14)
July 2008 (17)
June 2008 (19)
May 2008 (24)
April 2008 (11)
April 4, 2012
-
12
comments
Grab a Badge for Your Blog!
April 4, 2012
-
18
comments
What’s Your Favorite Pattern Book?
April 4, 2012
-
38
comments
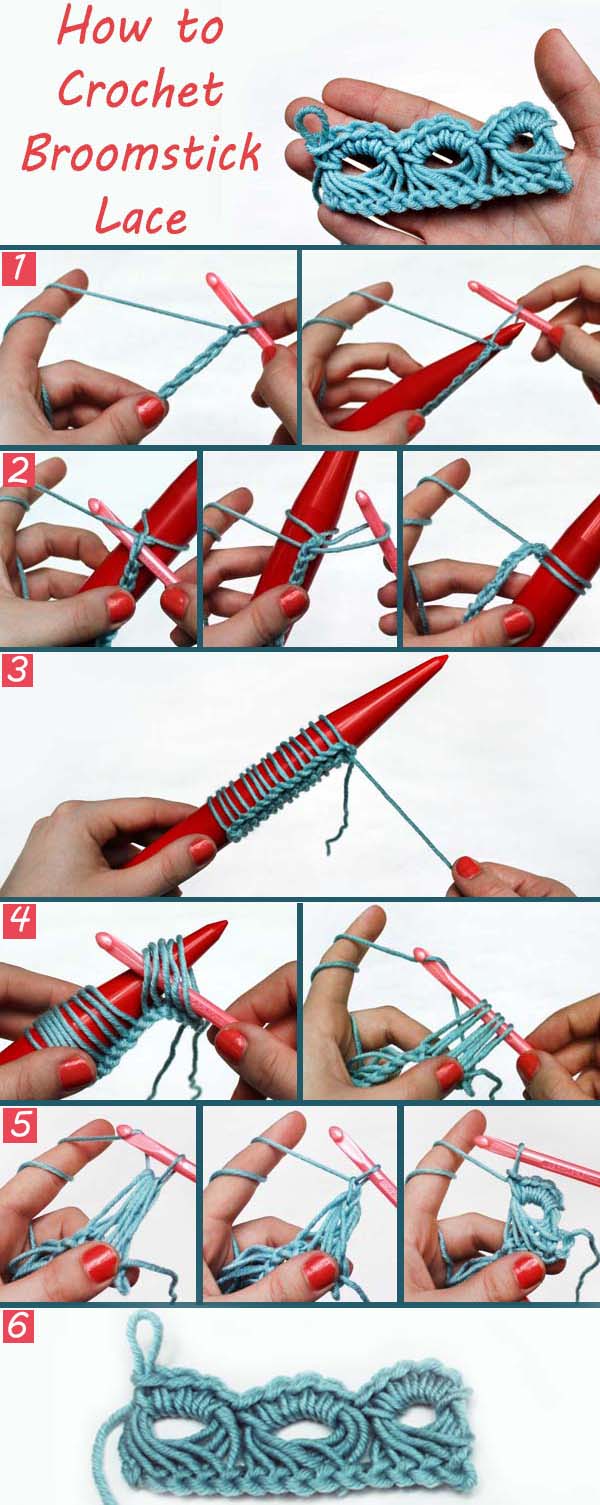
How to Crochet Broomstick Lace
April 4, 2012
-
16
comments
10 Tips for Washing Your Handmade Items
April 4, 2012
-
1
comments
6 Wonderful Knit & Crochet Wedding Projects Made by Customers Like You!
April 4, 2012
-
105
comments
How to Invisibly Seam Granny Squares
April 4, 2012
-
8
comments
10 Adorable Knit and Crochet Baby Patterns for Spring
April 4, 2012
-
8
comments
Become a Lion Brand Advisor
April 4, 2012
-
9
comments
4 Reasons to Bring Yarn on Your Vacation This Spring & Summer
April 4, 2012
-
6
comments
New to Yarncrafting? We’ve Got Some Tips to Help You Along Your Journey
1
2