
Want to put the finishing touches on your latest doll or amigurumi? Plastic safety eyes (also known as craft eyes) are an adorable option for topping off your project. Follow this simple tutorial to see just how quick and easy it is to apply safety eyes! I like to place my eyes when I’m about 3/4 finished with the head of my amigurumi, but you can add the eyes anytime before you close the head. (Note: Do not use safety eyes on projects for children under 3 or for animals.)
 |
Your safety eye will consist of two pieces: the front (with a straight or threaded rod) and the washer. |
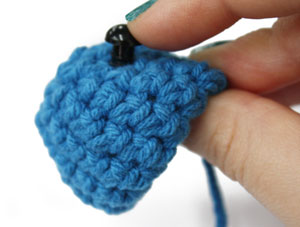 |
Decide where you’d like to place your eyes. Slide the eye through your work from the outside in. |
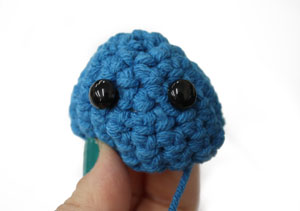 |
Place your second eye as well. Adjust the placement as needed. I often find that I need to move my eyes a few times before I get them just right. Before you start the next step, make sure that the eyes are where you want them. Once snapped in place, the eyes won’t be movable. |
 |
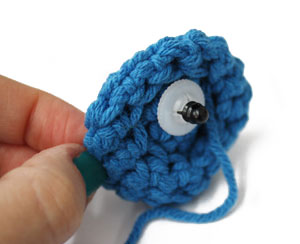
On the inside of your project, place the washer on the rod of the eye. Push down until the washer rests against your work. |
 |
The eye is now locked in place. Repeat for the second eye. |
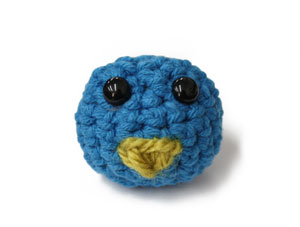 |
That’s all there is to safety eyes! Stuff and sew up your amigurumi. You’re all done! |
Do you use safety eyes on your amigurumi? Share your thoughts in the comments.
You must be <a href="https://blog.lionbrand.com/wp-login.php?redirect_to=https%3A%2F%2Fblog.lionbrand.com%2Fhow-to-use-safety-eyes%2F">logged in</a> to post a comment.
Megan - Crochet Every Day
I just recently started using safety eyes and I LOVE them! So much beter than yarn eyes! See — I used them on a chicken egg cozy! http://crocheteveryday.blogspot.com/2010/04/apr-1-chicken-egg-cozy.html
Anonymous
Very cute, Megan! What I enjoy most about safety eyes is the versatility; there range from the classic black to realistic-looking! Thanks for sharing the link to your project.
Maryann
I use safety eyes all the time, because I feel they give a more finished look to a project, and I’ve had trouble embroidering eyes in the past. I “cheat” when I use safety eyes, because I usually make my daughter position them on the item for me!
pat
I like to embroider my featues as you never know if a younger sibling will play with the toy. It will be very washable. I will rip out the feature and try again if it is not right. Great use for small or tiny amounts of leftover yarn.
Mphillips26
I use safety eyes on some of my amigurumi projects. They look great,but I’ve found it to be somewhat difficult to snap on the washer.This is especially true of the smaller eyes. I’ve had to resort to using pliers!
Micb
I work a small screw up and down through the  washer to make it easier to snap on the post for the smaller safety eyes.
Dee Hale
A wooden tread spool fits over the shank of the eye. Push the washer down as far as you can by hand, then put the hole of the spool over the shank, against the washer. Put the “eye” on a hard surface and hit it with your hand.It should go down all the way, but if it doesn’t. hit it with something harder like a hammer of the handle of a kitchen knife.   Dee
Jane
Thank you for this advice, Dee. Â I always break my nails when I snap those backs on!
Dee Hale
Where can we get eyes? JoAnns is the only place I have found them and all they have is brown or black.
Zontee
Hi Dee, our friends at Debra’s Garden have some nice colorful ones:
http://www.debrasgarden.com/proddetail.php?prod=0621091
Susan
In order that the eyes do not come out, I use a small elongated circle, of felt, that is the same color of the head of my creation, and make little “x” holes where each eye should go. Then carefully place the screw from the outside, through the knitting, through the felt, into the post for both eyes. It takes a little practice, but I feel like the eyes won’t come out using that technique. So far, the grandchildren haven’t returned any for Gram to repair. Susan
peter gerard scully
peter gerard scully…
[…]How to Use Safety Eyes | Lion Brand Notebook[…]…
Cataract problems
Cataract problems…
[…]How to Use Safety Eyes | Lion Brand Notebook[…]…
How to Make Amigurumi Cuter with Perfect Eye Placement | Lion Brand Notebook
[…] How to Use Safety Eyes […]
Rosina Smith
Sometimes that plastic washer just will NOT go onto the shaft of the safety eye. Somewhere online I read the tip to soak the washer in very hot water (not boiling!) for a few minutes, then apply. Wow, it worked!
Safety eyes | Aunoma
[…] How to Use Safety Eyes | Lion Brand NotebookSep 7, 2011 … Want to put the finishing touches on your latest doll or amigurumi? Plastic safety eyes (also known as craft eyes) are an adorable option for … […]
Ruth S
Etsy have some wonderful eyes, at reasonabl;e prices, all colours.
Bay-Baby, a blue Maryland crab | re:design
[…] by altering the colors to resemble a blue crab (Maryland’s state crustacean). I used safety eyes, of course, so little Ella can safely play with Bay-Baby.  So […]
Mystery Crochet Along Supplies List | Knot Just Yarn: Blog
[…] 1/2″ – 1″ Diameter Safety Eyes. My sample has 1/2″ but I wish they were slightly bigger. I highly recommend getting safety eyes that look more like real eyes with pupils. It will make your item look more realistic and far more cuter. (Here’s A Blog on using Safety Eyes) […]
Crochet Mystery Adventure Begins April 1st, 2014 | Knot Just Yarn: Blog
[…] 1/2″ – 1″ Diameter Safety Eyes. My sample has 1/2″ but I wish they were slightly bigger. I highly recommend getting safety eyes that look more like real eyes with pupils. It will make your item look more realistic and far more cuter. (Here’s A Blog on using Safety Eyes) […]
Mystery Crochet-Along with The Crochet Crowd
[…] 1/2″ – 1″ Diameter Safety Eyes. Mikey’s sample has 1/2″. Mikey highly recommends getting safety eyes that look more like real eyes with pupils. It will make your item look more realistic and far more cuter (learn more about how to use safety eyes here). […]
Yasmin McKenzie
How can I achieve the sunken eye look with safety eyes?