
You, our readers, asked for it and we’re happy to oblige! Designer and teacher Heather Lodinsky joins us for a new article on understanding the fundamentals of your knitting.
Knowing exactly where you are in a knitting project requires knowing where you have been. “Reading” your stitches by identifying a knit versus a purl stitch is helpful in showing you where you are in a stitch pattern. In the last article I wrote, I showed how to identify the stitches already worked to know where you are in your knitting.
Sometimes no matter how hard I try, I can easily lose track of which row I am working in a pattern. Life happens—the phone rings, we get talking or we just have to leave our knitting for some reason. Then I come back to my knitting and…what row was I working? There are various tools out there to help us keep track of our rows. Row counters exist that either attach to your needle, or need to be clicked and there are even “counting boards” where pegs are moved to show what row we are working. Even the simple “hash mark” on a piece of paper works well, but there is still that human element of just plain forgetting to mark the paper, move the peg or click the counter to the next number. As a knitting teacher, one of the most common questions I am asked is: “What row am I on?”
A skill as important as identifying your stitches is the ability to count your rows without a “counter”. The best way to count stitches is by first identifying a stitch and then being able to count stitches up and down, which will tell us how many rows we have done and what row we need to work next.

Click the image to enlarge.
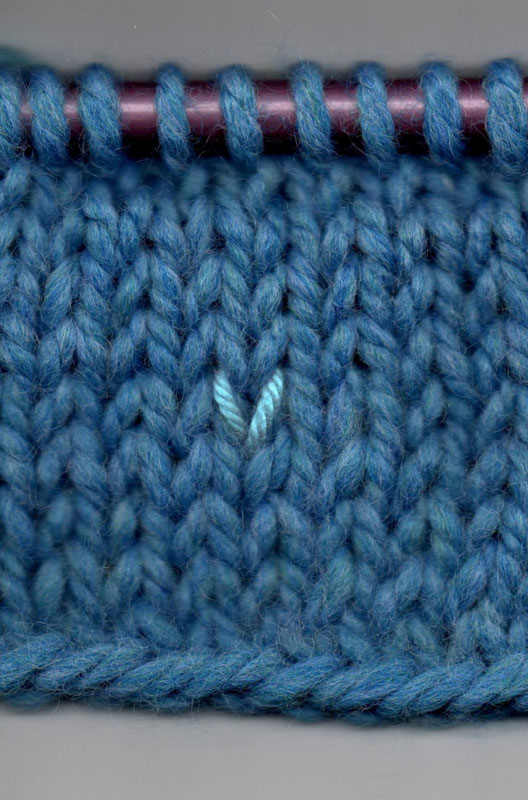
Lets’s first look at stockinette stitch – which, when we are working a flat piece, is knitted on the right side of the fabric and purled on the wrong side. First, we have to be able to identify a “knit” stitch. Look closely at the right side of stockinette stitch and see that a knit stitch looks like a “V”. This is what we are looking for in order to help us count our rows.
Click the image to enlarge.
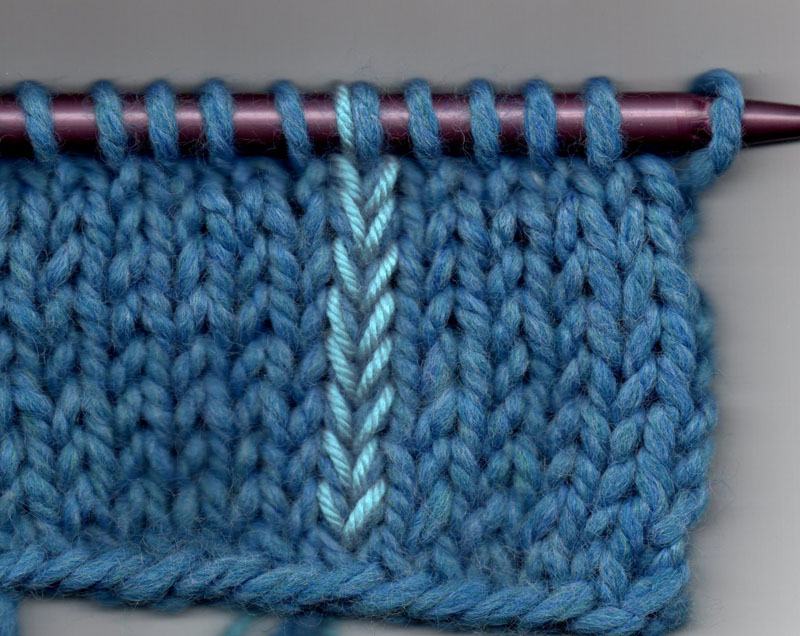
I have outlined a knit stitch with a contrasting yarn to show what we need to count. When we are counting our rows from the beginning of a piece, we generally do not count the “cast on” row as a row of knitting. On the other hand, the stitches that are on our needle, do count as a row. So below, I have again “outlined” the stiches we need to count. The “V” at the bottom is actually the cast on row, which we will not count as a row. There are 8 outlined “V”s below and we need to count the one on the needle as well. Altogether, 9 rows above the cast on have been worked. We are ready for row 10.
Click the image to enlarge.
Stockinette stitch on the knit side (or right side) is easy to see, but sometimes a project calls for Reverse Stockinette – which is the same except the purl side is on the right side. I have always found it difficult to count rows in reverse stockinette stitch–so what I do is count from the back where the fabric is stockinette stitch and then it is easy to count!
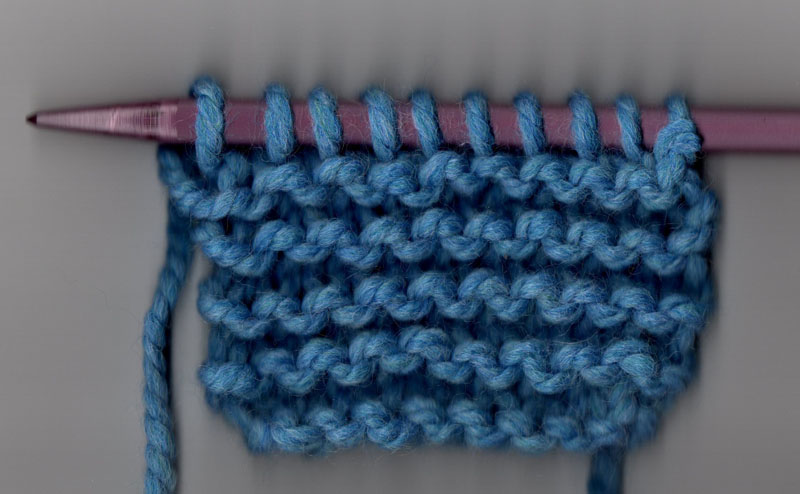
Garter stitch is the simplest of knit patterns because every row is knit. Counting rows like we just did for stockinette stitch doesn’t apply here because both sides are full of ridges with no “V”s to be seen. I find the best way to count rows in garter stitch is to count the ridges on the front, then the ridges on the back, and add them together. This will tell you how many rows you have worked!
The two pictures below are the same garter stitch swatch. In the first picture, there are 4 ridges above the cast on row (which appears as a ridge).
Click the image to enlarge.
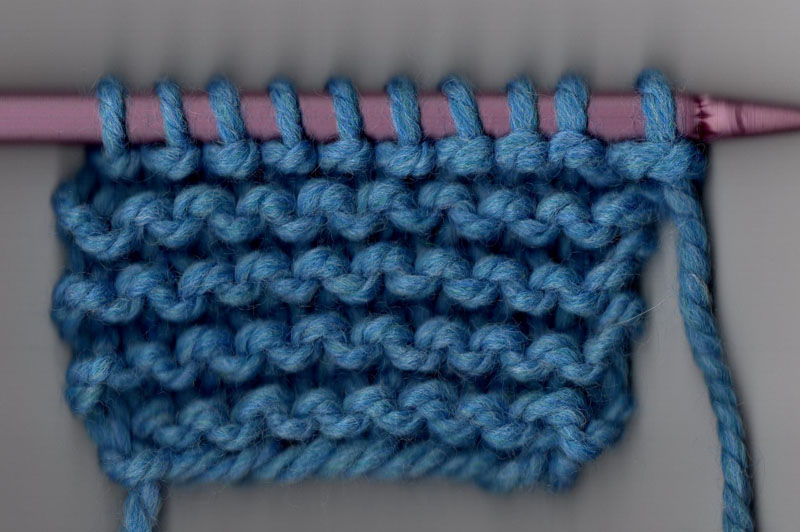
The next picture shows the opposite side of the same swatch. On this side there are 5 ridges to be counted. Rather than stitches on the needle, the ridge just below these stitches is what we need to count.
Click the image to enlarge.
Altogether, there have been 9 rows of garter stitch worked after I cast on.
Once you have learned how to identify and count rows (instead of writing or clicking what row you are working) you can use a detachable stitch marker or safety pin to mark a certain row. Then, as you are working up, you can just count up from that row you have marked.
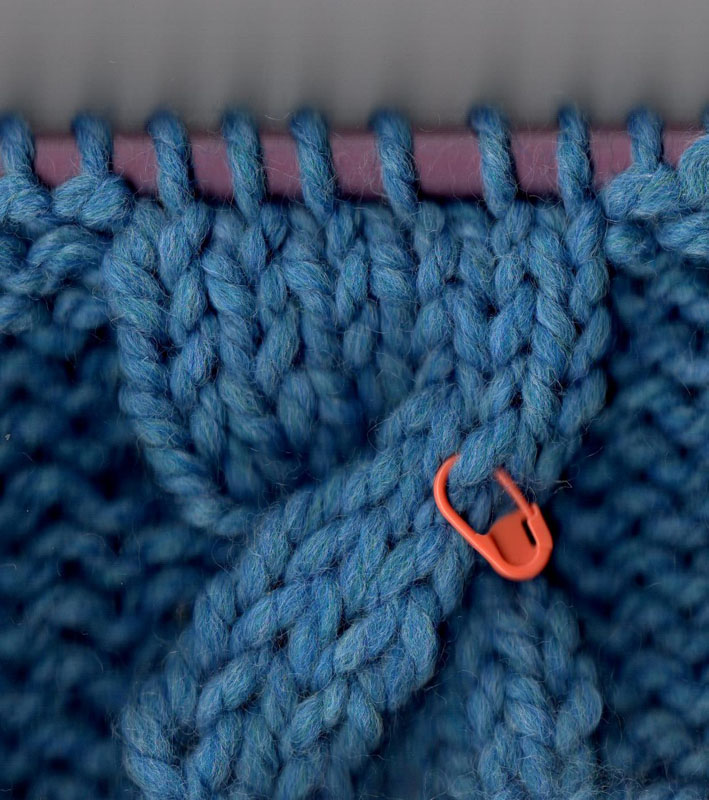
This is especially helpful for cable patterns where the twist of the cable makes it difficult to know just how many rows have been done since the last cable was worked. Here’s a great tip for keeping track of your cable rows. After you have worked a cable, place a marker or safety pin on one of the stitches of the cable when that row is completed:

Click the image to enlarge.
That marker or pin will tell you that the stitch marked was on the row you worked a cable. If the cable is every 8 rows, then 7 more rows need to be worked before another cable is worked. I worked the cable up a few rows and now we can count the “V”s above the marked stitch and need to include the stitch that is on the needle:
Click the image to enlarge.
Above the marked stitch, there are 4 “V”s and the stitch on the needle. I have worked 5 rows so far since the last cable twist. I need to work 2 more rows before I am ready to work the next cable. This technique of marking a row works well with lace patterns and with yarns that may be fuzzy or dark and harder to count.
Just as reading your stitches helps you to identify where you are in a pattern, being able to count your rows will help you become a better knitter by not having to constantly rely on marking down what row we are on. It can be easy to lose your place, but reading your stitches and identifying the row you are working will free you up for many happy hours of knitting and many less of ripping!
More articles by Heather:
You must be <a href="https://blog.lionbrand.com/wp-login.php?redirect_to=https%3A%2F%2Fblog.lionbrand.com%2Fthe-ups-and-downs-of-knitting-counting-your-rows%2F">logged in</a> to post a comment.
Joyce
So when the pattern says every eight rows it means after the seventh row, not the eighth row?
raffefan
You cable on the eighth row. I love the split ring marking row 1 of the cable.
Kathy
Exactly what Joyce asked – because you knit seven rows, the 8th row is on the needle, so is that when you switch to whatever is next?
Kathy
Exactly what Joyce asked – because you knit seven rows, the 8th row is on the needle, so is that when you switch to whatever is next?
Jackie Griep Scott
you work seven rows and then on the row after that is the eighth and you do what the pattern asks, this is what i am understanding.
BC
WOW! this is so helpful, I’ve been struggling with counting and now it is just so clear
Dawn
Thank you so much for the great photos and precise explanations…super helpful 🙂
Mary
If the cable repeat is 8 rows, and she has worked 5 rows and needs to work 2 more rows to complete, that must mean the marker is on row 1. 1 5 2=8
Barbara
I think the marker is on 8. She then knit rows 1 through 5. She has 2 more rows (row 6 and row 7) before she needs to work the cable again on row 8.
Gwen
This was great information!! Thanks for the article! 🙂
Carlene Paquette
Why have I never heard not to count the cast on row before? Helpful info! I also struggle with figuring out which is the right/wrong side of the work. Do you have any easy tips for that?
Zontee
Hi Carlene, if it’s a reversible stitch pattern, I’d recommend putting a stitch marker on the right side of the fabric for easy reference. If it’s a stitch pattern that looks different on each side, I’d recommend Heather’s earlier article for help on how to recognize your stitches so that it’s easier for you to tell which side is which: http://blog.lionbrand.com/2013/04/16/a-good-read-identifying-your-stitches/
Hope that helps!
AuburnRose
I use a cylindrical, stitch counter with a piece of yarn threaded through it. I then knot the yarn ends together. Slip the loop of yarn containing the counter onto the needle of whatever you are making, about three stitches from the end. Be careful to not knit it into your project. (if you accidentally do, just cut the yarn counter’s loop, remove it and retie it onto the needle) I always use a contrasting yarn so that does not happen. It will make sense once you have tried it. Of course, you can still make an error because the first row will have the counter at the end of the row and you cannot avoid increasing the number on it. However on the next row, the counter will be at the beginning of your stiches and you will have to remember to increase the counter after finishiing that row. After doing this a few times, you will quickly get in the habit. I have found this an invaluable method of counting rows.
teddybearmaker
Thank you for this — I thought I was the only one who had trouble counting rows.
AuburnRose
You are more than welcome and I hope it wasn’t too confusing.
Dee
I use split rings to mark my rows by 10’s and have found this is extremely helpful. The split rings work well as long as I turn them to the end. And if I use a different color on row 10, 20 & etc the count goes faster.
Melissa
Very helpful thanks
greta
Funny how something so simple can be so confusing! I really appreciate this information. I’ve been knitting for 3 years and was never sure if I should count the stitches on my needle as one row! Row counters do help a lot too, but if one forgets to click or turn the counter at the end of a row, it’s always good to have Plan B down pat! I like the idea of marking the cable row too.
Thanks! 🙂
Claire
Thank you!!! So well explained and easy to follow. I love to knit fuzzy wools for the grand-kid but often get distracted…
Jane
I thought I was the only one who was confused by counting rows. Thank you for this!
Karen Garbee
I use the little index post it notes to help me keep track of which row I’m on. I just put the post it underneath the row I’m on on my pattern and move it when I finish a row. That way I always know which row I’m on without having to count. When the post it no longer has enough stick ’em, I change it out for a new one.
Kathleen Hart
counting knit stitches, my mom taught me each line is a row or each ridge is 2
Rose Davis Adams
when working with bumpy or fuzzy yarn in stockinet stitch it is hard to count the rows, I put a plastic ring at the end of each knit row, then I know from the start the first counter is one and add two for each additional ring you have
lori
so you count up and down long ways as row? not the long ways rows that are on the needle?
Knittabitta
I am glad I pinned this because I never want to lose this information.
Deb N
this answers my question about the stitches on the needle. thanks!
Cable knitting… Easier than it looks! | Ross Unraveled
[…] is VERY important for anyone who is learning how to knit. Â I recommend checking out this webpage:Â http://blog.lionbrand.com/2013/09/23/the-ups-and-downs-of-knitting-counting-your-rows/ Â It not only includes basic stitch counting, but teaches you how to use a stitch marker while […]
Sue White
Very useful information. I’ve used all different ways but it’s never dawned on me to place markers every 10 rows and I’ve been knitting for over 40 years! It just shows – no matter what most people seem to think, you’re definitely never too old to learn.
Debi Sheehan
Thanks. You have clarified so much for me.. however I still have 2 questions:
1. Does “decrease every 4th row†decrease on the 4th row or after you finish the 4th row?
2. Do you count a “pick up†row as a row in Entralock?
Sylvia Larson
I use a long tail cast on and was taught to count that cast on as a row. I have in some cases not counted it as the first row depending on my pattern, i.e. if the pattern calls for the “first” row to be a purl row, but 99% of the time I do count the long tail cast on as my first row.
Thank you very much for useful information.
Shirley Davis
I am working a glove flat & what to change
To round. When the pattern says knit row flat
Changing to the round do you count
The rows or just the knit stitches?ShirleyDavis
Melanie Buchanan
I’ve been knitting for 10 yrs now… I’ve always used a row counter of some sort (I have a ton of different kinds). However, as explained in the article, something will come up and I’ll forget if I changed the row counter so have to count. Up until now, I’ve just guessed whether or not the CO row was counted, and I assumed the stitch on the needle was counted but never knew for sure.
So, thank you so much for the information. The pictures you included also helped me confirm I’ve been recognizing the stitches properly in order to count them accurately. Lol! Yup, 10 yrs so one would think I would know this by now. Heehee!
Good stuff! Thank you for your time in sharing this!
MaryEllen Brown
In your article you mentioned losing your row when it is necessary to leave your knitting. Although at times this can be untimely according to the number of rows in a pattern the time is well worth the it. . Copying each row an on index card, I prefer 3×5,, helps tremendously. If one needs to leaved one’s knitting the row one is working is always on the top. This was taught to me by a very lovely lady who taught me so much in knitting and the teaching was free. I had made a very lovely Irish pattern afghan that had many designs in one row. Had it not been for the 3×5 cards I could never have knit it. I had two sets of cards, one for each design pattern and one for knitting the afghan. Yes, preparation was rather time consuming but was I gad I had taken the time! However after knitting many years, I did not know if the row on the needle was counted as a row. Using the my method of not counting the row on the needle consistently it did not make much difference. But now I know!