Author of The Complete Idiot’s Guide to Knitting & Crocheting Barbara Breiter joins us for her monthly column on techniques that people frequently ask about.
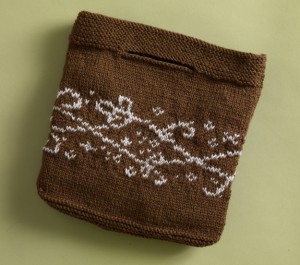
Have you ever thrown a wool sweater into the wash by accident and ended up with a matted, miniature version? That’s called felting. Ordinarily you don’t want to shrink your handmade creations, but sometimes we do it on purpose to create a dense, strong fabric.
 |
 |
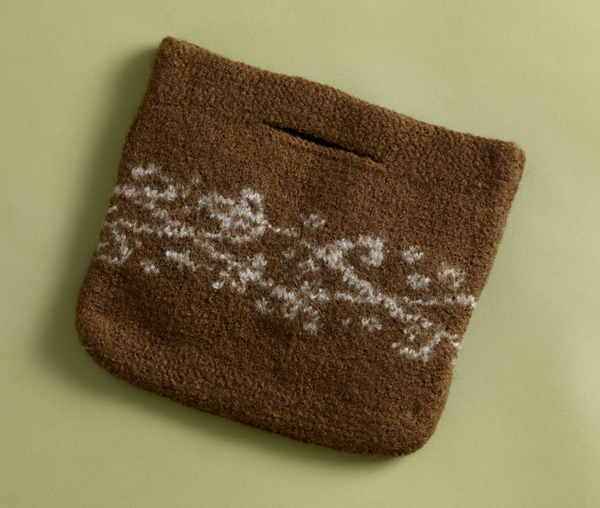
| Unfelted Knit Branching Out Bag | Felted Branching Out Bag |
Animal hair fibers felt because there are microscopic scales on them. The scales open up when exposed to hot water and detergent; friction or agitation tangles up these scales, resulting in felt. The result is thick and sturdy, making it ideal for purses and other projects.
Only yarn that is spun from animals or is protein-based will felt such as wool, alpaca, and mohair. Superwash wool won’t felt because, after all, the point is that it’s treated to safely throw it in the washer; the treatment either mattes down the scales or removes them so that they cannot lock together. Man-made fibers like acrylic won’t felt and neither will yarn that is spun from plants such as cotton or hemp.
Today, you can felt in the washer; historically people would first place it in boiling water (hence the term “boiled wool”) and then create friction with an old fashioned wash board or even rocks.
I like to place the object to be felted in a zippered lingerie bag; this will keep parts like purse handles from tangling. The water should be very hot; add just a bit of detergent. It helps speed the process if you place something in the washer to agitate against. Jeans that no longer bleed dye are ideal, as are canvas sneakers or old towels that don’t shed.
The amount of time needed can vary considerably depending upon the yarn, the heat of the water and the amount of friction. I check after about 10 minutes. Wearing rubber gloves, remove your project and see if it’s dense enough. If you can still discern the stitches clearly or if it stretches a great deal, it needs more time. Put it back in and check every 2 minutes or so.
When sufficiently felted, I don’t place my project in the dryer. It may end up misshapen or felt more than I wanted. While wet, it will still be somewhat malleable so you can block it and make sure edges are lined up evenly. I pin it in place on a towel and stuff the inside of a purse with plastic bags if it has a depth dimension to retain the shaping. Be sure you let it dry completely.
Resist felting is a fun technique to try for scarves or wherever your imagination may lead. The idea, like wax-resist batik dyeing (a technique in fabric dyeing that creates designs with undyed areas wherever the wax is applied), is to keep part of the project from felting. You can tightly tie up a section with string, for example, and that portion will not felt.
You may also want to try needle felting, using a special tool to felt by hand.
For more on felting, check out these blog posts:
Alissa Anderson
I love the white dress with trees that your model is wearing!!! I’m pretty sure I’ve asked before… but is there any chance anyone knows where I could get it???
Zontee
Hi Alissa, sorry, but since that photo was taken almost six years ago and we work with a stylist for the clothing in our photo-shoots, there’s no way for us to know where the dress came from, but there are some cool options on Etsy when you search for “tree print dress”:
http://www.etsy.com/search?q=tree print dress
Hope that helps!
Alissa Anderson
Wow! Thank you!