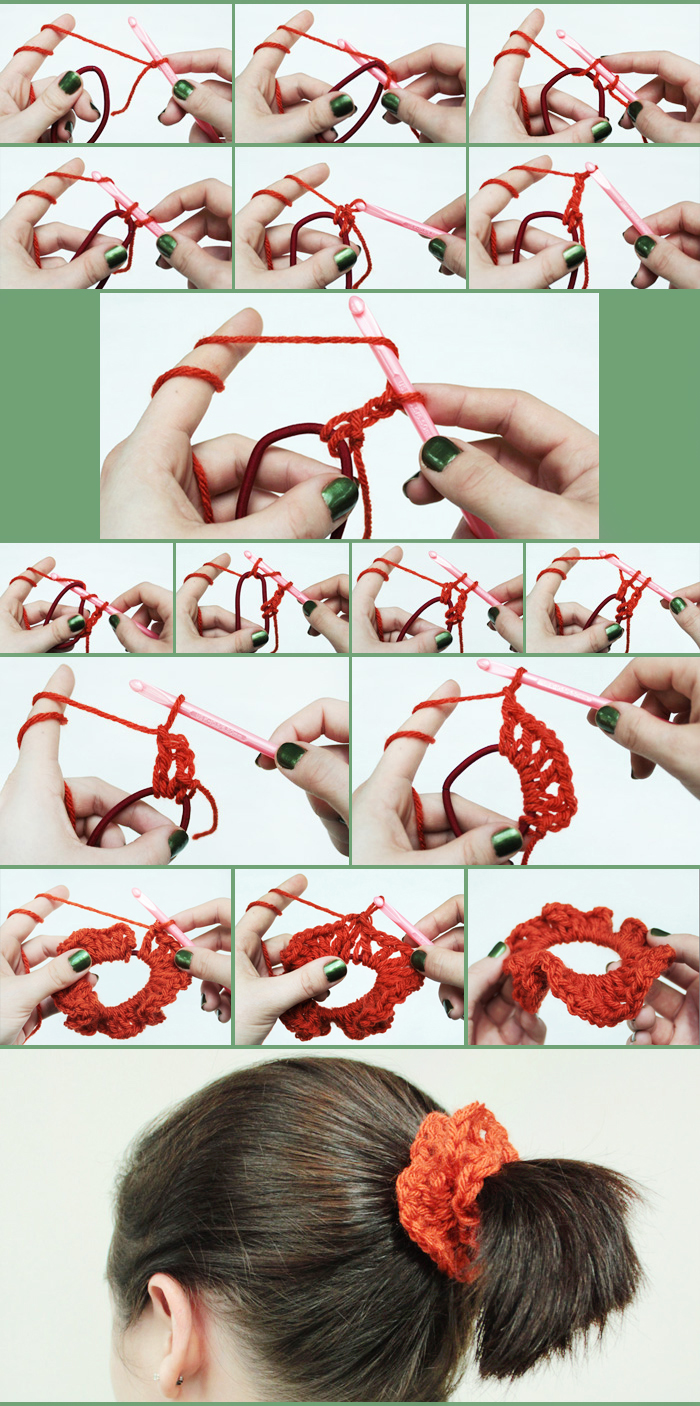
Create your own designer hair ties with this quick and easy method for turning any hair elastic (or plain old rubber band if you’re daring) into a fabulous scrunchy! Scrunchies make great party favors, gifts for girls’ sports teams or fun accessories for any occasion. Cute scrunchies are useful and always add a note of celebration – even for grown ups! Adding a scrunchy to a bridal shower goodie bag, making them for bride’s maids or crocheting enough for a spa day or girl’s night are all clever ways to give handmade scrunchies as gifts.
Materials:

1) Secure slip knot on your crochet hook, insert it through the hair tie and yarn over. you now have yarn looped over your hook twice, and the hair tie snug between them. Yarn over again, and pull through the two loops on your hook. Your yarn is now securely fastened to your hair tie!
2) Chain three more stitches (counts as first stitch).
3) Make one double crochet around the hair tie – yarn over, then instead of inserting your hook into a stitch, you’ll insert it through the hair tie. Yarn over and pull through two loops, then Yarn over again and pull through the last two loops, creating a complete double crochet stitch.
4) Chain 1.
5) Continue the double crochet, chain one pattern around the hair tie till the stitches are fairly dense around the relaxed/unstretched elastic. The more stitches you work, the larger your scrunchy will look. Don’t stretch the elastic to accommodate more stitches – this can lead to your scrunchy being less effective. The ruffle effect will grow naturally because of the density of stitches and the extra volume created by the chain stitch between each double crochet stitch.
6) When you have crocheted all the way around, join your final with a slip stitch to the topmost chain of your first stitch. Knot tightly and secure.
7) Wear your new scrunchy in style!
This craft is great for thick, fine, curly or textured hair, making it a perfect fast-finish project to make with a group or to give as group gifts!
Have you ever given cute DIY projects like this one as party favors? What small projects do you like to make for yourself & others? Leave a comment below to share your story (we’d love to hear it!).
Related Links:
Brandi Schoch
I love this idea for my daughter thanks!!!
Deanna Young
I made these for all the little girls on my daughter’s soccer team
Cadence
You can also add a second round with shells, picots, etc.
Margaret
 That’s a great idea! You could even use a different yarn for the second round, a row of stitches in a different color or texture (like adding Vanna’s Glamour or Martha Stewart Crafts Glitter Eyelash Yarn) would certainly jazz things up a bit!
Portialee13
What young lady wouldn’t like these in her school colors??!!
Kelli
My Great-Grandmother used to make these for us all of the time when we were girls. Â I found one not too long ago in something at my Mom’s house and I brought it home to give to my daughter. Â What sweet memories.
Noels
These look great with beads crocheted in at the tops of the stitches. Â Have made a couple for my hair and they look good.
6 Easy, Fast-Finish Hair Accessories to Crochet | Lion Brand Notebook
[…] check out these step-by-step instructions with pictures we wrote on how to create your own crocheted hair tie. In this post, I’ll show you how to […]
Alethea
I haven’t used the pattern yet, but want to know about adding beads to them. Anyone try that yet and can offer ideas?
Tatatato
me gusta mucho estas “colitas” gracias
eva marina
esta re bueno!!!
Dawn roll
I like to make cochet
Ginny
It was so easy to make.
Writing Sample Portfolio | MargaretDunhamMargaretDunham
[…] Dress Up a Hair Tie: Make a DIY No-Sew Scrunchy (13 comments, 4K pins, 40 likes) […]
Kendall Brown
Thank you so much for this I love them. I made two of them for a baby themed practice to put on my pig tails!