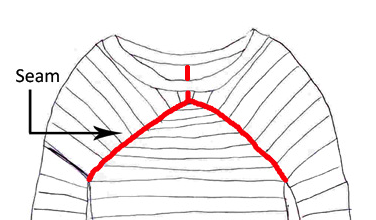
In last week’s post, I told you how I chose the yarn and stitch pattern to create my own sweater design based on a picture. (To see the picture, click here.) This week, I’ll tell you how I figured out the shaping and the number of stitches to use.
As I mentioned last week, I had decided to knit the sleeves first, since their unusual shape determine the bust measurement. Not wanting to tackle the complicated part right away, I decided to begin at the cuffs.
First, I got my numbers in a row. Because I was using two different needle sizes (5 for the cuff and 10 for the main body), I made two different sample swatches, each 20 stitches by 20 rows. Then I measured them carefully. To figure out stitches per inch, I used this equation: Number of stitches ÷ swatch width = stitches per inch. I also figured out the number of rows per inch: Number of rows ÷ swatch length = rows per inch.
To figure out the number of stitches to cast on, I wrapped a measuring tape around my wrist at the desired snugness of the sleeve. Then I used this equation: Stitches per inch x cuff measurement = number of stitches. (I rounded the result up, since there’s no such thing as a fraction of a stitch!) Then, for my final number, I used this equation: Number of stitches (rounded up) + 2 stitches for seam allowance = numbercast on. Finally, I cast this number onto my size 5 needles and knit until the cuff was the length I wanted. (I chose to make it 2 1/2 inches long.)
Then, I realized that the sleeve needed to be wider at the shoulder than at the wrist. My cast-on amount of stitches wouldn’t reach around my shoulder and underarm — but how much wider should it be? When measuring my own shoulder proved to be too clumsy, I turned to my closet. There, I found a cardigan that has a similar fit to what I want my sweater to be: slight ease at the body with a bloused sleeve. I measured the shoulder seam.

Then, using the same math problem as I did for my cast-on, got a result that was 20 stitches more than the number I cast on. Therefore, I would have to make 20 increases.
Now that I knew how many increases to make, I had to figure out how to evenly distribute them. I knew the easiest method would be to use the Diophantine equation, better known by knitters as the Magic Formula. For this, I would also need to determine the length of the sleeve. I measured my arm from armpit to wrist. Then I used this equation, based on my main body swatch, to figure out the number of rows: (Arm measurement − length of cuff) x rows per inch = number of rows to knit. Finally, I searched online for a Magic Formula calculator. I chose one, entered my numbers, and voila — instant pattern!
Finally, I had to create the shaping at the shoulder and bust. This step took a little more guesswork than the previous ones. From my sketch, I knew that the sleeve would continue past the shoulder to form the neckline.

Therefore, I knew that I would have to bind off somewhere in the center of the sleeve piece to start the hole for my head. Based on this, I decided to continue with a stepped bind-off, rather than decreases, to shape the scoopneck neckline.
To help myself figure out the shaping, I sewed the sleeve closed, up to where the bustline seam would begin. Then, trying the sleeve on, I used trial and error to figure out where my bind-offs should occur. After a couple of rounds of frogging, this was my result!

My sweater isn’t finished yet, but I’m really excited to put my design to the test. But even if it isn’t perfect, I have to admit — making the design has been half the fun!
Related links:
jane
Were you able to finish your sweater? would love to see your progress! 🙂