
I love granny squares because they make it so easy to play with exciting colors. Often, my squares end up with different colored borders, so how do I choose a shade to seam them? The answer’s easy: I can use any color because I use an invisible seam! This super easy technique creates a durable seam that disappears into your crocheting. Ready to get started? Gather your granny squares and follow the steps below!
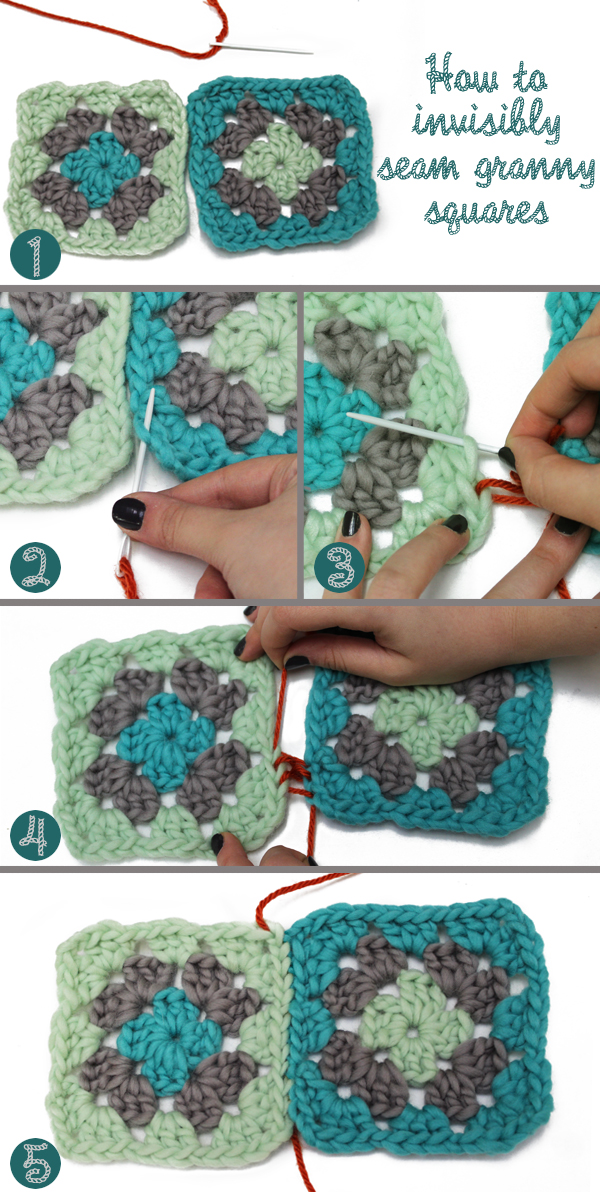
Step 1: Gather your materials: finished granny squares, a blunt needle, and your seaming yarn (I used a contrasting yarn for demonstration, but you may want to use matching yarn). Lay your granny squares side to side with the front side facing up.
Step 2: Insert your needle into your first crochet stitch from the back to the front.
Step 3: Repeat Step 2 on the opposite side. Continue this process on each stitch, alternating between sides. It’s sort of like lacing shoes.
Step 4: Ready for that seam to disappear? Lightly pull on both ends of your seaming yarn.
Step 5: Repeat with all squares, and that’s all there is to invisible seaming! Remember to weave in your ends and enjoy your new granny square project.
Related links:
You must be <a href="https://blog.lionbrand.com/wp-login.php?redirect_to=https%3A%2F%2Fblog.lionbrand.com%2Fhow-to-invisibly-seam-granny-squares%2F">logged in</a> to post a comment.
Grace Jones
Great post Jess! I appreciate the excellent quality photos and the lovely color choices.
Jess Hicks
 Thank you, Grace! 🙂
Kgcrosthwaite
Great idea! Thanks for the tutorial!
Marion Brookes
thank you so much i havejuststarted another granny square blanket and this is sewing up so neat
Tiffany Kohnen
I had always wondered how one went about piecing granny squares together. Thanks for this awesome blog post!
Sdryden
I just love stuff like this – Thank you
Wendy
Thank you for the tutorial. I avoid granny squares because of the seaming.
Diane
Now could you please do a post on how to weave the ends in on granny squares so they stay put? That would be another great tip to share!!! Thanks!
Jess Hicks
 Hi, Diane. I like to crochet over my ends as I come to them, which should just leave you with a single end to weave in. If you make that tail long enough, you can use it for your seaming. Hope that helps!
Karen
 I love this tutorial! I do find however, that just crocheting over the ends will not keep them firmly anchored. One wash and they are all waving hello >:-(  Any suggestions for other methods would be greatly appreciated!
Aussie_sheila84
The way I do it is to make sure that as you weave in the ends you change directions with the yarn
Cadence
What is the yarn used here?
Also, would it be more “invisible” if a smaller weight yarn was used for the seam than the actual squares?
Jess Hicks
 Hi, Cadence. The yarn is Martha Stewart Crafts Roving Wool in Sea Glass Blue, Dolphin Gray, and Jordon Almond. You can see more about the yarn here: http://www.lionbrand.com/yarns/rovingwool.html
As for the yarn used for the seam, it doesn’t make much of a difference in terms of visibility. The main thing you want to consider here is stability in your seam. I’d recommend against using a yarn with a very different weight (i.e., don’t use fingering weight to seam up bulky weight squares) because the seam won’t be as stable.
Cadence
Thank you! Very helpful.
Tryglyph
Thanks so much! I have a big pile of granny squares I have been stuck on, because I didn’t know the best way to put them together! There’s hope for this blanket yet!!
Elaine
Like Wendy, I too avoid granny squares because of the seaming, but I recently started squares for a blanket for my greatgranddaughter due in about a month. Thanks so much because I didn’t like the way it was going together and now I can get it finished in time for Ella Rae’s birth.Â
Steph
Thanks so much. I am bookmarking this for future reference;)
Steph
Thanks so much. I am bookmarking this for future reference;)
Debquigley
Thanks. This was helpful. Is there a way to weave in the loose ends when changing colors when making the squares themselves?
Debquigley
Thanks. This was helpful. Is there a way to weave in the loose ends when changing colors when making the squares themselves?
Taryn Lee Williams
i crochet over the top of the loose ends, i also rub a small amount of flexible fabric glue into loose ends before crocheting over them or weaving them in, one that doesn’t go hard when it dries, so they don’t pop back out when i wash it
Wendy Hampton
 Oh what a genius! I never thought of trying something like that, Taryn! Thanks for sharing!
Wendy H
Susan
Is there any way we can see the back. Does the tread show up there?
Jess Hicks
 I didn’t take photos of the back, but it looks the same. The seam is completely reversible. 🙂
Sherrie
thank you, this will be very helpful.
Mary L
Susan asked the question I wanted to know. Do the stitches show on the back side or are the hidden there, too?
Jess Hicks
 Hi, Mary. The seam is completely invisible and reversible, so it doesn’t show on the back, either.
Faith
That’s a great tip – thanks!
Pat Fulton
Thank you very much for that help. I love the easy to follow instructions, and close up shots. Even I, can do it now. Very pleased. :>))))))))))
NWDigitalMedia
Still, this is why I stay away from granny squares. Love to do them and have one I completed last Fall, but not put together! I would rather find a way to do an continuious seaming.
Linda Kwakman
Ik zou ze willen doen met de vasten bovenop,hoe pak ik dat aan!
Linda L.
I just tried this and the seam really does seem to disappear both front and back! I can’t thank you enough – now I can get started on the hexagon afghan I’ve been wanting to make. 🙂
Jenie48
It makes me want to try one! Thanks for the tip.
Miniechat
Bravo, I have avoided Granny Squares because of the ugly joining. This is lovely. Â
Katia Angelotti
Perfeito, adorei!!
Stephanie Krebs
I needed to see this post yesterday morning before I put together a granny square blanket. The blanket is still cute but this would have made me so much happier.
Kd7qyy
Thanks for the instructions. I have a Granny Square afghan that my mother made. She could never join the squares to her satisfaction because she didn’t like the seams showing. Now I can put this together and enjoy her fine stitching.
Thanks again!!!
Cdecina
Thanks!!! this is a big help.Â
Christine Long Derks
That is GORGEOUS! Thanks for sharing! I’ve used mattress stitch in knitting and never thought of using it for joining granny squares!!
Wpike
I have never like to sew pieces together, so I always tried to make something that didn’t need sewing.
Krista Ruskin
Is there any tricks to joining the corners neatly? That’s where I struggle.
Jess Hicks
 I mostly join mine in long rows. I recommend pinning together the corners of your squares (use a safety pin, stitch marker, bobby pin — whatever’s handy!) so that they match up perfectly for seaming.
Crochet Projects & Resources | Pearltrees
[…] Step 2: Insert your needle into your first crochet stitch from the back to the front. Step 3: Repeat Step 2 on the opposite side. Continue this process on each stitch, alternating between sides. How to Seam Granny Squares | Lion Brand Notebook […]
Anna Gabriella
Thank you for the tutorial, a mystery is solved now.Â
Köszönöm a leÃrást, egy rejtélyt oldottatok meg.Â
Greetings from Hungary, Europe
Jrzehr
After you sew all the squares together how do you get the blanket to stay together? If you are just weaving ends in, wouldn’t they just come back out? My first blanket was a granny square and I crocheted the squares together, while they stayed together a few of the individual squares came apart. Help?
Jess Hicks
 I make sure to leave a long tail to weave in. The edges do occasionally pop out, but I just tuck them back in or snip a little bit. Because the ends are so long, a tiny snip every now and then is okay.
Merewing
Never realized until now why I have so many granny squares and no blankets. I never liked the way my first granny project looked when it was complete. Nice to hear I wasn’t alone! This will finish lots of projects for all of the new babies due in this year. Instructions are easy and perfect. You did a great job.
Peki
Thanks for this cool tip. I can not wait to try it on my next project
Patricia
Thanks for doing this tutorial. I have always done my seams this way as I don’t like that ridge effect that the other types of seams create. Glad to see it finally on the web. I have only found this technique in very old books, the latest books don’t appear to include it for some reason.
Lrhoades54
Yea now I can finish my grandson’s afgan that I started 8 yrs ago. Just because I didn’t know how to put it together it is still sitting in the closet.
Janet
Gorgeous! About many skeins of each color of this Martha Stewart Roving Wool would I need for an average sized afghan? Thanks for posting this. It’s just what I’ve been looking for!
Janet
Jess Hicks
 Hi, Janet. I’ll use this afghan, originally crocheted in Tweed Stripes, as an example: http://www.lionbrand.com/patterns/L0228AD.html?noImages=0 For each shade, you’ll need about 7 skeins.
Janet
Thanks, Jess!
Janet
Wow. It really helps to see the photos in this post. I would’ve never put those three colors together by looking at the color samples on the website. But they look great together. Maybe your next post could be on color combinations. :-)Â
Dianne
Fantastic idea thankyou for sharing it with us!
Bobbyejo
GREAT! And Thank You Taryn for the tip on the fabric glue ~ I have never heard of this and can’t wait to find some nonhardening fabric glue for all those snippets ~ thanks again to both of you
Hissweetie1986
what is the brand of glue you use for the snippets? I have 3 afghans to finish (I have triplets) and have been dragging along not wanting to piece them together. Â This glue would be fantastic!
Jazzy Raven
Geat Tutorial! Thanks a lot for this. 🙂
Learn2Crochet
Thank you for this tutorial!
Sandy
Thanks for this great demonstration! Â I will be trying it!
MarciaEK
Great suggestions!  Hmm, after you have several rows of granny squares, do you have an suggestions for sewing the rows together? I usually have problems with the chain at the corners of each square. Thanks!
How-To: Invisibly Seam Granny Squares @Craftzine.com blog
[…] friends at Lion Brand Yarn have a simple tutorial for creating an invisible seam between granny squares. I love the way it […]
Craft | Pearltrees
[…] How to Seam Granny Squares […]
Shirley Muswema
This is a great tutorial, thanks so much. Do you perhaps have any tutorials on seaming hexagons?
Zontee
 Hi Shirley, you can use the same seaming technique as with the granny squares just by lining up the hexagons with each other on each of their 6 sides. Alternately, you can try some of the seaming techniques mentioned by other commenters above. In one of our previous blog posts, we show some of those other techniques in action on hexagons: http://blog.lionbrand.com/2009/10/15/motif-afghan-crochet-along-the-finish-line/
Susanwstn
since i am a novice can u post the instructions for these square? Â
Zontee
 Hi Susan, you can go to LionBrand.com and just type “granny square” into the search box to pull up lots of different patterns with directions on making them. Here’s a simple pattern to help you get started: http://www.lionbrand.com/patterns/clw-grannyScarf.html
There are also lots of tutorials online for granny squares, so you can also type “crochet granny square” into your favorite search engine (Google, Bing, Yahoo, etc) or YouTube for more help.
Susanwstn
Thank u!! I will get started.
postele
postele…
[…]How to Seam Granny Squares | Lion Brand Notebook[…]…
Mycki22
Did you just sew through the top loops or the whole stitch? It’s hard to tell for sure from the pics. Great tutorial! Not dreading sewing all my squares together as much now. 🙂 Thanks!!
Oiseauk
WOW, that’s really something! Grazzi
Charlenebusse
I have inherited completed gr sq’s and have delayed sewing them together as it is a drag! I felt that they would have this awful ridge on the backside and I even know how to do this method you recomend…duh! Thank you so much for jogging my memory…
Char
Flyingicecream
Just pulled out a couple of my completed granny squares and tried this out, Â and it worked like a charm! I used a contrasting color just to see for sure how ‘invisible’ it really was, and there was just a smidge of the color poking through in a few places so I pulled it out and used the same color as one of the borders and it looks perfect! I pinned this a few weeks ago and I’m so glad I remembered it.
Hannah
wow! just what i needed! I’m making an afghan out of granny squares
How to create a great pinterest pin
[…] can either follow the visuals to work out how to do it or click the link to see the image in a larger size complete with written […]
Girbska
thank you for this tutorial!
7 Tips - How To Leverage Pinterest for Blog Promotion - Write On Track
[…] Photo Credit: Lion Brand […]
Colleen
Thanks…i need to piece together my 1st baby afghan…..keep posting tips like this
Donna
Are you going through back loops only or both loops?
Carol B
I admit I was a skeptic and wasn’t quite sure how to follow these directions until I sat down with a couple of squares and did it. It works! You can be sure I will be using this method in the future. Thanks!
5 Useful Articles to Help Finish Your Knit/Crochet Project Effectively | Lion Brand Notebook
[…] How to Invisibly Seam Granny Squares […]
Ðезаметное Ñоединение мотивов, ÑвÑзанных крючком | Мои Петельки
[…] ИÑточник маÑтер-клаÑÑа: lionbrand.com […]
Colleen C
I too like to crochet over the ends as I go. this way when you snip them they stay put. It Works!!!
How to crochet: How to join granny squares? | Best of Crochet
[…] invisible joining of granny squares one is one my favourites, since it brings out the shape of granny squares in a […]
Anleitung: Sunburst Flower Granny Square haekeln « Kasa Amend
[…] Nachtrag: Da es einige Fragen zum Zusammenfügen der fertigen Squares gab: Ich habe die Squares auf der Rückseite zusammengehäkelt. Hier gibt es aber auch eine Anleitung wie man sie zusammennäht: http://blog.lionbrand.com/2012/04/19/how-to-invisibly-seam-granny-squares/ […]
How to Invisibly Seam Granny Squares | DiyReal.com
[…] Â Source:Â blog.lionbrand.com […]
Patching Up My Granny Square Blanket - Make and Takes
[…] Hidden whipstitch method by Lion Brand Yarn – makes for a seamless look. […]
Vivette Pullum Ashen-Brenner
I’m a knitter but I do know how to crochet and I’ve made granny squares…including a huge single granny square in rainbow colors that I made when I was pregnant but I never knew how to sucessfully stitch them to gether. …it’s a lot like the mattress stitch we knitters use.
PlainJane
When I sew or crochet granny squares together, I work in a zig-zag diagonally across the squares. Picture the next square being placed on top of the left hand square above & sewn into place. This puts all the seam ends at the outside of the finished afghan where they can be worked over while adding an edging. Much less apt to come apart in the middle of the afghan.
Zoe
WOW! Why did I not know this sooner! Thanks for sharing!
Joy Merrill
Super easy to follow tutorial, thank you! Never again will I allow the intimidation of joining hinder me from making squares projects again!
L-Squared.Org » WIP Wednesday: Lots of Dots (Week 15)
[…] method creates. So, instead, I’m going to use the invisible seam method (explained well HERE). This joining method will probably take me a lot longer than crocheting the pieces together would, […]
Deb
lovely clear directions
Lots of Dots | L-Squared.Org
[…] have spent the last month or so sewing the blanket squares together (using the invisible seam technique), during any spare moments. However, because sewing is not my favorite part and since I was so […]
A Great Granny Square Giveaway! | Lion Brand Notebook
[…] How to Invisibly Seam Granny Squares […]
Beatrice Ryan Designs Crochet A Long Afghan.. Week 2 | Beatrice Ryan Designs
[…] Squares together. I found a great tutorial from Lion Brand Yarn to demonstrate this method… Click Here for the tutorial on How to Invisibly Seam Granny Squares Together […]
Crochet-A-Day: Crochet Phone Cozy - Make and Takes
[…] thread through one side and then the other as the sides are lined up. Here’s a great link for hiding your seam. If you’re just learning and your whip stitch is a bit rusty, you can turn your work inside […]
Crochet-A-Day: Crochet Hand Warmers - Make and Takes
[…] thread through one side and then the other as the sides are lined up. Here’s a great link for hiding your seam. If you’re just learning and your whip stitch is a bit rusty, you can turn your work inside out […]
Super Mario Bros Granny Square Blanket | Goddess Crochet
[…] The yarn is all Caron Simply Soft, they just had the perfect colors for the job! The actual diagram for the blanket, along with the square count can be found HERE. After crocheting all 252 squares, I blocked them using a device my handy husband made for me…a block of wood with pins at measured distances. Stack the squares on and hold over a steamer for a minute or so. It makes SUCH a difference in the quality and shape of the square. It just evens it out. This isn’t the one my hubby built, but here is a good example of how to block granny squares with that method. The page is in Russian, but the pictures provide good instruction. See link HERE.  AFTER all the squares were blocked, I went about attaching them using the seamless/mattress seam method. Here is a link for instructions on THAT in case anyone is interested. HERE. […]
danielle m
I think this tutorial is exactly what I’m looking for. But just in case, I had a question for ya.
Is the seam visible on the other side? I’m making a mitered granny baby blanket and the colors are different where they’ll be joining. I want to make sure the squares won’t have seams on either side because baby blankets are eventually tossed around by said baby. Hehe.
Thank you so much!!!
Nancy
If you are joining squares for an afghan, do you join rows with one continuous piece of yarn? Or do you join each square, one at a time, and weave in the ends, before joining another one? I hope this makes sense. 🙂
Lorena
Hi Nancy! To do this invisibly, it’s best to seam them one by one. A bit of work, but worth the effort!
mari
this looks great…but i still have no idea where to sew on each square to make the seam invisible………………………. how is this any different from a whip stitch? but invisible?? please advise. 🙂
scales666
Just finished all the squares for a huge project and having issues sewing together properly.THANK YOU THIS SAVED Me!!!!
Julie Coulson
This is similar to how I would have done it I must admit they exact way you have shown is much nicer and tidier .
Is there a way to do a flat seem with a hook ? Silly question.