We’re almost there!
I’ve finished making all my motifs and, since I was joining them as I did the last round of each, I don’t have any additional joining to do. However, many of you chose to wait until now to join your motifs, a method I often choose. Since I know at least ten ways to do so, I have a choice of options at this point. Sewing motifs together with a tapestry needle and whip stitch is a non-starter for me. Meaning: I never do it. Waaaaaaay too slow and finicky.
Single crochet seam
This seam can be done either on the wrong side or the right side of the piece. It is a sturdy yet flexible join. It makes a nice ridge, which can be used as a design element to frame the motifs. Some people think the ridge looks “wrong”; I think it’s a lovely three-dimensional element that adds interest, and I often choose to put it on the right side. I’ve used a contrasting color yarn so that the seam shows up.
To work a single crochet seam on the right side, hold the motifs with wrong sides together and sc through the adjacent stitches and chain-spaces on both motifs.
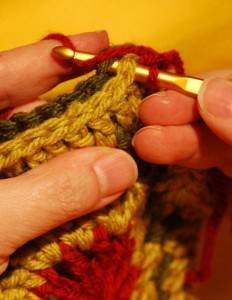
In this design, I would probably work a bunch of short seams to create long strips of hexagons, then join those long strips with long zigzag-shaped seams lengthwise down the afghan. You’ll have to figure out the best way to handle the corners when 3 motifs meet.
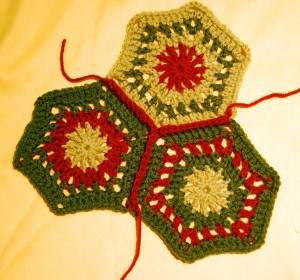
On my sample, I joined the 3rd motif to the 2nd one from chain-spaces to chain-spaces, then chain 1, and joined the same chain-space of the 3rd motif to the next chain-space of the 1st motif, continuing along that edge to the next corner. (This will make more sense when you have a lot of pieces in your hand and you try it yourself!)
Here’s what the sc seam on the right side looks like:
Here’s what it looks like on the wrong side:
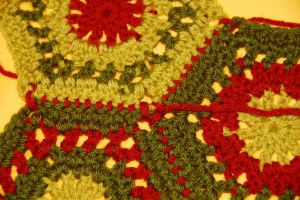
Note that this last photo shows more or less what the seam would look like if you worked it on the wrong side. To work a single crochet seam on the wrong side, hold motifs with right sides together and sc through the adjacent stitches on both motifs.
Single-crochet/chain seam
This join is a bit looser and more flexible than the single crochet seam. Again, it can be done either on the right side or the wrong side of the work. Instead of working into every stitch and chain-space as shown above, join with a sc at the corners, *ch 1, skip 1 pair of stitches, sc through next pair of adjacent stitches; repeat from * across the edge to the corner. As for the single crochet seam, you’ll have to experiment a bit to figure out how best to handle the corners where 3 motifs join. It may require a chain 1, 2 or 3 at the corner to lie flat.
Single Crochet Join on Final Round
My final suggestion is a hybrid of the join-as-you-go method that I showed you before. In this method, add an additional round of single crochet around each motif, joining as you go.
On the first motif, work a complete round of single crochet, placing 1 sc in each dc and (sc, ch 1, sc) in each corner space. Fasten off.
On the second motif, work a round of sc to the next-to-last corner. Sc in corner, ch 1, join that chain in the adjacent chain from the first motif (as described here), sc in same chain-space of current motif, join that sc to the adjacent sc from the first motif, and so on.
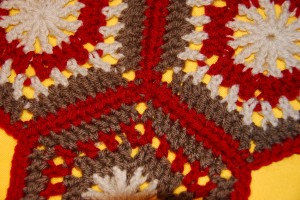
As you work, you may find that you need to put 2 or 3 chains in the corner to make the corners tidy—don’t be afraid to play around with it to get the perfect technique for your situation.
Which of these (or any other methods) is best? By now (hopefully), you’ll know what my answer is: only you can decide what’s best in your situation. Play with variations on these joins and decide which one you think is just right for your needs. For example, you may find that the join-only-in-the corner method that I showed you in a previous post is quick, but not sturdy enough for hard use, or you may think it gives the perfect lacy look you prefer.
Weaving in ends
Everyone has just been itchin’ for me to talk about weaving in ends. Your time has finally come. In an earlier post, I wrote about working over yarn ends as I create new stitches. I will do often do this, but I find that in an item that gets handled a lot, like an afghan, the worked-over ends are not secure enough. I prefer to weave in all my ends with a tapestry needle for the final finish.
Yes, this is tedious. It’s not nearly as much fun as stitching cute little hexagons. However, it IS a critical part of the afghan-making process. A couple of nights in front of the TV should do it.
I use a blunt-tip tapestry needle with a big enough eye so that I can easily thread it, yet not so big that it has trouble fitting through the stitches. You do know this trick for threading a tapestry needle, don’t you?
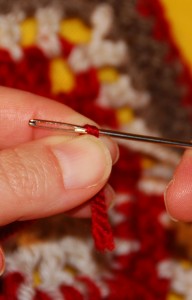
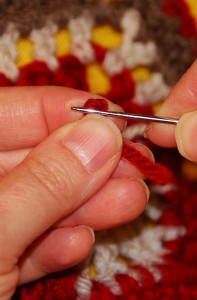
Weave the yarn tail in a couple of different directions through the back of the same-color stitches. The more different directions you go in, the more secure your tail will be.
Some people choose to use a sharper needle and actually skim through the back of the stitches, splitting the yarn. If you have a latch hook, you might find it easier to use it to weave in your ends.
A Finishing Round
Once I had all my ends woven in, I used a steam iron to carefully block the entire afghan. You may have heard that blocking is not necessary with acrylic yarn, but I find that blocking gives a finished look to any crocheted piece. I was careful to use the lowest steam setting on my iron, and I NEVER touch the iron to the fabric, as it it is possible to “kill” acrylic yarn and thus alter its drape. I just skimmed the iron over the afghan, keeping it about 2″ above the fabric.
Then I decided that a final round of single crochet would be a nice touch and would help strengthen and secure the edges. I worked 1 sc in each dc around, putting (sc, ch 1, sc) in each “outer” chain-space corner, and 1 sc in each “inner” chain-space corner.
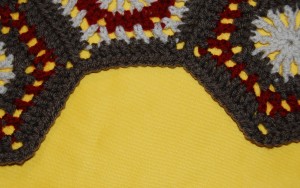
Final Results
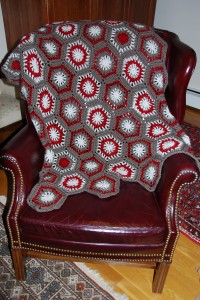
Can you see where I threw in a few off-pattern motifs to keep it interesting? Adding another color would have been fun, as well.
The finished size is about 37″ x 53″. That’s reasonably close to what I predicted. It is a bit small for a traditional-sized afghan, but I could easily have added motifs to make it larger. As it is, I decided it’s a perfect lap-ghan size to throw over my legs while I’m crocheting.
Also as predicted, the weight of the finished afghan indicated I used a total of about 8 balls of yarn. The breakdown of colors was about 5 balls of Taupe, 3 balls of Linen and 2 balls of Cranberry. (Yes, these add up to more than 8 balls, because the final ball of each color was not used up.)
It’s Just the Beginning
Those of you who have stuck with me this far, congratulations! I hope I’ve been showing you things you didn’t know before, and that you have been having fun and gaining confidence while working along with me. I haven’t been able to share half of what I know and love about crocheting; if you want to learn more, read more here at the Lion Brand website, refer to The Crochet Answer Book and Beyond the Square Crochet Motifs, and take classes. All my fellow crochet teachers and I are anxious to share our love of the craft with you.
I hope you’ll keep stitching and striving to grow your knowledge while enjoying what you are doing. No stress, no “wrongs”, just opportunities to learn. I’ll be hanging out here at the Lion Brand Notebook for another week or so to answer questions and respond to comments. After that, you’ll still be able to find me on the Ravelry CAL group or on my website.
Stitch On–and HAVE FUN!
Related links:
Dawn
Edie, I have to say I have been loving making this. It is my first crochet project and I am tickled with it so far. Thank you!
Edie says: Congratulations, Dawn! You should be proud of yourself!
Abby
Edie,
Just wanted to thank you for all the work you’ve put into this project. I am having a lot of fun making my little motifs and can’t wait to put them all together.
Is there a place where those of us who have participated in this crochet along can post photos of our finished pieces?
Thank you, again!
Abby
Edie says: Abby, if you are on Ravelry, there’s a Lion Brand Motif Afghan Crochet-Along group where you can post your photos.
Johanne
Another way I used to join the hexagons, is very similar to your first method, except I only went through the back loop. I often use this method, it creates a very nice finish, similar to what a whip stitch would look like.
phillygirl64
I think I’m gonna redo the VCB granny square blankie I have sitting as well! thanks Edie and Johanne!
Melissa Slofkosky
Edie. Thank you, for all your information in this crochet along. I have been crocheting along time. However, I learned how to do the sliding loop.I really like it. I also learned how to do the standing crochet.It really makes changing colors alot easier. I am also going to try the join as you go method.
Melissa
Edie says: Hi, Melissa. Isn’t it amazing that, no matter how long we’ve been crocheting, there is always something else to learn? I’m always looking for tips to make my stitching look better–and make it easier. We can learn so much from each other!
Ilehlia
Edie, your final result looks just terrific, especially on that chair. I’m glad “we” chose those colours for you! Thanks so much for all the great tips. Like Melissa above, I’ve been crocheting a long time, but never learned a lot of these finer techniques. I look forward to another CAL with you in future.
Edie says: Thanks, Ilehlia. I’m so glad you joined us. I hope we’ll be able to do it again, also.
Deborah
I have learned so much from this CAL! The wonderful photos really help explain the text. You mention that your afghan is not a “traditional-size afghan.” What do you consider a traditional-size afghan to be? When joining the squares of a sampler afghan, do you recommend a row of single crochet around the squares first before joining? My pattern calls for a variety of different colored squares and I’m having trouble deciding what color to use to join them. I’ve ordered one of your books since I’ve joined this CAL because you have a great way of teaching. I appreciate all of the time you spent on this!
Edie says: Although there’s no real standard for afghan sizes, I think of a full-size afghan as being at least 42″ x 58″ or so–plenty big to grab and cover a full-size adult. I usually make them about 48″ x 60″. My finished afghan is more of a lap-ghan size–generous enough to cover the legs, but not really Snuggie size.
You can certainly sc around each motif if you like. When you use a single color for the sc round on all the pieces, it creates a framing, unifying effect. Trust me when I say it’s worth the time to experiment with several different design ideas before deciding on which looks best. It is NOT time wasted.
Vicky Schoeman
Edie
Your finished CAL project looks great. What about adding half hexagon motifs to the edges where applicable. I’m busy with an afghan of my own and wondered if you had such a pattern. I suppose I could work out one myself, but your help would be much appreciated.
Greetings from sunny South Africa, where the weather is slowly warming up after an unusually cold winter.
Vicky Schoeman, Cradock, South Africa
Edie says: Hi, Vicky. You can certainly add half-hex motifs if you like. I don’t have one prepared, because that is beyond the scope of this Crochet-Along. Others have mentioned that they are considering figuring one out. If someone does have a coordinating half-hex, please share it with us here and on the Ravelry group.
Kiki
I love mine, too! I am sort of combining the join as you go method, and not! I’m doing sort of “flower groups”. There are two, each with a different solid center and the 6 motifs that connect to it are identical to each “flower”. So I am joining them to the solid center as I go with sc, but the multi-colored “petals” will be joined to eachother when I add the filler motifs to emphasise the “petal” look. Hard to describe, but I love the effect!
Claudia
Edie,
Your afghan looks fantastic!
Thank you so much for all the great ideas. I like others have learned alot from my first Crochet Along. Especially the slip loop! What a great idea. I tried the join as you go method, at one point I didn’t know if was was going to have enough yarn to complete it. That’s when I worried about this method, but it worked out. Thanks too for the instruction on joining…I have always used the needle with the whip…. this looks a whole lot better!.
Thanks again… Loved it!!!!!
Edie says: So glad you liked it!
Brenda Stevens
Hi,
Edie are you still checking in here or should I contact you through your website? I’ll post my questions here just in case. One is what is the difference between the magic loop with its “double ring” and another loop or ring idea I’ve seen with just one loop? What makes the doubled loop better? I’m going to “play” with it and see what I come up with, but I would like your input, or anybody else, too.
I am slow, I know, but I have only made one motif so far, though I have made it a couple of times -playing around with standing double crochets and a different way to end when changing colors – with some Lily Sugar N Cream yarn because it’s a smoother yarn and I can see the stitches better. I wish you could see what I’ve done – I’d love your opinion on my “joins”.
Earlier in the CAL you suggested that I find a time/place to crochet without distractions. I chuckled at that because there is no such thing available here – or very rarely at most. Life is pretty busy here with 7 kids (ages range from 21 years down to 2), homeschooling, and our 40 animals, including a dog, cats, rabbits, chickens, a guinea, goats, llamas and horses. This is part of why I am slow 😉 Oh, and I also have several other projects going on, besides crocheting.
I wish there was a way I could see how others’ projects turned out.
Thanks for doing this CAL! I have learned from you and been encouraged by you! Hope you come to teach in Minneapolis soon! (hint, hint)
Laura
Looks as though everyone did a great job with this CAL and thoroughly enjoyed the process…..congratulations.
Unfortunately, I didn’t wind up participating because when getting seriously stumped with a certain part of the hexagon directions, I felt as though I was bothering you, Edie, with several questions about the same place in the pattern. I couldn’t seem to ‘get it’ and after your third response, I got the feeling you were annoyed with my density when it came to this part of the pattern, so I just decided to back off. However, I followed along via the blog and again, congrats to all.
Edie says: Hi, Laura. I’m so sorry you didn’t end up participating and that you felt frustrated with the instructions. I’m also very sorry that you felt you were bothering me–that certainly wasn’t my intention! I know how discouranging it can be to try and try something, and still just not get it. Unfortunately, I can’t quite understand where you are getting stuck, and therefore haven’t been able to figure out how to make it clearer.
The reason I suggested asking a friend is that I’ve found when I get stuck and can’t understand something, the written word (and even pictures) doesn’t also work to get me unstuck. Often I have to try a bunch of different ways to figure it out–having someone read instructions aloud to me, for example, or going to someone who has done it before and getting hands-on help.
Since this particular CAL is over, the blog is not the best place to continue the conversation. However, I hate to leave you hanging if you want to work on the afghan. If you’d like to give it another shot, I’d be happy to talk to you on the Lion Brand Motif Afghan Crochet-Along Ravelry group, or at my individual email.
Sandra
Hi Edie, I’m still enjoying the making of this blanket. Due to my jobs I’m making a slow progress, I think it will be have a significant one during the Holiday season. For now here is how is looking so far (picture on the sidebar: http://blogdesandramaria.blogspot.com
I chose joining the squares directly as I go, seems to me it makes such a nice effect when you see the blending of both yarns!
Yours is lovely, congrats on your finish!
To all the participants: I’ve been peeking here and there, on your blogs and also on Ravelry. It’s wonderful how different they look just by the color combinations. They all look delightful!
Thanks for hosting it!