Thanks to everybody for helping me decide which colors to choose for my afghan. I’ve enjoyed reading all the comments and can’t want to see all the colorful combinations you choose for your projects. It seems like I got plenty of votes for colorway #4, and since that fits with my décor, I’ll go with that one. Here are some I didn’t choose, but that you might have:
Many of you are anxious to get started with learning a join-as-you-go method, but I’m going to ask that you be patient for one more week while we do some other steps.
Swatching Tells the Tale
As with any project, it’s important to do a swatch before beginning a project. A swatch gives us an idea of what size hook to use, how much yarn we’ll need, and what the likely finished dimensions of the afghan will be. Luckily for us, in this case the swatch may just be the first or second motif of our project.
I tried a couple of different hook sizes and settled on an I-9 (5.5mm) hook for the Vanna’s Choice yarn that I’m using. You may need a different hook size to get the ideal feel for your gauge and yarn. You want a motif that has a little bit of body without being too stiff or too floppy. If you’re not sure what size you need, start with the suggested size on the yarn band, but don’t hesitate to change hooks to get the ideal gauge for you.
My motif measures about 3.25″ across one edge, 6.5″ from point-to-point across the center, and 5.5″ from side-to-side across the center. I printed out some (really cool) hexagonal graph paper from Incompetech.com and used that to envision how the motifs will be arranged. Here’s what my hand-drawn worksheet looks like. You can see the size and shape of the afghan outlined in black.
You can also see that I need 60 hexagons in all. My swatch weighs in at about 12 g, so 12g x 60 motifs = 720 g, or 8 balls of Vanna’s Choice yarn. However, since I’m using more than one color, and I’ll need some yarn for joining, I know that I’ll need more than 8 balls of yarn, not including the yarn needed to join the motifs together either as we go or at the end. At this point, I can’t be completely accurate in knowing what amounts I’ll need, because I don’t know how colors A, B and C will be used.
If you are using lots of colors, and just want to do a patchwork/freeform design without a plan, just start stitching. Leave a longish (12″) tail on the final round, and don’t weave in the final tail. You’ll understand the reason for this later.
Planning the Design
In my case, I want to have a plan for placement of my motifs. I still need to decide how I want to arrange the colors on each motif, and also how to arrange the motifs to form the overall design. I’ve started by stitching one motif. Because I’m still in the designing stage, I’m going to work the first few motifs in a variety of color arrangements. Let’s call my colors A (taupe), B (cranberry) and C (linen). I use a kind of shorthand to describe the color arrangements, with letter designations for each round. Here are the motifs I’ve done so far, although I could do even more variations with just these 3 colors.
Here’s where it gets really fun. I can do any of the following: (1) Decide to join my motifs once they are all complete. That means that right now I can just stitch individual motifs. I can decide on placement and color arrangements as I go, allowing the design to develop as I stitch. I don’t have to commit to a placement scheme until the last minute. I actually prefer this way most of the time. That’s because I don’t mind joining motifs at the end—it’s not that hard or time-consuming, I promise. (2) Use a random pattern of color variations throughout. (3) Pick one or two color arrangements and use them in alternating rows. (4) Scan the motifs, then print out the (now smaller than life-size) images on my color printer, making as many prints of each one as I choose. Then I can cut them out and play with the pieces until I have an arrangement I like. If I tape the pieces together I’ll have a template to remind me what to stitch next. (5) Do #4 above with color pencils or crayons. This can be lots of fun, and the kids can play, too! (6) Scan the motifs, and then manipulate them digitally using an image-editing software program. Since I’m trying to learn a new-to-me program, and since it makes nice prototype afghans for this purpose, this is the method I’ll choose here. You’ll see that they are just rough digital “sketches”, but that’s all I need at this stage. (Note to mention: this is just about the extent of my skill at this point. The strange white lines between the motifs are just my inexperience!) Here are some of the options I came up with, based on the scanned motifs above.
Of course, there are many other options! This time, I’m going to let other members of my family decide which version they like, and which one I’ll make. I suspect I’ll be adding a tiny amount of a fourth color (sapphire?) to add some pop.
What’s next?
Whew! I’ve been doing lots of planning, but now I’m ready to start stitching in earnest. I’m going to make 4 or 5 complete motifs, but not join the final round. I’ll probably make some others through Round 3 only. Once I decide on my joining method (next week’s post), I’ll do the final round on those motifs as needed. Why don’t you do the same?
The Sliding Loop
One final thing for this week: I want to show you how I do the “sliding loop” technique for starting a motif in the round. Although the pattern says to start with a ch-4 ring, I prefer to start all my motifs with a sliding loop—a variation of what you may know as the magic loop. It is a bit tricky to learn, but once I mastered it, it became my favorite method. It makes an adjustable ring into which to work the first round, and I can make the ring as large or as small as needed to fit my needs.
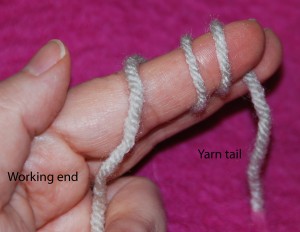
Wrap the yarn 2 full times around your finger, with the yarn tail toward the tip of the finger and the working end of the yarn toward the palm.
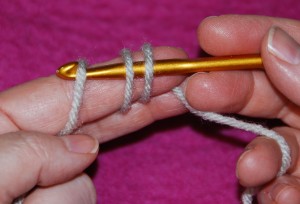
Insert the hook under all 3 strands.
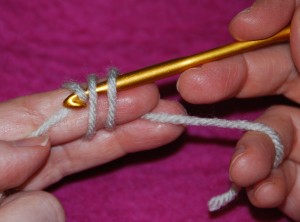
Pull the working yarn under the other 2 strands.
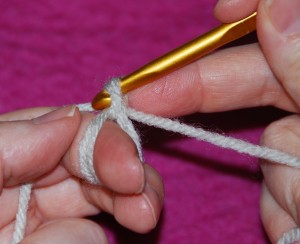
Pull the yarn through and allow the two strands to come together. Take the doubled loop off your finger.
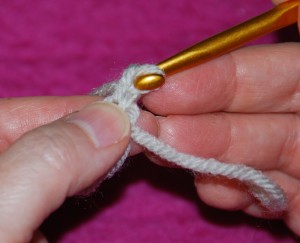
Pinching the doubled loop to keep them from coming apart, chain the number called for in the first round. In our case, it will be ch 6.
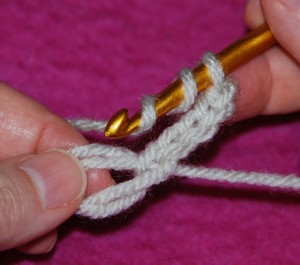
Work all first-round sts into the doubled ring. Those of you with eagle-eyes will notice that this example is not exactly the same as yours-I’m only putting 1 chain between treble crochet sts, not 2 as called for in the pattern.
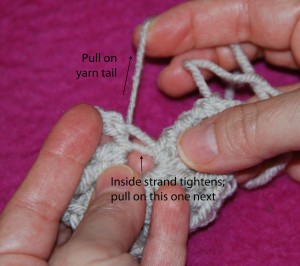
As you work, you may have to expand your doubled loop in order to get all the stitches in. Once you have completed the round, you’ll see that the doubled loop is still peeking between your stitches. Gently pull on your yarn tail and you’ll notice that one of the strands (probably the inside strand) will tighten. Go ahead and tighten that strand up, but not all the way. Once it is just barely visible, stop tugging on the yarn tail and instead pull on that tiny little tightened strand.
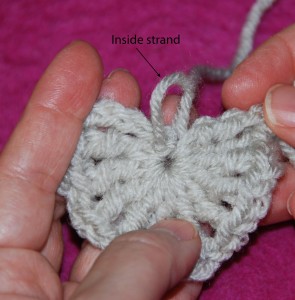
When you pull the inside strand, the outside strand will tighten, and you’ll get a big loop from the inside strand. It looks scary, but the next step is magic…
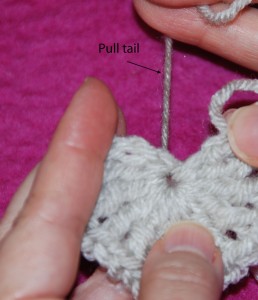
Now pull on the yarn tail once more and that big loop will magically disappear!
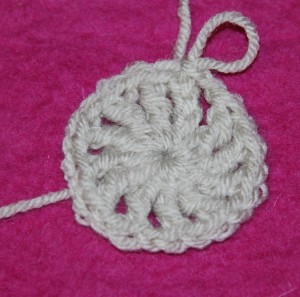
Once you have a nice tidy center, finish the round with a slip stitch. Again, note that this round only has 1 ch between each treble. Yours will have 2 chains.
Please post your questions or comments here, and feel free to chip in with helpful suggestions for each other. We’re in this together!
Related links:
Ashley
Hello!
How fun using the computer to manipulate the motif and really plan out the afghan.
I have already finished a couple of motifs, they the finished look!
The one thing I am having trouble with is the join on the first round. The pattern says to join with a hdc, and this just doesn’t make sense to me. I have done it so far and I can’t see anything wrong with it, but I just wonder why a slip stitch wouldn’t work.
The sliding loop looks interesting, but since I am using this project to “reintroduce” my mother to crochet I will stick with the chain 4 to make a ring.
I still havn’t decided on a joining method, but again since there are two of us working on this project I will probably just wait and join at the end with a slip stitch or sc.
Thanks again and happy stitching to all!!!
Ashley
Edie says: If you join with an hdc instead of doing the last 2 chains then a slip stitch, the “joining hdc” forms the final space, but leaves your hook in place to begin the next round. However, if you are finishing off that round and starting a new round, you can just finish off with the chain/slip st ending, fasten off, then join your new yarn. We’ll be talking about joining new colors and other technical refinements next week.
Liz
That hint for starting is just the ticket I needed. I hate a huge, wonky hole in the center. Thank you for passing that tip on.
Judy
What is the finished demention of version 2 versus version 4? Since I am making this for a baby, what would be a good finished size?
Anxious to try this new beginning method. Thanks.
Edie says: Hi, Judy. I think either of the ones shown are too big for a baby afghan. However, you can just make fewer motifs, and arrange them in fewer rows, to make the perfect size for your baby blanket. The final finished size will depend on the size of YOUR motif.
Ilehlia
Wow, the illustrations you provide are terrific! Especially of the possible finished variations. I have to confess that I thought the hexagon motif would look a little hokey, or too busy. But that first variation with the vertical stripes looks just stunning. This is exactly what I needed, because I’m not good at envisioning the final result. Thanks for going to all this trouble for us!
Ilehlia
PS. I just printed off my hexagonal graph paper. The link is at the bottom of the web page, where it says Pregenerated Hexagonal Graph Paper. I figure it’s going to be hard enough to calculate everything for an afghan without having to calculate the graph paper by myself too! I used the 4 motifs per sq. inch. It’s grey and a bit pale, but visible, and the lines won’t interfere with my colour scheme. It also seems to have the largest hexes. Have fun, everyone!
Ilehlia
Okay, I went back to the hexagon graph paper site, and checked it out again. I got scared off by the form you have to fill in. But I just printed off the default settings, and only changed the colour to grey, and it looks a lot like the one in your sketch, Edie: ½” hexes along the sides. Maybe my ramblings here will help somebody else who might otherwise be intimidated by techno wizardry! 😉
Miriam
Edie – After seeing your digital motifs I must say that not only am I thrilled to have you as our teacher but uber-grateful too. The motifs are spectacular!
I’m heading out to get my yarn today!
Miriam
Marlene
I am excited to particpate but as a newbie I am not sure how much yarn I should purchase – any suggestions?
Zontee says: Hi Marlene, welcome! Please reread the above post, as Edie does discuss how much yarn you’ll need (8 balls total, exact amounts per color will depend on your variation).
susan
I am still confused. Are you saying we need a total of 8 skeins vanna’s choice? Or do we need 8 for the main color? Then how much do we need for the other colors we are using?
Jess Says: Hi, Susan. You’ll need 8 skeins total, depending on how large you want the afghan.
rebe72
Edie and All-
Hello! I have started by completing one motif and starting on two. I have a few questions…
1) The size. You stated that your finished motif was 6.25 across the center, using an I hook. I only have an H hook, and so my finished motif measures an even 5″ across the center points (widest point). How will this effect my size of my afghan and how to figure out how many motifs I will need? I am still confused on how to figure this out. I had to use up some skeins I had in my son’s school colors, so I am using Red Heart super saver in maroon and gold.
2) Having said that, my son said he likes the look (THANK GOD!..he’s a teenager, so if it doesn’t look “just so” it isn’t going anywhere near his dorm!) but he made the suggestion of alternating the make-up of the motif by doing two rounds in one color and the other two in the other color. For example, the two motifs I have created so far have gold in the center, then maroon for the two outside rounds, and maroon in the center with gold for the two outside rounds.
My question is this…if I wanted to arrange the motifs so that they resemble a circular “starburst” pattern, would this be possible? And if so, how would I go about it?
I know that you get so many posts so I’m really sorry to bother you with asking for such personal help, but I’m stuck. Thank you for the time it takes to respond. The graph paper is confusing to me. I really thank you for heading up this group and think your colors are just beautiful! Thanks again!
Edie says: The hook size is less important than the way the piece feels in your hand. If you are happy with the way your 5″ piece feels, that’s fine, but if it’s too stiff, you need to use a larger hook with that yarn. Let’s assume that your 5″ piece is about 2.5″ along one edge. Look at the sketch that I outlined. You’ll see that, measuring across, you have four hexagons that need to be measured from point-to-point, and three to be measured along one side, so (4 x 5) (3 x 2.5) = 27.5 inches across.
Measuring lengthwise, you have to measure how long one motif is from side to side. There are 9 hexagons in that direction, so if your hexagon is 4″ from side to side, then 4 x 9 = 36 inches long. Of course, you can add hexagons anywhere you want to make it the size you like.
Think of the graph paper as a page out of a coloring book, and just use it to color in a picture of the afghan that you want. (Of course, you can use plain paper, too.) If you want to figure out a starburst pattern, draw hexagons in the starburst arrangement you like, then fill in with other motifs. This is where colored pencils/crayons/markers come in.
Debra
Hi Edie,
Thanks for all the wonderful tips. I really love your digital sketches and I love the idea of scanning and printing out the motifs to help in the design process. I’ve made my swatch. Now I’m off to crochet a few more motifs with different color arrangements. Thanks again!
Alison
Hi Edie and everyone,
I have created two motifs with varying colors in the middle. I am using Red Heart Super Saver Yarn in white and lt. fuchsia and Caron Perfect Match in evening jewels ombre–all are from my stash. The white and the ombre are the centers with the lt fuchsia as the very last row (not sure I have enough to use beyond the last row–only 4 skeins).
Thank you for the version one. My husband (my helper in my decision process) and I were trying to figure out how to arrange the motifs and that is perfect. I am not sure how many of each motif I will need but I will play it by ear as I go along.
I am really excited and looking forward to making this afghan for my daughter’s new big girl bed.
Alison from Walnut Creek
Shelly
That way of laying out all the motifs is a great idea! I was a bit intimidated by the idea of making an afghan before, but now I’m inpspired 🙂 How much yarn on average do you think this would take, using one main color and two secondary, like your patterns? Actually, I should just go back and check if it’s in a previous post…
rebe72
Hi Edie
It’s rebe72 (from post 10) I printed your rough sketch and used it to try to figure out the number of motifs I need. On your sketch, you have up-to-down being 5 1/2, and mine is 4 1/2. You have your widest point across the center being 6 1/2, and mine is 5. You have your each side being 3 1/4″, and mine is 3″. Using your figures in your rough sketch, you have 6 1/2 X 4=26, 3 1/4 X 3=9 3/4, then it looks like you added those together to get 35 3/4th. When I did that, I got 5 X 4= 20, 3 X 3= 9, added together makes 29″.
Lower on your sketch you wrote 9 X 5 1/2=49 1/2″. When I do that, I get 9 X 4 1/2= 36 1/2′, and OBVIOUSLY that is just too short or small to cover a twin bed or be a blanket. What does your numbers 4 and 3 signify? And 9? I’m so confused.
Mary
I decided to try this. It’s my first CAL. I’m using up some medium blue yarn I bought for another afghan and never used. Now that I printed the graph paper I may figure out how to alternate blue motifs and cream motifs and maybe even throw in some that combine both colors. I’ve made four in the blue already and found that looking at the diagram really helped with that HDC join. I kept coming up with a pentagon until I looked at the diagram.
Edie says: Hi, Mary. I find that using the diagram helps me with ALL my crochet patterns!
FleaFlecks
I dove right into this last week and have already done about 30 hexagons; I am just laying them out on the floor and moving them around to decide where to put them! I have two main colors (blue and burgundy), an additional unifying color (ivory/buff), and am then spicing it up with a whole bunch of other colors which I move through each round (so for instance a yellow middle, yellow second round, third round,fourth round). I think this will give me the randomness of a “scrap” afghan but still have some unity to it.
But OOPS I have tied all of mine off so I won’t have a “Tail,” at least for these first thity I made! Oh well. I suppose I can sew them all together at the end, probably with the burgundy color.
Edie, your image looks so cool with just the three colors! I think I’ll have to make another afghan using that method and just sticking to the three colors. But I want to find a different hexagon pattern for the second one. (I like this one, and I have it “down” after doing thirty, but I just don’t want to do the same project all over again!)
Edie says: Isn’t it fun to play with the placement of the different pieces? To me, that’s one of the most exciting parts of a design-your-own afghan, and one argument AGAINST join-as-you-go.
If you haven’t woven in your final tails, you may still be able to join us in a join-as-you-go method.
phillygirl64
I love the mock-ups on the computer 🙂 …thanks to them, I’ve decided to make 2 sets of motifs – just not sure which layout yet
I’m still trying to settle on my color scheme…I’m using VC in chocolate and a couple of the roses; it reminds me of neapolitan ice cream
this weekend I am going to try that magic loop technique and see if I like it better than the usual way of starting
Cassandra
The amount of yarn each peron will need varies. It will depend on the number of motifs you decide to make, your yarn tension and hook size as you stitch, etc.
I tend to stitch very tight so I almost always have to increase the hook size from what the pattern says so I get the correct gauge. If I decide I want to use the hook size listed in the pattern I know I will need more yarn than the pattern calls for because I will need to make more motifs.
Follow the instructions Edie gives for determining the amount of yarn you need. Make a motif and weigh it on a postal scale that can measure weight in grams. Once you get that weight multiply it by the number of motifs you plan on making. To figure out how many skeins of yarn you will need to buy, you need to know what the weight of a skein is for the yarn you plan on using. If you are going to use something other than Vanna’s Choice this is important.
Cassandra
rebe72,
I understand where you are confused. You are trying to figure out how Edie came up with the measurements. Hexagons take a little more getting used to when figuring out dimensions. I have a drafting background so I uderstand how the shapes work together.
I have created a graph that I think will help explain it. Send me an email at knitcroquilt@astound.net and I will email the file to you.
susan
I have done a lionbrand afghan that were diamonds. I liked it because there was a half diamond so the edges could come out straight. Is there a way you can give us a half a hexagon pattern for those who would want straight edges on two sides.
Also, do you think adding tassles would work or look okay?
Cassandra
For those of you having difficulty figuring out the math for the length and width of the hexagon afghan you can check out my blog, http://knitcroquilt.blogspot.com ,where I have posted a detailed explanation with a diagram. I hope this helps y’all.
Edie says: Thanks, Cassandra. That was very helpful. I hope others will chime in and help each other!
rebe72
Edie and all-
Thank you so much everyone for helping me understand it all! It is so wonderful to have a bunch of gals that are so understanding and helpful! I understand what I’m needing to do now, and have even printed the pattern out so that I can follow along. I don’t know if I am going to just make a whole bunch (I need to make 215 motifs for the size he wants!) and then join them, or try the “join-as-you-go” method.
Thanks again to everyone. Ya’ll are great!
Cheryl
WOW! What fun! Wanted to thank you, Edie, for a great book! I decided on Vanna’s Choice Baby in Duckie and Sweet Pea and am doing row three in the alternate color. It is coming out great! Having trouble figuring out the sliding loop, however I love the standing double crochet method from your book for joining the new color. Thanks again!
Victoria in Fallbrook
Edie, After thinking about what I wanted to do for a week and reading through all the posts I finally decided to do a baby blanket. My daughter is just a few weeks away from finding out what she is having (boy or girl) I am going to use brown, her favorite color and one other neutral color for the first few rounds then go back and do the last round pink or blue after we find out. I am just about done doing a really cute bunting. Any color advice is welcome. Have fun Victoria
Helene
Edie,
I have started my first hex and am very nervouse about changing colors and weaving in ends. I am self taught and don’t think I have these types of details down very well. I am using motif #4 and love the colors. Wish me luck.
Helene
I said in my earlier post that I had trouble with ends but after trying my first motif I can see that I desperately need help. When changing colors between rows, how much of the old color do you leave and do you work both the end of the new and old colors along the new work. Please someone help me.
floundering in Philly
Edie says: Hi, Helene. I usually leave 3-4″ of tail at both the beginning and ending. I’ll be talking about working in ends as we go in my fourth post.
Stacey
I made my first motif today and I think that I will join it the way I usually join motifs by chaining and single stitching it together in the ch 3 holes. I haven’t done it with hexagons but will try. Unless your join is better. I will wait and see. I am going to do some in tan and some in tan and denim woolease because that is what I have left over. I hope it will look good.
Edie says: Joining in the corner holes is one way. You can also join all along one edge.
Luanne
I am a self-taught crocheter. This is my first CAL, my first hexagonal motif, my first a lot of things. When making the motif, do you keep going in the same direction or do you turn the work from one row to the next? Where in the triple or double crochet stitch do you place your hook for the next round – do you slip it under the front loop, the back loop, both, any convenient hole? It’s easy to see where to put your hook when working in a “chain” space, not so easy when working in an actual stitch. Also, I am eagerly waiting for information on joining colors and weaving in ends. I am excited to finally learn how to do things the right way, as opposed a “way that works”. Thanks!
Edie says: Hi, Luanne-so glad you are jumping right in there. This motif is worked in the same direction on all rounds, so the right side is always facing you. In crochet, the default placement for the hook is under both loops of the stitch, so unless it says otherwise, that’s where you put it. And by the way, there’s nothing wrong with a “way that works”–sometimes that’s exactly what you do. Other times there are refinements that we can use. Stay tuned.
Jan
Quick question about the sliding loop … is there only one loop of yarn in the hook when you make the first stitch? I am a brand new beginner, but am very eager.
Jan
Edie says: Yes, once you’ve pulled the loop through the doubled strand, you have just one loop on your hook. For that first step, be sure you are pulling one strand under two strands, as in the photo. If you don’t want to try the sliding loop, just go with the chain 4 as written in the pattern.
Snow Hawk
Edie,
Am participating in the CAL but am not certain how to comment, so hope this gets to you. I chose Vanna’s Choice Eggplant as A, Magenta and Pea Green. I plan to make 2 sets of blocks: Set#!=Pea in center, Eggplant, Magenta, Egg; Set#2=Magenta in center, Egg., Pea, Egg..Will be making a lapghan to throw over couch. Purple is my favorite color and this combo feels fallish.
Snow Hawk
Edie says: Sounds nice! Be sure to share pictures.
Snow Hawk
Edie,
Am participating in the CAL. Chose Vanna’s Choice Eggplant, Magenta and Pea Green. Making 2 sets of blocks-color order = Pea,Egg,Magenta,Egg and Magenta,Egg,Pea,Egg. Purple is my favorite color and this combo feels fallish. Making a lapghan to throw over couch and want a lacy look so am using a J hook. Am having fun.
Snow Hawk
Scojean
I too am figuring out how much yarn I’ll need since I’m using leftovers in my stash. This will go along with a bunny I made earlier this year for my grandson.
Here’s my question: I have 6 colors. All are very bright. If I use 3 colors for 1 motif, then the other 3 colors for a 2nd style I’m concerned it will get too “busy” overall. Any suggestions that will allow me to proceed without having to buy more yarn? Thanks much!
Edie says: You might want to experiment with doing just one or two colors per motif. This will keep the “busyness” down. Or just do solid colors, or one main color with the center or just Round 3 in a different color. Stitch a few and play with them as I described to see what arrangement you like.
Laura
Edie,
For those of you who are having trouble with new color joins, this is what I do:
When I’m finishing up a square let’s say, I usually weave the ending yarn tail along to the nearest corner. Then I begin a new color in the previous corner by drawing the yarn through and then doing a ch1 using both the working yarn and the yarn tail and I pull until the tail pops through to the right side.
Then I complete my ch 3 or whatever my instructions say having already ch’d 1. When I’m ready to make my first dc or whatever, I hold the yarn tail across the front and to the left and crochet over it as I go along. This makes a very strong join that won’t pull out. Hope this helps!
Mary
Hi Edie,
Just made my first hexagon. I’m using Wool-Ease. I decided to use a couple shades of green and a cream color. I have crocheted awhile, but had to rip out my hex a few times at various points to get it right. The sliding loop is fantastic and I’m glad I learned how to do it. (I make baby hats all the time in the round and it would be nicer to start it that way.) I would like to dive in and start making hexes, but I’ll wait. I already bought a bunch of yarn, but now I realize I might need to buy more of one color (and return one of another) depending on how I map out my design. Silly me. I’ll probably practice making the hex again a few more times with just one color. I am also eager to learn how to switch colors properly.
Laura
Hi Edie,
I’m having problems with the pattern and who knows why? I’m usually pretty good with grannies, etc. but I’ve tried this one 3 times before coming here for your expert advice.
I’m putting in a link to a picture of my hexagon through Row 3 and as you can see by looking at it, it’s not the correct shape at the point of joining. Please tell me what I’m doing incorrectly.
http://farm3.static.flickr.com/2558/3959378556_112d5abb06.jpg
Two separate questions: at the end of rnd 1, is the last st I do, a ch2, or just finish with the tr?
Also, rnd 4 where it says to repeat from * around, omitting last dc (which dc is that)? Thanks so much for your help and if you’d rather, feel free to email me as I seem to be the only one so far having problems.
Edie says: Hi, Laura. The motif is written as if you were working it all in one color, and thus not cutting your yarn and joining a new yarn. When working this way, you need your hook in place ready to begin a corner in Round 2. If you look at the chart, you should be able to see exactly where the stitches go, and how they should be lining up.
The last thing you do on Round 1 is (tr, hdc in 4th chain of ch-6). The hdc at the end of Round 1 takes the place of a (ch-2, slip st) join, and it leaves your hook in place ready to begin Round 2. Think of the hdc join as a chain-space just like all the others in that round.
When you work Round 2, ch 6 (this is a dc and ch-3, a corner), then work another dc into that same hdc-space. You have created the first corner of Round 2. The next dc goes into the 4th chain of Round 2 (those 4 chains count as a tr), the next dc goes into the ch-2 space remaining from the ch-6 at the beginning of Round 1, the next dc into the next tr, and so on.
At the end of Round 4, again, look at the chart. The first ch-3 counted as a dc, so when you come around to the beginning of the round and the pattern says “repeat from * around”, if you actually repeated the entire thing from *, you’d end up needing to do one more dc than you have a place for at the end of the round. It makes more sense once you have the piece in front of you.
Mandy
I decided to pick extremely bright colors (Caron Simply Soft in Grape, Watermelon, and Limelight) for my hex motif, and after 4 complete hexes, I love the way they look! I usually pick a lot of neutral and low-key colors for my projects, and it’s a lot of fun to work with the brighter colors.
Laura
Edie,
You said, “If you look at the chart, you should be able to see exactly where the stitches go, and how they should be lining up”.
I have been looking at the chart like a hawk, LOL, over the past couple of days as I worked the hexagon at least 5 or more times. Each of the symbols on round 1 show dc’s and ch 2’s but at the end where rnd 1 blends into rnd 2, it just shows a straight small blip and then a straight line. That’s where I’m getting confused as to where to put the second and third sts.
Sorry to be apparently, the only one having this trouble, but it must be a major mind block on my part. However, I’m off to give it yet, another try.
Edie says: That “small blip” is the symbol for half double crochet. Instead of working a ch-2, slip stitch there, if you work a hdc, you’ll still get a space, but your hook will be in position to begin working Round 2 at that space, instead of in the beginning chain from Round 2.
It can be frustrating to figure out something this hands-on with just words and pictures. Do you have any crocheting friends? I find it very helpful to get together with others to share ideas and work out problems. Something that is challenging to me is obvious to someone else, and vice versa.
Barbara
This is really interesting and I intend to follow along.
:)Hugs N Smiles 🙂
Barbara
Laura
“if you work a hdc, you’ll still get a space, but your hook will be in position to begin working Round 2 at that space, instead of in the beginning chain from Round 2.”
Okay, I see what you’re saying with the above but when it comes to the next stitch after the ch6 (the dc in sp made by joining hdc) where does that st go? Does it go into the 4th ch where the hdc was made or does it go into the first space of the ch 2 from rnd 1?
One more clarification please, would be on rnd 4 ch 3 (counts as dc), dc, ch3,dc in ch 3 sp…..would that space be in the base of the previous ch 3 to begin the rnd, or into the prio ch3 sp made by the previous rnd?
In answer to your question, Edie, most of my fiber friends are knitters and the few that crochet are just getting started. I know it must sound like I’m just getting started too, LOL, but I’m just having doubts about the way I’m doing this and want to make it right. After all, that’s what learning is all about, so I’ll wait for your answer and thank you so much in advance.
Edie says: That first “real” dc on Round 2 goes around the post of the hdc from Round 1. Pretend that instead of a hdc there is a chain-space there, and just put the Round 2 dc into that space. In other words, you aren’t working into a “real” chain-space, it’s an “hdc space” that serves as a ch-space.
At the beginning of round 3, you made a chain 6. The first 3 chains of the ch-6 are a “pretend” dc, while the remaining 3 chains are a “real” ch-3 space. So, on Round 4, the (dc, ch 3, dc) goes into the “real” ch-3 space. Nothing goes into the base of a chain-3.
Kiki
I just got my yarn today so now I can start! I haven’t decided on my join method yet, so I will probably just do the inner rounds for now!
cookie
Hi Edie
I’m a little behind…but I think I can catch up. I can’t find any instruction after September 24th (today is the 30th). I have my yarn and have figured out the double loop/ring…love it…I see where comments have been made as late as yesterday. so I’m guessing I’ve missed a week. Have I? Where is the best place to log on to your CAL. Thanks!
Edie says: Hi, Cookie. The CAL posts go up every Thursday morning about 9:00 am Eastern Time, so you’re not behind–you just have to wait until tomorrow for the next one.
Dawn
I too have been having some difficulty, but I expected that as this is my first crochet project. However, Edie, how hard would it be if you would post a couple of pictures of the start end of each round and the start of the next as you worked it? I have made mime work out, but I dont think I am doing them “right” by the pattern. Thanks!
Edie says: Dawn, I’ll see what I can do about putting pics on Flickr tomorrow. Meanwhile, take a look at today’s post for an even better way to work this motif.
Veronique
First of all Edie, I would like to thank you for having put the directions in chart form also. I like doing crochet but find charts are so much easier to follow than written. I have my colors fiured out and have made several. Just waiting now for how you will be joining these.
Now for Laura, follow the written directions first until you have it down. Go word for word -stitch for stitch- then once you understand that then work from the chart. It looks like your main problem is the beginning chain at the start of every row =remember to count that when you get to the end of the row -that is where you are joining / ending the row.
susan
Hello Edie,
People on the message board are talking about using standing joins instead of chain 6s, what are they talking about?
Edie says: It’s a technique that I introduced in my book Beyond the Square Crochet Motifs as a way to improve the look of the beginning of a round. Chapter 1 of the book described a lot of different ways to improve your crochet technique. I write about the standing dc in today’s post.
Motif Afghan Crochet-Along: Crochet Techniques, Part I | Lion Brand Notebook
[…] Motif Afghan Crochet-Along: You’re the Designer […]
Christine
Oh my gosh I love the sliding loop!!! I’d seen my best friend use it before, but she never got around to showing me. It’s so easy and convenient! Thank you for the instructions!!!
Christine
Rita
Hello Everyone, when I make the sliding loop, I am left with the big loop, which is the second line, I still get a tight closure, but end up with that loop in the middle plus the string. It does look great, the closure, but I was wondering if anyone had any suggestions for getting rid of the second loop like in the pictures?
Edie says: Make sure that you are tightening the loop as a 3-step process. First, pull the tail to tighten the first strand, but not so far that you can’t get your fingers in for the next step. Second, pull that tightened strand so that your big loop disappears. Finally, pull the tail once more to close it all up.
Also, make sure that you are working the first round into the doubled loop, not just into one loop.
London Loft Conversion Experts
London Loft Conversion Experts…
[…]Motif Afghan Crochet-Along: You’re the Designer | Lion Brand Notebook[…]…
akron printing. akron printer
akron printing. akron printer…
[…]Motif Afghan Crochet-Along: You’re the Designer | Lion Brand Notebook[…]…