
by Tamara Kelly, www.mooglyblog.com
Ready to jump into a pattern that’s a little spicy? Lion Brand’s Celtic Afghan might be just what you are looking for! The linen colored cables might say traditional, but crocheting one is full of adventure – and I’m here to help walk you through it!

First things first – you WILL need to be able to read a pattern to make the Celtic Afghan. So click here to go to the pattern, and print it out. It’s not written in the traditional manner, which at first might throw you off, but once you read it through, it turns out to be broken down in a very smart way!
There are 3 cable patterns used in the Celtic Afghan. But before you get caught up in those, you will want to take your Vanna’s Choice and favorite 9mm hook, and make the Foundation Row – 119 double crochets.
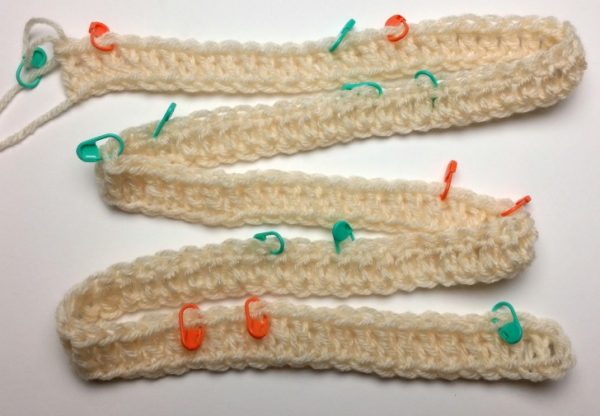
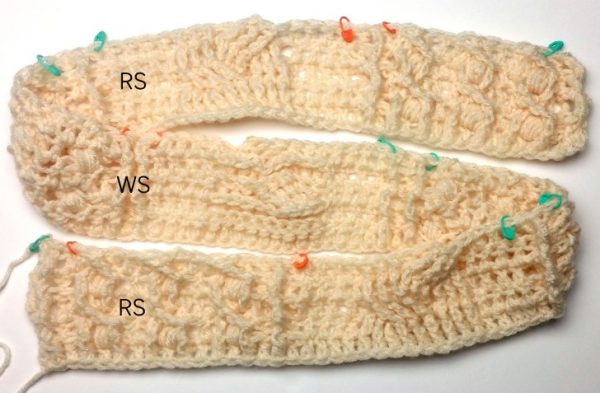
See all those stitch markers? They aren’t listed in the pattern , but they are going to make it so much easier! Place the stitch markers on the following stitches, starting from either end of the row: 3, 14, 17, 34, 37, 48, 51, 68, 71, 82, 85, 102, 105, and 116.
If you look at these stitch markers, they are all either 3, 11, or 17 sts apart. These mark the different Cable Patterns. Cable Pattern 1 is 3 sts, Cable Pattern 2 is 11 sts, and Cable Pattern 3 is 17 sts. And now you can tell at a glance which section is next as you work!
Every row begins and ends with a Cable Pattern 1 (3 sts) section, and there are always Cable Pattern 1 sections between any Cable Pattern 2 and Cable Pattern 3 sections. But keep in mind that the very first st of each row is replaced with a ch 3, so you’ll start each row with the 2nd stitch of Cable Pattern 1.
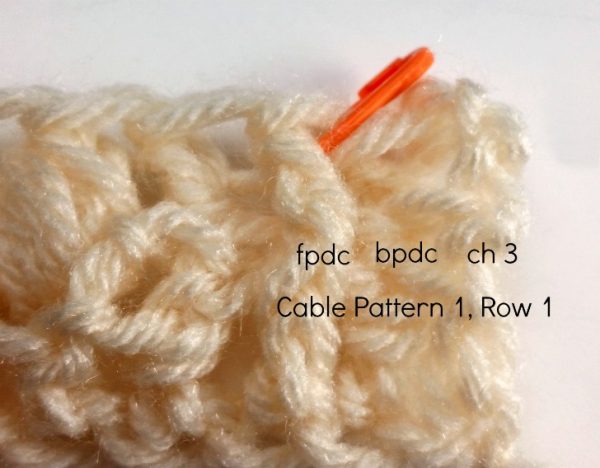
Ready to begin? Get the 3rd page of the PDF in front of you, and look at the top where it has the PATTERN STITCHES section. You are going to start with the ch 3, then work the bpdc around the 2nd st of the row, then fpdc around the 3rd stitch. This Cable Pattern 1 Row 1.
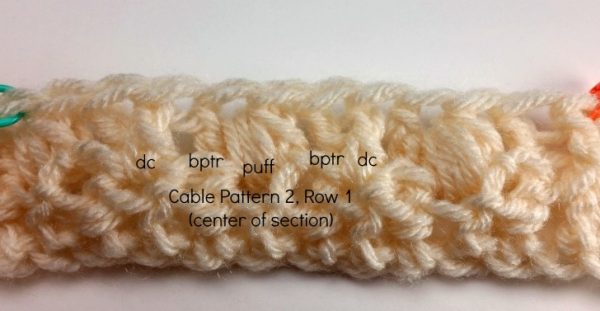
Next is a section of 11 sts, so you know it’s time for Cable Pattern 2 Row 1!
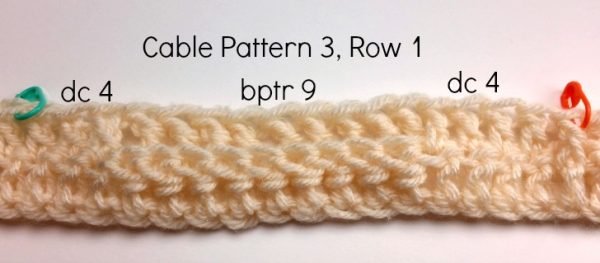
Continue across, working the Row 1 instructions for each section – the stitch markers will tell you what section is next. Just be sure to move them up as you go! Then Row 2, and on through Row 4.
It might sound overwhelming, and some of the stitches are a little complicated. There are not just regular front post and back post stitches, but there’s also a big puff and a fptrcross – which I know I had to read through a few times before I got it! So I made a video featuring all 3 of the Cable Patterns, and all 4 rows of the pattern. It’s much easier to understand them in action!
After the first 4 row repeat, it should look like this:
You can see the stitch pattern coming together, and those gorgeous cables are off and running! To continue the blanket, just repeat Rows 1-4 of the Cable Patterns until your blanket is about 59 1/2 inches long – or whatever length you like! To finish it off, just ch 3 and dc across.
You can add a border if you like, but there isn’t one listed in the pattern, so this is a great place to add your personal touch to the blanket. And your own Celtic Afghan is sure to be an heirloom the family will treasure! I hope you enjoy making it!
Carole Dorrian
Hi. On the second row 17 stitch section, I notice you are saying ” skip 3 stitches and do 3 front post DOUBLE crochets in the next 3 stitches” but you appear to be doing front post TREBLES. I am finding this a little confusing, can you clear it up for me please?
Emily
Hi! Thanks so much for the wonderful tutorial!
I am about 10 inches into the pattern, and my cables on cable pattern 2 will NOT lay flat.
I’ve ripped out and reworked them, following the tutorial closely, and it looks exactly like the tutorial – except that, once I’ve worked the next row or two, the bptr into the cable posts on the previous row mush together around the puff. So, instead of beautiful, oval-shaped cables that frame the puff stitches, I have more squished, diamond-shaped cables that lay right next to them.
I tried contacting LB pattern support a few months ago, but never heard back.
Are there any other resources available for this pattern?
Thanks – I’d love to finish this project!
Cindy Manley
I have spent several hours studying the pattern chart (even blowing it up from the PDF size to be big enough to see more detail) and watching the video several times. There are DOUBLE Front Post stitches shown in row 2 but not in row 3 as a part of the 9 “twist” group. I think the DCFPs are better in the pattern–makes the twist straighten and lie flatter.
Cindy Manley
Oops, my prior post should have dealt with rows 2 and 4 (not 3 as I said.)
Gina Gorman
Hi. I would love to try this pattern but could you please tell me how many chains you used in the foundation row of you mini blanket in the video? I find perfecting the pattern on a smaller scale is the best way for me to learn. Thank you in advance!
Gina