
Nothing says autumn quite like cables. This classic knitting technique utilizes a cable needle to help you knit your stitches in a different order, thereby creating a twist or cable. Here’s a quick demonstration of how to use a cable needle.
 |
I’m going to cross the two right stitches over the front of the two left stitches (also known as a 2/2 front cross). However, the technique is the same for every type of cable. |
 |
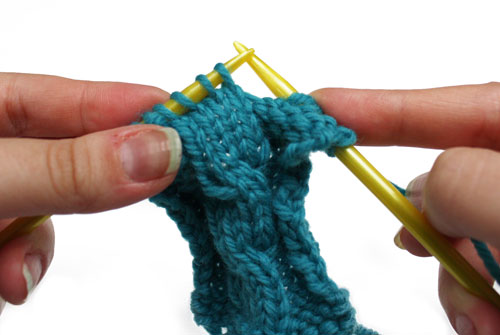
Carefully slide the stitches that you want to move onto your cable needle. Make sure you do this purlwise to keep your stitches straight. Because I’m crossing two stitches in front, I’ll slide them onto the needle. |
 |
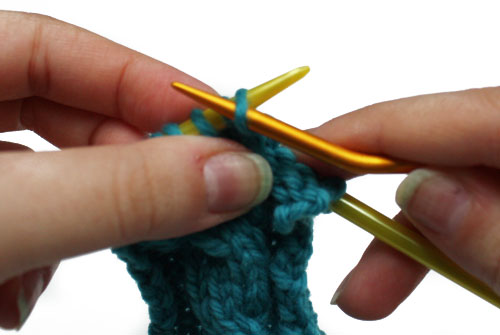
Now that the stitches are on my cable needle, I’m going to place it the direction I want the stitches to go. Because I’m crossing my stitches in front of the others, I’m placing the cable needle in front. |
 |
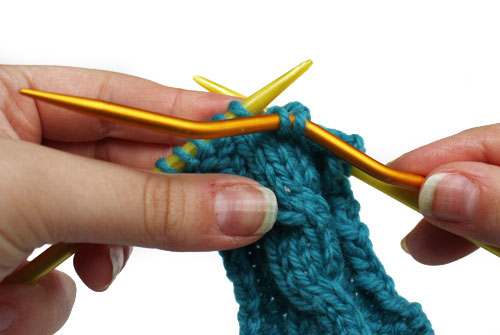
Now I briefly ignore the stitches on the cable needle and return to my left needle. I knit the next two stitches (which will make them appear in the back of my cable). |
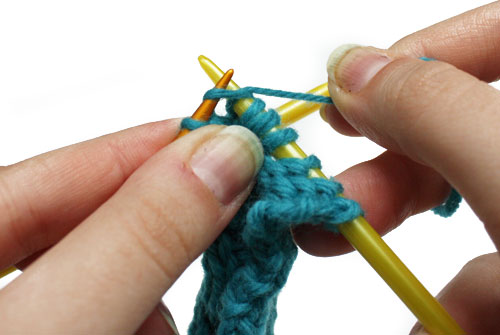 |
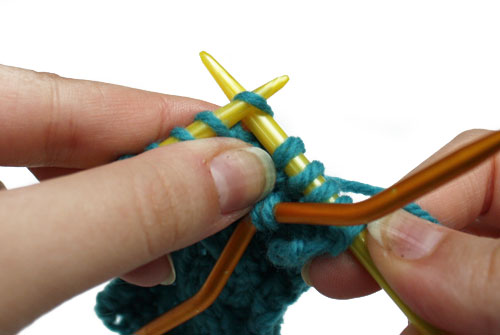
Now I return to my cable needle. You can either return these stitches to the left needle or knit them directly from the cable needle. I’m knitting these two stitches straight from the needle. |
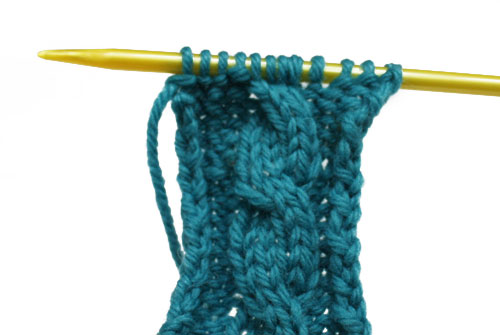 |
After you’ve knit the stitches from the cable needle, place the needle aside and continue your pattern. Congratulations, you’ve cabled! |
And that’s all there is to using a cable needle! What a handy little tool. Want to practice your cabling? Try swatching the various cables available on our StitchFinder!
You must be <a href="https://blog.lionbrand.com/wp-login.php?redirect_to=https%3A%2F%2Fblog.lionbrand.com%2Fhow-to-use-a-cable-needle%2F">logged in</a> to post a comment.
Juli Williams
I love my cable needles. The first scarf I designed had a cabled border.
Sally
I’ve been building up the courage to do cable – and now I see it’s not as complicated as I thought!
Tepeecreek
I tried this and thought I was doing great; but when I looked at it, I saw that there is a space/hole between the cabled stitches. I did it over and over and could not eliminate this.
Anonymous
This does happen sometimes. Try to keep the stitches the same tension; if you pull harder to try to fix the holes, you may make the holes larger. I find that blocking my cables usually helps correct the tension and make the holes smaller. Hope that helps!
Jennifer Best
Ohh you make it look and sound so easy!
Anonymous
It really is, Jennifer! Give it a try!
Jennylohr11
Okay, then on the purl side, what do you do??
Anonymous
Hi, Jenny. It really depends on the pattern. In most patterns, you’ll only be doing a cable stitch only on the right side every few rows. The rows in between are traditionally worked in stockinette. Let’s take this cable as an example: http://cache.lionbrand.com/faq/298.html?www=1&lbc=&language=En You work the cable row once every 16 rows, and the rows in between are worked in stockinette. I hope that helps. 🙂
Cee
So what I would really like to learn is how to do a cable ~without~ using a third needle.
Anonymous
I’ve got a post in the works right now. 🙂 Keep an eye on the blog!
Birdie
so glad I clicked on this – have been wanting to cable too and thought it was too hard – i’m going for it now!
Anonymous
Glad to hear it, Birdie!
How to Cable Without a Cable Needle | Lion Brand Notebook
[…] that you’ve learned to use a cable needle, what do you do if you want to start a cabled project and don’t have a cable needle on hand? […]
Knit Some Cozy Cables This Season | Lion Brand Notebook
[…] problems with cabling? Be sure to check out our previous instructional posts on “How to Use a Cable Needle“. While you’re at it, learn “How to Cable Without Needles” as […]
love quotes for him from her
love quotes for him from her…
[…]How to Use a Cable Needle | Lion Brand Notebook[…]…
Great article. Thanks for sharing!
Great article. Thanks for sharing!…
[…]How to Use a Cable Needle | Lion Brand Notebook[…]…
5 Stitch Techniques: Feat. 10 Patterns | Lion Brand Notebook
[…] surprise you with how easy they are to master. Simply switch the order of the stitches knit–with a cable needle or […]
The Basics of Knitting Cables | Lion Brand Notebook
[…] How to Use a Cable Needle […]