Last week, I discussed directional decreases for knitting. Of course, there are also many types of increases you can use to create shaping.

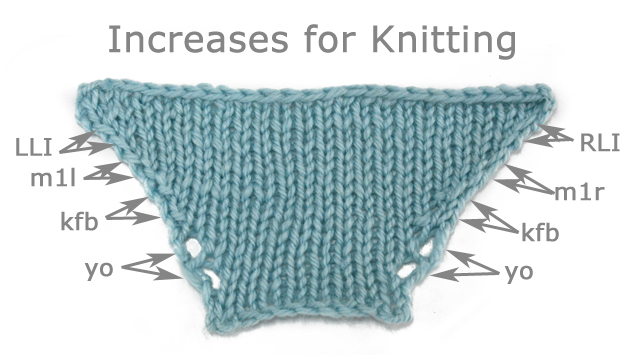
Let’s go over the increases, starting with the bottom. The yarn over (yo) increase is a great decorative option that works well on either side of your work. Keep in mind that the finished stitch leaves an eyelet.
The knit in front and back (kfb) increase is also referred to as a bar increase. The completed increase appears to be your regular knit stitch on the right, plus a new purl stitch on the left. Because the new stitch is formed to the left, your original knit stitch will slant a little to the right. Despite this, the kfb is a quick, simple increase that works on either side.
For directional increases, I most often use make 1 right (m1r) and make 1 left (m1l). These variations of the make 1 increase create smooth, almost invisible increases that mirror each other very well. That’s why they’re my go-to increases.
Another option for directional increases is a lifted increase. The right lifted increases (RLI) and left lifted increase (LLI) have similar results to the make 1 increases, so they’re a great choice if you’re doing increases every few rows. However, I’d advise against them if you’re increases every right side row, as this increase can create some puckering and a noticeable line when used on every other row.
While there are other knitting increases, I find that these 4 techniques get me through most situations. Now you know how each increase looks, so when your knitting pattern calls for a vague “increase 1 stitch”, you can make your stitch selection with confidence.
Related links:
You must be <a href="https://blog.lionbrand.com/wp-login.php?redirect_to=https%3A%2F%2Fblog.lionbrand.com%2Fincreases-for-knitting%2F">logged in</a> to post a comment.