Sister and brother duo, Elizabeth and Robby Miracle, first created this dyeing series for a Lion Brand newsletter several years ago. Although that newsletter is no longer around, we loved the idea of making kitchen-safe dyes so much, that we’ve updated it and reprinted the series here.
Creating your own dyes can be a fun and exciting way to personalize projects. This month, we show you how to make all-natural dyes and use them with different cotton and wool yarns.
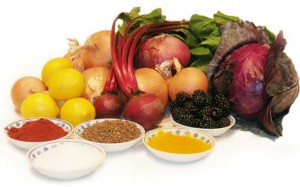
We used only edible items purchased at our local market, boiling water (and in some cases, salt or vinegar) to make beautiful, all-natural dyes.
After trying our dyes, you will probably want to experiment with other natural food dyes of your own. Start by using fruits or vegetables that stain and experiment! You can mix dye baths to make different colors. You will probably find, as we did, that the colors are all — surprise — “earth” tones!
Because this project requires boiling water, adult supervision is required.
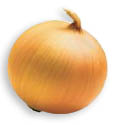
Dye Bath Using Skins of Yellow Onions
This quantity of dye will easily color 2 skeins of LB Collection Pure Wool or , 2 skeins of Nature’s Choice Organic Cotton. Other options include: Alpine Wool, Fishermen’s Wool, LB Collection Organic Wool, LB Collection Superwash Merino, Martha Stewart Crafts™ Merino, Martha Stewart Crafts™ Roving Wool, Martha Stewart Crafts™ Cotton Hemp, Kitchen Cotton. Click here to see all Lion Brand yarns.
 |
 |
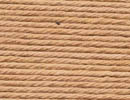
| Dyed Cotton |
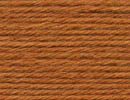
Dyed Wool |
Ingredients:
Skins of 2 dozen yellow onions
4 tbsp salt
3 quarts water
Bring onion skins and water to a boil in a stainless steel or enamel pan and simmer for 1 hour, stirring occasionally. The mixture will reduce in volume by about a third while boiling. As the dye bath gains color, you’ll see the skins becoming flexible and much more pale.
At the end of the hour, remove the onion skins from the water. Pour it through the fine mesh strainer into some other receptacle, clean any scum or remaining matter from the pan and put the strained dye back into it. Add the salt.
Your dye bath is now ready.
- Bundle the yarn for dying into a hank. It needs to be looped in such a way that the dye will be able to circulate freely but also needs to be secured so it does not tangle. If you do not do this, you’ll spend a lot of time untangling it when it is wet. Bundling turned out to be particularly important for wool yarn, which will felt together if allowed to move during dying. Here is how we made the bundles:
- Wind the yarn into large loop. You can do this on a swift or by wrapping it around the back of a chair or by wrapping it around your forearm from your fingers, under your elbow and back up again.
- Secure the wound yarn by tying it loosely in two places with short pieces of yarn.
- If your pan is small, double the loop, twisting it into a smaller circle and securing it with two more short pieces of yarn.

- Bring the dye bath to a boil;
- Dampen the yarn by dipping it in water and wringing it out well. This will help the dye spread smoothly through the yarn.
- Place the yarn in the dye bath.
- Cook for one hour. If the dye bath evaporates to a point where the yarn is not covered with dye, add more water. We did not find that cooking the yarn for more than an hour made the color darker.
- If you want to test your color during processing, remove the yarn from the bath and rinse it. If you like the color, great, if not, put it back for more processing time.
- When the yarn is finished simmering, remove it from the bath and rinse it in cool water until the water runs clear. Do NOT throw out the dye bath until the yarn has dried completely and you know you are happy with the color. Note: When rinsing the yarn, use soap as well as water. It is better to find out that your yarn is not color-fast now than later when you’ve made it into something.
- Wring out the yarn.
- Cut the second set of ties on the yarn, but leave the first ones in so that the yarn is in a big loop.
- If you are dying wool yarn, put it back on the swift or chair or whatever you used when winding it originally, rewind it into a ball and then rewind it back into its loop. This is because some of the strands may have felted together slightly. The winding process will unfelt anything that felted and we found it much easier to unfelt the yarn when it was damp.
- In all cases, hang the yarn up to dry.
 Notes:
We found that the cotton did not accept this dye color as well as the wool, but it is a beautiful, creamy beige. The color of both cotton and wool dyed in this dye is similar color to the Red Onion Skin Dye, but the color is slightly warmer in tone.

Leslie
I enjoy dying with onion skins. My process is the same. I get my skins from the grocery store when they clean out the onion bin. Pounds at a time. Make friends with your produce guy! He also saves purple cabbage leaves for me.
Nausheen
Wow what fun! And so easy. Thank you for sharing this.
Estelle Hendrickson
If you live in an area where you can get to a West Indian or Hispanic grocery try to get Sorrel flowers or what is called Fleur de Jamaica petals. The red color is outstanding and so bright, just boil the petals as you would using the onion skins and follow the instructions from there.
Tina Leftwich
My Mom taught my sister and me how to use onion skins to dye our Easter Eggs as children. If you wrap the skins around the the egg, seal up with aluminum foil and boil as you would for hard-boiled, they turn out a lovely marbled texture. We always foil wrapped a few and then put a few in the water unwrapped as the ‘dye’ that leaked out of the wrapping would turn the loose eggs a solid golden yellow.
Lois
My Grandmother used onion skins to dye her white/gray hair blonde/ yellow, before hair dyes.