Designer and teacher Heather Lodinsky joins us to share tips on reading your knitting.
For the last two decades, I have been a freelance designer writing patterns for knitters and crocheters. For just as long, I have taught knitting at my local yarn shop three times a week here in Buffalo, New York. These two jobs of mine have always complemented each other. Knitters (and want-to-be knitters) walk in for instruction and help with their projects. I always want the knitters that come to my class to be happy with their knitting and not feel the urge to throw their projects in the back of a closet to become a so-called “UFO” (Unfinished Object). From the very start, I like to get students familiar with “reading” their knitting, so that they can identify what stitches they are working, understand what they have already done and know where they are going with their knitting. Think of this “reading” or identifying your stitches as your own knitting “GPS”…or compass for those of us “pre-techies”.
Probably the most amazing revelation for me as a knitter was when I realized (after many years of knitting) that the knit stitch and the purl stitch are the exact same stitch—but they are done on the opposite sides of the fabric. We are taught as knitters that if you knit every row you will get that wonderful, reversible ridge fabric named “garter” stitch—shown below.
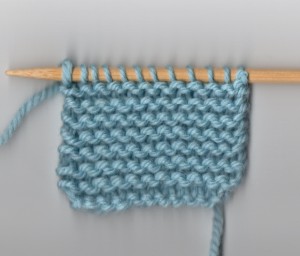
So, what happens when we purl every row? Garter Stitch again!
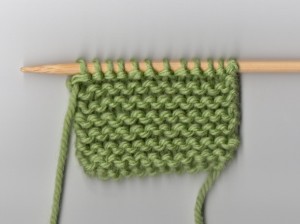
We usually are taught to think of knitting and purling as two different stitches. This could be because working a knit stitch versus a purl stitch just seems so different. In reality, the knit stitch places the “bump” (or top) of the stitch that is knit to the back of your work, and the purl stitch brings that bump to the front. So why is it so much easier to for most of us to learn a knit stitch than a purl? Well, my guess is that most of what we do in our daily lives is done with our hands pointing things away from us; whereas in purling, we point our needles towards us. Once my students are familiar and comfortable with knitting, I then show them purling. After that, we knit and purl in the same row and learn how to “read” stitches. Understanding and identifying your stitches is probably one of the most empowering skills a knitter can have to make and keep knitting enjoyable.
So let’s look at what we call the knit stitch the purl stitch. A stitch that is knitted will have a smooth “V” at its base, whereas a stitch that is purled will have a bump at its base. One of my knitting students told me that the way she could identify a “purl” stitch is that it looks like it is wearing a “pearl” necklace! A different spelling, but I thought it was a great way of identifying your stitches!
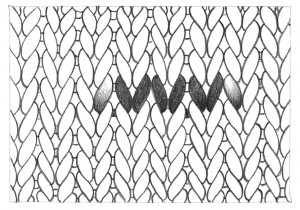
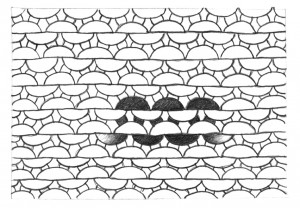
How can identifying or “reading” your stitches help you with your knitting projects? Recognizing your knits and purls can help you know what you need to do in your next row, or show you what you did in your last row. Ribbing is one of those stitch patterns where we line up the knit and purl stitches – as they appear. It can be confusing when a pattern says to “knit the knit stitches and purl the purl stitches”. What this means is to work the stitches as they appear on the next row you will work – not how you worked them on the previous row. So, when you look at the row ahead of you, you would knit the stitches that appear as knit stitches (smooth), and purl the stitches that appear as purl stitches (bumps).
Here is what we call “1×1” ribbing – where we knit the knit stitches and purl the purl stitches – as they appear:
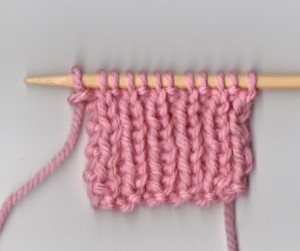
Below is a stitch many of us have tried – the seed stitch. Still a knit1, purl1 pattern – but this time, we knit the purl stitches and purl the knit stitches…as they appear!
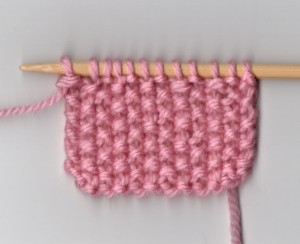
Both the ribbing and seed stitch patterns shown above create a totally reversible fabric. Let’s look at a rib stitch that is different on the right side versus the wrong side. So, let’s see what a “knit 1, purl 2” ribbing looks like on the right side:
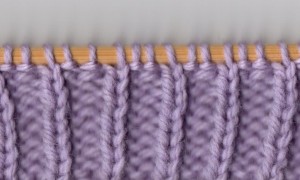
Now for the wrong (back) side, there are 2 knit stitches and 1 purl stitch:
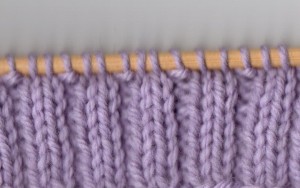
This pattern is an excellent example of where “reading” your stitches will help you greatly to know what stitch to work next. It is very easy to lose track of where you are in a pattern repeat, or to see if you did it correctly. By going back to the beginning of row you are working and reading the sequence of stitches, you can see where you are in a pattern repeat. Or reading from the beginning of the previous row can show you where you made a mistake that needs to be fixed.
As a pattern writer, I know the importance of the written word in communicating a design. As a knitting teacher, I know that learning how to “free” yourself from constantly depending on a pattern for every stitch is also so important to allow a knitter to enjoy their project and look forward to the next!
—
Heather Lodinsky last wrote about knit and crochet cables for the Lion Brand Notebook. Learn more about her and her book, 150 Knit & Crochet Motifs, in this blog post.
sewgrannysue
very helpful for me, a beginning knitter!!!
Delita Kiggen
The stitch that you call seed stitch I have always known it to be “Moss Stitch”.
Zontee
That’s a difference between US and UK terminology. Seed stitch in America is 1×1 alternating of knits and purls. Moss stitch in America is 2×2 alternating of knits and purls. I believe in the UK the 2×2 alternating is simply called “double moss stitch.” Hope that helps!
ez4u2sa
great reference. only been knitting a few years i need to advance and do my complicated items. where in buffalo are you located
Marla Barr Renner
Learning to read your stitches is helpful if you need to make a correction on a previous row. I hate unknitting to get to a stitch that should have been a knit and not a purl or a purl and not a knit. Simply turn your work around to the back and undo the wrong stitch and redo it correctly. Turn your work around to the front and continue knitting.
sue
I would love more information on how to do this! Don’t really understand.
kathie
I would also like more of an explanation on how to do this. It sound’s terrific.
Diane
I don’t understand how you can do that without un-knitting back to the mistake.
Lynne Govers
To “undo the wrong stitch and redo it correctly,” knit to where you are just above the incorrect stitch. Then turn the work so that the stockinette side is facing you, if necessary. Then let the topmost stitch fall off your needle and “run” down to the incorrect stitch. Use a crochet hook to pick up the loop correctly and, leaving the crochet hook in the work, grab the next ladder bar up, loop it through your newly corrected stitch, then continue looping the bars all the way up to the top of your work. Put the last stitch onto the left hand needle and continue knitting to the end of the row. This works best with plain stockinette knitting, but can be adapted to pattern knitting.
sue
Gotcha! Thanks, I will definitely try it next time this type of mistake happens to me.
Norma Hunt
when one realizes its the same stitch one can then go on when doing long bouts of stocking stitch use the european methofd , back and forth with out turning takes a little practice to get tension but so worth it time saving.making plain sweaters and afgans go by.
fab
Funny thing is that I am learning to use a knook and had only done crochet before. It is just in the last few days that I realized I could do a rib by following the stitches from the prior row. This has been very helpful in moving on to pattern stitches.
Lancsjewels
This was great, learning to read stitches is very helpful, especially as I am a new comer to knitting. Thank you
Maura Hart
that was a great post, very clear and helpful. now for a dumb question. what the heck is
reverse stockinette??? thank you!
Zontee
Hi Maura, reverse stockinette is simply when the purl-bump side of the fabric (the right illustration shown in the blog post) is showing on the “right side” (public or outward facing) side of the fabric. It’s literally the reverse side of stockinette stitch. Hope that helps!
Minaxi
this was SO beyond helpful. I’ve been knitting for a few years now, off and on. I have noticed that I’m hesitant to take on more complex projects for fear of not knowing how to knit when I should be purling, etc. Reading stitches is so obvious but hasn’t really been taught to me over the years no matter where I took a class. So thank you for this – it really helped!
Zontee
Glad to hear it, Minaxi! I’d also encourage you to check out our online video class as another resource: http://www.lionbrand.com/6030/PictPage/1922259251.html
Pjake
Okay, I am 63, have knitted for years and can ‘t tell you how many objects I have torn out because of confusion. This is the absolute BEST thing I have ever seen and I could actually understand everything she wrote in this explanation. Kudos to her, wish I could be in her class, as I know I would understand every single thing she would be teaching. Thanks for sharing.
Zontee
Glad you enjoyed it, Pjake! I’d also encourage you to check out our online video class as another resource that you might like: http://www.lionbrand.com/6030/PictPage/1922259251.html
wendy
This Packed with lots of great information. This was also very helpful way to figure out how to count number in a stitch design. I suggest book mark these instructions since will always be a
good reference tool in future .
Chris
I knit the continental way and have trouble following directions for anything beyond the basic stitches. Are there any directions, with illustrations, for cable stitches etc using the continental stitch?
demelzabunny
I knit continental, too. The trick to figuring out diagrams/pictures that show instructions for English/American-style knitting is to understand that the working yarn that is being used to form new stitches is the same string of yarn that we are holding to the left; it’s just being held to the right. So you need to analyze what’s going on before and after whatever stitch is being made, and pay attention to where and how the yarn is being looped around the needle(s). I do cabling w/no problem as a continental knitter, because the instructions just tell you to knit, or slip stitches onto the cable needle (cn), hold it to the front or back, etc. You won’t have any problem cabling as a con. knitter, trust me.
Arcrawfo
I like to knit continental for large sections too – not so much for lace or cable work. The way I understand it, and the way I’ve taught others, is that it’s the yarn that’s held at the front (purling) or back (knitting) of the work. I did once talk about needles pointing one way or another, but the children I was teaching got very confused with their sore wrists and extra effort at coordination. I teach it to the kids by looking at purl stitches and seeing how the little loop is the connection bw each stitch and we’re just changing whether it appears on the front or back.
Like demelzabunny said, when I have used continental for lace or cable work, I haven’t read the pattern any differently to when I knitted English style, becuase the stitches aren’t changed by the style of knitting. I did find, however, that in English style I had been using the yarn to hold worked stitches in place while I fiddled around with the next stitch and this was something continental style didn’t support. I had to work with a looser tension and in a relaxed manner in Continental – probably a good thing 🙂
Joan in the Deep South
Thank you! I am a self taught beginning knitter. I am so happy that this is so understandable to me. Wishing that I could come to one of the classes you offer!
Zontee
Hi Joan, Lion Brand does offer a great class online called “The Knitting Doctor: Mistakes and How to Fix Them” that you might enjoy: http://www.lionbrand.com/6030/PictPage/1922259251.html
Carrellli
Marvelous! It’s the way I learned years ago, and the way I teach knitting, too. It’s the only way to recognize where you are, what you should do next, and how to fix a boo-boo!
purplelady
I like the way you put about people that put in the back of the closet is called a ufo. Also the part that was said about a purl stitch look like a pearl necklace. I am not sure that I see that but it is interesting.
Rosebug
This is great. It is the very question I had tonight with my knitting (as a beginner). It was so clear that now I can pay attention to what is front and back/ knit and purl. Thank you.
Linda
I thought this article was informative and helpful. But I have a question about the way American patterns are written. The German patterns are so much easier to understand. They show a diagram with symbols, as well as the written pattern. As long as they are translated, they are so much easier to read and to understand. I think that more people would take up the craft if the patterns were easier to read.
PixelPopstar
this is a great start. thanks so much.
laura
Well written and very easy to follow. A great help to many of us! Thaks!
Gmama
I wish I lived close to her shop. She sounds like the type teacher I would love to have.
seashore
Very easy to understand. I wish she would continue to share more. Like I had purled
a stitch and it needed to be knitted. I was trying to do that without going two rows back.
I could not do it. What did I do wrong?
Elaine Sigmon
Thank you so much for this article. It is indeed very helpful. I am mostly a crocheted but dabbling in the knitting world. I was hoping you would tell us how to count the rows. I have a hard time counting where I left off. Any thoughts? Thanks again.
Denise
Great explanation…would you please do the same regarding how to count your rows.
larhah
When counting rows, I always just count the v’s, skipping the cast-on row (or if it’s from the middle of a piece, skipping the row where the pattern changed), and counting the row still on the needles. Sometimes this requires some thinking, and it doesn’t help much if there are no straight lines of knit or purled stitches, but it has seemed to be quite accurate when there are. Bear in mind that from the right side, if a stitch looks like a bump, it will have a v on the wrong side, so you can sometimes use a column of purl stitches to count with.
I know it’s not as clear as the author’s explanation was, but maybe this will help someone.
Carol
I agree with Denise…your article was wonderful and I would love to see an article on row counting too.
Emily Ross
I also would appreciate an article on row counting! Thank you!
Gram
This is a great explanation for anyone who loves to knit. I had to spend a lot of time figuring this out on my own. I wish I’d had access to your article several years ago – very helpful. As a former educator, I can say that you have a talent for teaching others!
NormaJean Golus
Where is her shop in Buffalo?
Zontee
Hi NormaJean, Heather teaches at the lovely Elmwood Yarn Shop in Buffalo.
Mrs K
I wish this same teacher would write about gauge. She writes clearly.
Zontee
Hi there, while Heather hasn’t written specifically about gauge, we do have several blog posts and articles that might be helpful to you:
http://blog.lionbrand.com/2012/05/14/gauge-swatch-101-how-to-make-and-measure-your-swatch/
http://blog.lionbrand.com/2009/12/03/swatch-this/
rose
i manage to teach crochet to seniors here in colorado, i wish you would print an article like this only a crochet version. t/u…………rose
Anne Roberts
I love this. I have been knitting for years (and years and years) and would actually like a post about how to count rows – especially garter stitch. I don’t know why, but whenever I’m trying to count garter stitch rows, I get lost and have to go back to my gauge swatch to measure it, then measure my knitting to hopefully get the right amount of rows (I also have this issue on stocking stitch, but not quite as badly). I think with the garter stitch all those waves up and down with the stitches makes me dizzy!
easyreader50
I, too need to knopw how to count rows w/o getting confused. I did not know about the seed stitch. I’ll have to try it.
kathy
Perfect! Thank you so much. An explanation that can be understood. Wish there were more teachers like you Heather!
Pottsy29
Thank you, that was very helpful. I, too, would like to know how best to count rows.
Joanne
Very helpful. I just recently returned to knitting and crocheting. I am mainly a crocheter but am trying to switch up. I mainly do very easy shawls, blankets, etc. I have a very hard time reading patterns.
Esther
This is great. Very clear writing and with the pictures, it is easy to identify the knit and purl stitches. Thank you so much. This really helps me to understand what to look for while knitting.
Bonni
I am fortunate that I live almost around the corner from the yarn shop. Whenever I have a problem with my knitting she is there to help; Tues. & Fri. And I get to chat with other knitters. Sometimes I just chat. Heather is so PATIENT! And the yarn in the shop is fabulous.
Zontee
Thanks for sharing, Bonni!
Peggy
I would love to know what I am doing wrong if my gauge is correct for number of stitches per inch but my row count is wrong either not enough rows per gauge or too many, it must be a tension thing but how do you improve your ability to meet the gauge requirements?
Zontee
Hi Peggy, most knitters (and crocheters) will find that they may match stitch count, but not row count. For most patterns, stitch count is more important because the stitch count will determine the width and the pattern will state to knit a certain number of inches (not a certain amount of rows), but for patterns that are worked side-to-side (where each row builds the height of the piece), the row count will be more important because it will determine the width. (For instance, a sweater made traditionally, the stitch count will give you the bust measurement, whereas a sweater made from sleeve to sleeve, the row count will determine your bust measurement.)
Some knitters find that switching needle material (bamboo, plastic, aluminum, steel) will change their gauge just enough, but if you can’t, simply keep in mind which part of the gauge is the most important for your particular pattern based on how it’s made. Hope that helps!
bigpat
I’ve been knitting for 55 years and I’ve recently discovered that I purl incorrectly!!! Working English style, I bring my yarn to the front of my work and wrap my stitch counter-clockwise instead of clockwise like the knit stitch. It gives my knit (smooth) side a twisted ‘V’, but it is so consistant that it doesn’t effect my gauge or ability to follow a pattern. I recently completed an Aran sweater for my husband and showed it to experts in Ireland and they didn’t even notice my “flawed” purl stitches. I’ve been able to “read” my stitches for decades, but counting rows can be daunting. A tutorial on that issue would be most welcome.
bigpat
Woops! Reverse those stitch rotations. The knit is counter and the purl is clock.
tondapuss
I remember when I learned this. The light bulb went on. I’m teaching a friend to knit and this is a great explanation. Thanks! Would love to see more articles.
Zontee
Hi tondapuss, you can find more articles from Heather specifically here:
http://blog.lionbrand.com/author/heather/
Or simply keep visiting our blog for many more articles!
Barbara
Thank you, very simply explained!!
Verna
Verna
Great explanation–my nemisis is picking up dropped stitches or having to pick up stitches if I notice a mistake and have ripped out stitches. Help!
Zontee
Hi Verna, check out this blog post that might help:
http://blog.lionbrand.com/2011/09/06/did-you-know-how-to-fix-knitting-without-frogging/
Also, you may want to check out our great online class about fixing mistakes:
http://www.lionbrand.com/6030/PictPage/1922259251.html
Pauline
Love your explaination. I live in the Buffalo, NY area where is your shop. Not many shops in this area.
Zontee
Hi Pauline, Heather teaches at the lovely Elmwood Yarn Shop.
Janet
Thank you so much for this clear explanation and the accompanying pictures. I am just teaching myself to knit, so this is a priceless help.
Lyn Meadows
This is one of the best articles I have read in a quite a while. I wish you taught near where I live. THank so much for this. I will be prinitng it out and showing it to all of my friends.
Zontee
Hi Lyn, glad you enjoyed it! You may also want to consider our great online class that covers fixes for the most common mistakes made in knitting:
http://www.lionbrand.com/6030/PictPage/1922259251.html
Rachel
Easily understood. But can you please tell me if there is a way of fixing an error , for example i was doing a cable scarf , and then when i got it again to continue , i later noticed that continued my knitting on the wrong end and by then i had quite a foot long done. Is there a way of taking it apart and continue on the row where i began wrong?
Zontee
Hi Rachel, the best way is to string a “life line” into your project. You’ll grab a circular needle a size or two smaller than your project’s needles, find the row below the problem and thread the circular needle slowly across, into all the stitches in that row. Then you’ll rip back your project down to that needle (the needle will catch all those stitches that have been threaded onto it), and then you can knit those stitches off of the circular needle onto your regular needle and continue.
For more lessons in common mistakes in knitting, you may also be interested in our online class: http://www.lionbrand.com/6030/PictPage/1922259251.html
Suzanne
Good learning tool…thanks.
Pat Shaw
I liked how everything was so easy to understand here, too. But I need to see how to pick up dropped stitches. I try to look through books on how to do this but mine always look terrible after trying. I can’t seem to do it correctly on knitted or purled rows at all!
Zontee
Hi Pat, there are some great videos from knitters on YouTube.com that might help you. You may also want to consider our online class on fixing common knitting mistakes, including dropped stitches in both knit and purl: http://www.lionbrand.com/6030/PictPage/1922259251.html
Ted
It’s generally easier to reconstruct dropped stitches on the knit side, especially if they “escaped” and ran several rows. If several stitches have been dropped (cat grabbed work while it was set aside, perhaps! ☺), do one column at a time, from R to L if right-handed. The chaos quickly resolves as the top stitches are placed back on the needle. Instead of a disaster, you get a better “feel” for how your fabric is being formed.
Jeenootz
Yes, we need a tutorial on counting knitted rows/stitches.
Lavon Smith
My mother taught me how to knit and crochet when I was around 12 (I am now 71). I have had a lot of practice and prefer knitting. The above “class” was very interesting. I knew what she was talking about but now had a context to put it in. Very good information. I help ladies from time to time and this is quite valuable. Thank you. PS: I also would like info on counting rows. It is still hit or miss for me.
TCB Created by Design
So many of you are asking about row counting. Here is a trick I use to keep me on track. I knitted a queen-size afghan in the elongated chevron, which required counting stitches in the pattern repeats and the rows, too. There were 19 rows in each repeat. I used a row counter (little red box – clicked once for each row completed). But to keep truly on track, I used the stitch markers that look like little padlocks. On every 19th row, I placed a stitch marker. That way, at the edge of the work, I could count rows along the selvedge edge from the marker to the row on the needles. I included the row on the needles in the row count because that row was already worked, too.
TCB Created by Design
In my explanation about row counting in the elongated chevron pattern, I mis-spoke…sorry. I do not count the row on the needles because it has not been worked. The exception is if I am in the middle of the row – being right-handed, I would count the row on my right needle because those stitches were worked for that row.
cqd.chin
I am new to knitting and …I thought It was just me…..lol.
Best explanation ever!!!!!
Myrna
Such useful information – so clearly written. Thanks.
Jean
This is excellent and great examples! Thanks, now I can move ahead with my grandson’s sweater.
Grannyo
Thank you for this article. Like othersI found Heather’s writing so much easier to follow, than most others I have read. In addition, I found the comments from other readers also inspiring, with many giving little tips about row counting. Specially the answer by Zontee about undoing rows. I seem to do a lot of that!
Louise Primeau, Québec
As a long time knitter, I really enjoyed reading the way you explained the reading of the knit and purl stitches. I could feel the love your love for knitting. Thank you for this really enjoyable reading.
Pam
I have knit for over 50 years, and this is the best tidbit of information I have ever come across. Wish I would of had it years ago. Thanks Heather.
Pam
» Real-Life PURL Marketing Lessons to Get You Started Orlando Magic Jerseys
[…] News About Purling: Knit Seed Stitch THE PURL STITCH Identifying Your Stitches […]
How to Cable Without a Cable Needle: A Tutorial and Video | Lion Brand Notebook
[…] A Good Read: Identifying Your Stitches […]
mooncat
Does anyone know if there are any good Left Handed Knitting books out there?
Counting Your Rows in Knitting | Lion Brand Notebook
[…] a knit versus a purl stitch is helpful in showing you where you are in a stitch pattern. In the last article I wrote, I showed how to identify the stitches already worked to know where you are in your […]
Tracy Nickels
I taught myself how to knit and crochet, I’ve done lots of projects. I’ve seen a pattern for experienced knitters and crochet. Takes awhile to get it right, how does one get experienced if
you don’t try? I’m 62 going on 40. 🙂
Liz
This helped me so so much. Thank you!