
Knitting teacher and author Heather Lodinsky joins us for another article on the wonderful world of cables. Click here to read her previous blog post on knitting cables.
Creating cables with yarn may conjure thoughts of knitting—but did you know that this magic twisting of stitches can be worked in crochet? Last month, we explored how cables in knitting are created by the use of a cable needle to change the order of stitches and to shape the resulting left or right twist of the cable. The first time I saw a crochet cable pattern, I thought there must be a complicated technique to “twist” stitches that were already worked. In knitting, cables are made rearranging the order of “live” stitches (ones that are not bound off, or finished). So, with the exception of the one loop on your crochet hook, how do you create a cable with stitches that are already finished? The answer lies in how you work each stitch and in which order they will be worked in a given row.
 For crochet cables, we crochet the “posts” of the stitches in the row just finished, not the top edge as is usually done in crochet. In crochet patterns, a “post” is the vertical part of a crocheted stitch just below the top edge of the stitch. These posts will vary in length, depending on the stitch worked in the row itself.
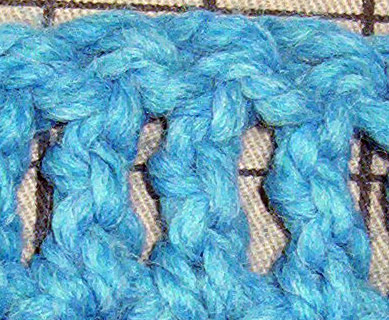
By working these “posts” of stitches – the beautiful uninterrupted flow of cables can be created by crocheting. Just look at this amazing crochet cable afghan that actually looks as if it were knit!
Crocheted cables are made by working around the posts, rather than going into the top edge of a row of crochet – as is normally done. There are two ways of working around the post of a stitch from the front and round the back, or working around the post from the back and around the front. Let’s look at both of these techniques.
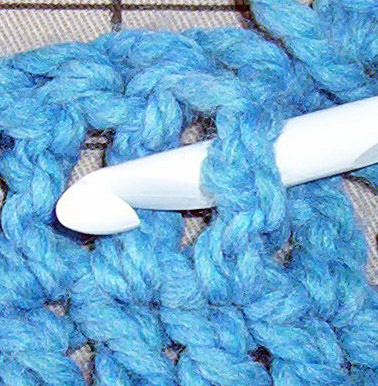
Front Post StitchWorking a “Front Post” (usually abbreviated as FP) means that the crochet hook will go around the post as shown below, entering from the front, going around the post and then back to the front. If this stitch is to be done as a double crochet, then the yarn is wrapped around the hook once before going around the post, then yarn is caught again and the double crochet is worked around the post. When this is done on the right side of your project, it creates a smooth transition between the rows of stitches which is integral to making a crocheted cable work. |
 |
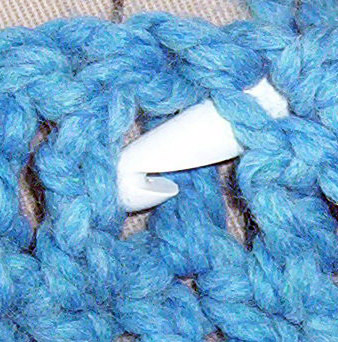 |
Back Post StitchThe opposite of a Front Post crochet stitch is one that is done around the Back Post as is shown below. This technique has the crochet hook going around the post from the back, around the post, and to the back again. Like the Front Post double crochet (FPDC), be sure to wrap the yarn around the hook before going around the post, catching the yarn, and then completing the double crochet around the post. In many crochet cable patterns a stitch worked as a back post on the wrong side will keep that smooth transition of stitches appearing on the right side. |
Last month, we tried a basic left-slanting knit cable. This time, we will try a left-slanting crochet cable that is done over 6 stitches and is only a 4 row repeat. Without having to start a large project, you may just want to try the cable trim piece in the pattern “Curvy Girl Intertwined Poncho” that can be found in the free pattern library on the Lion Brand website.
The trim piece in this pattern starts by only chaining 10 – so it is a nice small piece to learn a crocheted cable. Now that we know our “front post” from our “back posts” all we need to do is work the stitches in the correct order. Working the around the posts from either the front or the back as written will assure that the stitches will “flow” from row to row. Like knitted cables, the order of stitches has to be rearranged, so that the stitches will “move” to form the cables. Rows 3 and 5 of this cable trim piece are the rows where the cable actually “moves” by skipping 2 posts, working around the next two posts and then going back and working the two posts that were skipped. This rearranging of the order of stitches along with working around the posts creates the magic of crochet cables.
Trying this piece may tempt you to want to work the entire poncho! You might also want to try a couple of smaller cable crochet projects, like the “Cable Lace Scarf and Cabled Bag“.
Adding “cables” to either your knit or crochet knowledge will add many fun hours to your stitching time as well as you creating many cozy, cabled projects.
Related links:
Kristin Moran
The abbreviation for front post should be fp, not fb, as you have in the article. Otherwise, I enjoyed it, as I enjoy cabled crochet.
Zontee
Thanks for catching that typo, Kristin. I’ve updated the post.
Jolene
Can’t wait to start this!
Kreweel
This looks like fun, just one ? is the yarn doubled? I could not find anywhere that said that, but the size of the hook seems big for the yarn called for.
Zontee
Hi Kreweel, if you’re referring to the Celtic Afghan, I believe the hook size is large because you’ll want to keep your stitches pretty loose when you’re creating cables (since the fabric will tend to cinch in a lot more than with regular stitches). Hope that helps!
Virginia Hoffman
Boy, this is gorgeous! Can’t wait to try it.
Kathy Renz
I enjoyed your article. Your writing is easy to follow and I am going to look up the patterns you recommended right away. I am left-handed so I crochet from left to right. I assume I would follow your advice, except to switch the direction, but is there anything else you can think of that I can keep in mind? Thank you.
Zontee
Hi Kathy, that’s exactly right–just keep in mind that if you follow the directions in the opposite direction that the twist of your cables will also be in the opposite direction, so if you want the design to look exactly like the original pattern (and it’s not a symmetrical design), you may have to do a little planning.
Anndee
Is there a pattern for the afghan in the photo?
Zontee
Hi Anndee, it’s the Crochet Celtic Afghan–just click on the photo to get to the pattern on LionBrand.com (you’ll need to log into your free LionBrand.com account, if you aren’t already, to view it).
Learn to Add Dimension and Texture to Your Crochet Work | Lion Brand Notebook
[…] are you craving more ways to add texture to your projects after last week’s post on crochet cables? The options for adding texture to your crochet work are seemingly endless, but I’ve rounded […]
5 Essential Advanced Crochet Techniques | Lion Brand Notebook
[…] Wonderful braids and raised textures are yours for the making with crochet cables. Learn just how easy this technique actually is with this blog post. […]
A Good Read: Recognizing the Knit and Purl Stitches | Lion Brand Notebook
[…] Lodinsky last wrote about knit and crochet cables for the Lion Brand Notebook. Learn more about her and her book, 150 Knit & Crochet Motifs, in […]
5 Crochet Articles for Customization
[…] Unlock the Secrets of Crochet Cables ♥ […]
Counting Your Rows in Knitting | Lion Brand Notebook
[…] Unlock the Secrets of Crochet Cables […]
Jan Weeber
It would of been more instructive if the author took us from the beginning…chaining and making crochet stitches….I don’t like ‘half’ articles, especially for those really trying to learn this stitch.