
This column by Barbara Breiter, author of The Complete Idiot’s Guide to Knitting & Crocheting, originally appeared in The Weekly Stitch newsletter.
Slip stitch patterns are an easy way to add color to your knitting; unlike Fair Isle and Intarsia, you knit with only one color per row so they are less complicated. When knitting slip stitch patterns, some stitches from a previous row are slipped and others are knit or purled with a new color.
When a row is completed, you will have stitches that are slipped which are a different color from the stitches that you just knit with the new color. The slipped stitches will be elongated; this will cause the stitch pattern to pull in, so check your gauge carefully if you substitute one in a pattern that calls for Stockinette or another less dense stitch pattern.
Always slip stitches as if to purl, unless the pattern specifically states otherwise. Stitches are usually slipped with the working yarn held to the wrong side, although there are some that require holding it on the right side, which results in a woven look. The pattern will tell you to slip the stitches with the yarn held in front or in back; this is not the same as the right side or the wrong side. With yarn in back means the side of the work facing away from you; with yarn in front means the side next to you or facing you as you knit.
As with most knitting and crochet techniques, the best way to learn is to try making a swatch.
Here’s a simple slip stitch pattern called Two Stitch Check. It’s a multiple of 4, so to begin cast on any number that is divisible by 4 with Color A or red.
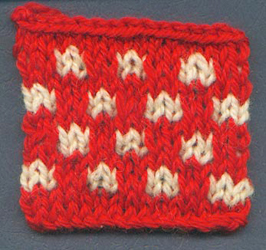
Row 1 (RS): With Color A, K
Row 2: With Color A, P
Row 3: With Color B, k3, *sl2 wyib, k2; rep from *, end k1
Row 4: With Color B, p3, *sl2 wyif, p2; rep from *, end p1
Rows 5 and 6: With Color A, Rep Rows 1 and 2
Row 7: With Color B, k1, *sl2 wyib, k2; rep from *, end sl2, k1
Row 8: With Color B, p1, *sl2 wyif, p2; rep from *, end sl2, p1
For more fun with slip stitch knitting, try these patterns:
| Concerto Cowl | Slip Stitch Pom Hat | Berry Sparkle Scarf |
| Fallen Leaves Scarf | Slip Stitch Kimono | Slip Stitch Sampler Throw |
–-
To sign up for the Weekly Stitch and get columns like this, free patterns, how-to videos and more, click here.
Add Color With Slip Stitch Patterns: An Introduction | Yarn Buyer
[…] http://blog.lionbrand.com/2014/06/30/add-color-with-slip-stitch-patterns-an-introduction/ […]
Add Color With Slip Stitch Patterns: An Introduction | Crochet Wisdom
[…] Source: blog.lionbrand.com […]