
Techniques for binding off are as numerous as techniques for casting on. There are bind-offs that produce firm edges, looser edges, stretchy edges, edges that look like the pattern stitch used, gathered edges, decorative edges, and bind-offs that join two edges together. It is wise to begin by learning a basic bind-off technique to use with your first few projects. After you have completed some projects, you may be in the mood to learn some new bind-off methods.
Here are a few different bind-off techniques to try.
Note: In the following detailed instructions, the first stitch on a needle is the stitch closest to the tip of the needle, the 2nd stitch is the next stitch further away from the tip, and so on.
The most basic bind-off method is also known as a chained bind off because the bind-off edge looks like a chain of stitches. For a video, illustrations, and instructions for working a basic bind-off, click here.
Some people find that their basic bind-off is too tight, making the bind-off edge too short and stiff, and possibly puckered. There are a number of tricks and alternate methods to achieve a looser bind off.
Of course, relaxing a little and trying to work more loosely is the first thing to try to correct the problem of a too-tight bind off. But, relaxing and trying to work more loosely isn’t always enough. Using a larger needle to bind-off often does the trick. But, you may also like to try one of the following techniques to achieve a looser bind-off.
The Suspended Bind-Off is a slight variation on the Basic Bind-Off and can help ensure that the bind-off is not too tight. When lifting the 2nd stitch on the right needle over the 1st stitch, do not drop it from the tip of the left needle. This “suspends” the stitch and ensures that it will not be drawn too tightly around the base of the 1st stitch. Bring the tip of the right needle in front of this “suspended” stitch and work the next stitch dropping both the stitch and the “suspended” stitch from the left needle.
1. Work the first 2 stitches together. Notes: The stitches can be knit together or purled together, depending on the pattern stitch. The decreases (k2tog or p2tog) can be worked through the front or back loops. Either approach works well.
2. Slip the new stitch on the right needle back to the left needle.
3. Repeat steps #1 and #2 until there are no stitches remaining on the left needle and there is only 1 stitch remaining on the right needle. Cut the working yarn, leaving a long tail (for weaving in later and perhaps for sewing seams). Draw the tail through the last stitch, removing the stitch from the right needle, and pull the tail all the way through to form a knot.
Methods for binding off that use a yarn needle, instead of a second knitting needle, to carefully weave a long tail of yarn through the stitches of the last round are known as “sewn bind-offs”. The most basic sewn bind off can create a looser bind off edge and has the added benefit of producing an edge that mirrors the edge created by a long-tail cast-on.
Detailed steps appear below:
1. Cut the yarn, leaving a tail at least 2-3 times longer than the width of the piece. Thread the tail onto a yarn needle. Place the knitting needle holding the stitches in your left hand.
2. Insert the yarn needle, as if to purl, into the first 2 stitches on the knitting needle and draw the yarn all the way through. Do not drop the stitches from the knitting needle.
3. Insert the yarn needle, as if to knit, into the first stitch on the knitting needle and draw the yarn all the way through. Drop the first stitch from the knitting needle.
4. Repeat steps #2 and #3 until only 1 stitch remains on the knitting needle. Insert the yarn needle, as if to purl into the last stitch on the knitting needle and draw the yarn all the way through. Drop the last stitch from the knitting needle.
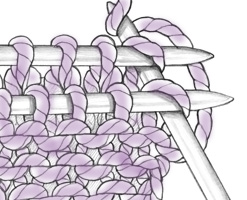
A crochet hook can be used to help bind off. The single crochet bind-off can be looser than the basic bind-off, but the two bind-offs look almost identical.
Detailed steps appear below.
1. Place the knitting needle holding the stitches in your left hand and a crochet hook of about the same size as the needle in your right hand.
2. Insert crochet hook in first stitch on needle and slip the stitch off the needle (1 loop on crochet hook). Wrap the yarn over the hook from back to front and draw through loop on hook (1 loop remains on crochet hook).
3. Insert crochet hook in next stitch on needle and slip the stitch off the needle (2 loops on crochet hook). Wrap the yarn over the hook from back to front and draw through both loops on hook (1 loop remains on crochet hook).
4. Repeat steps #2 and #3 until no stitches remain on the knitting needle and only one stitch remains on the crochet hook. Cut the working yarn, leaving a long tail (for weaving in later and perhaps for sewing seams). Draw the tail through the last stitch, removing the stitch from the hook and pull the tail all the way through to form a knot.
The Basic Bind-Off can be worked by knitting all of the stitches, which is typically done when binding off Garter stitch or Stockinette stitch from the right side. It can also be worked by purling all of the stitches, which is typically done when binding off Stockinette stitch from the wrong side. When binding off Stockinette stitch, some people prefer to bind off from the wrong side but knit all the stitches. This little trick can help reduce the natural “curl” of the Stockinette stitch bind-off edge.
Knitting the stitches when binding off on the right side of a Stockinette stitch piece, and purling the stitches when binding off on the wrong side of a Stockinette stitch piece, are the simplest examples of binding off “in pattern.”.
Binding off “in pattern” means that the stitches of a basic bind off are worked in the same manner they would be worked if the next row of the current pattern stitch were worked. Another simple example of this is binding off in K1, p1 Rib. In the K1, p1 Rib pattern stitch, one knit stitch is alternated with one purl stitch all the way across the row. Accordingly, when binding off in K1, p1 Rib, the first stitch is knit. The next is purled, then the 2nd stitch on the right hand needle is lifted over the 1st stitch and off the needle. The next stitch is knit, and the 2nd stitch on the right hand needle is lifted over the 1st stitch and off the needle, this process is repeated and the bind-off completed as usual.
Detailed steps appear below:
1. Knit 1 stitch. Purl 1 stitch. You should now have 2 stitches on the right needle.
2. Insert the tip of the left needle into the 2nd stitch on the right needle and lift it over the 1st stitch and off the needle. One stitch has been bound-off and there should still be 1 stitch on the right needle.
3. Knit 1 stitch. You should now have 2 stitches on the right needle.
4. Repeat step #2.
5. Purl 1 stitch. You should now have 2 stitches on the right needle.
6: Repeat step #2.
7. Repeat steps #3–#6 until there are no stitches remaining on the left needle and there is only 1 stitch remaining on the right needle. Cut the working yarn, leaving a long tail (for weaving in later and perhaps for sewing seams). Draw the tail through the last stitch, removing the stitch from the right needle, and pull the tail all the way through to form a knot.
Another method for binding-off in pattern that works well for any pattern stitch, uses a larger needle to work the very last row before binding-off and then binds-off without working any of the stitches, just lifting them over each other.
1. Use a larger needle to work the last row in the pattern stitch. You may needle to practice on a swatch to determine the perfect larger size needle to use. The goal of using a larger needle is to ensure that the bind-off is not too tight.
2. Slip all of the stitches onto the right needle so that the working yarn is attached to the stitch the farthest from the tip of the needle. Now place the needle into your left hand.
3. Slip the first 2 stitches to the right needle. Note: You should slip the sts. Do not work (knit or purl) them.
4. Insert the tip of the left needle into the 2nd stitch on the right needle and lift it over the 1st stitch and off the needle. One stitch has been bound-off and there should still be 1 stitch on the right needle.
5. Slip the next stitch to the right needle. You should now have 2 stitches on the right needle.
6. Repeat step #4.
5. Repeat steps #5 and #6 until there are no stitches remaining on the left needle and there is only 1 stitch remaining on the right needle. Cut the working yarn, leaving a long tail (for weaving in later and perhaps for sewing seams). Draw the tail through the last stitch, removing the stitch from the right needle, and pull the tail all the way through to form a knot.
Tubular Bind-Off is a sewn bind-off that produces a stretchy edge that looks like K1, p1 Rib.
1. Cut the yarn, leaving a tail at least 2-3 times longer than the width of the piece. Thread the tail onto a yarn needle. Place the knitting needle holding the stitches in your left hand.
2. Insert the yarn needle, as if to knit, into the 1st stitch on the knitting needle and draw the yarn all the way through. Drop the 1st stitch from the knitting needle. Note: If first stitch is a purl, insert yarn needle into first 2 stitches, draw yarn through and drop both stitches from knitting needle.
3. Insert the yarn needle, as if to purl, into the 2nd stitch on the knitting needle and draw the yarn all the way through. Do not drop any stitches from the knitting needle.
4. Insert the yarn needle, as if to purl, into the 1st stitch on the knitting needle and draw the yarn all the way through. Drop the 1st stitch from the knitting needle.
5. Insert the yarn needle from the back to the front between the first 2 stitches on the knitting needle and draw the yarn all the way through.
6. Insert the yarn needle, as if to knit, into the 2nd stitch and draw the yarn all the way through to the BACK of the work.
7. Repeat steps #2-#6 until there are only 1 or 2 stitches remaining on the knitting needle. Repeat step #2. If there is still a stitch remaining on the knitting needle, insert the yarn needle as if to purl, draw through and drop the stitch from the needle.
 3-Needle Bind-Off – A 3-Needle Bind-Off is a method for binding off the stitches on two pieces of fabric and seaming them together at the same time. For illustrations and instructions, click here.
Decorative Bind-Off (e.g. Picot Bind-Off, I-Cord Bind-Off) – Decorative bind-offs are used to bind-off the stitches and create a decorative edge.
Elastic Bind-Offs – Bind-offs that produce very stretchy edges well suited for the tops of socks, cuffs, and necklines.
Sloped Bind-Off – A sloped bind-off provides a nice smooth, diagonal edge when a series of bind-offs are worked at the beginning of multiple rows, as when binding off to shape shoulders or necklines.
—
For more on the interesting world of cast-ons and bind-offs, check out this episode of our podcast, YarnCraft.
Practice Multiple Knitted Bind-Offs with Two Samplers | Lion Brand Notebook
[…] Detailed instructions for each bind-off technique appear following the sampler photos. See the previous blog post for details on the different bind-off methods mentioned […]
Emily Ruth
Thank you so much for these!
Ruth Ellen
Wow! thank you for this blog! I recently returned to knitting after a generation of dormancy, and had to “reinvent” the casting on and binding off. What i came up with/remembered, after trial and much error, was exactly what you described as the basic binding off . . . I am looking forward to trying the other methods . . .thank you!
Zontee
Hi Ruth Ellen, hope you’ll also check out Kj’s earlier blog posts about casting on:
http://blog.lionbrand.com/2013/02/18/great-beginnings-start-your-knitting-project-off-right-pt-1/
http://blog.lionbrand.com/2013/02/19/great-beginnings-start-your-knitting-project-off-right-pt-2/
Amy r.
I would love to see a video example of the looser bind off. I’m having trouble picturing it in my head
Amy r.
I would love to see a video example of the looser bind off. I’m having trouble picturing it in my head
Zontee
Hi Amy, don’t forget to check YouTube.com as there are a ton of great videos from knitters demonstrating many common techniques.
MoniqueLeigh
That tubular bind-off is not remotely like the tubular bind off I’ve seen elsewhere. The name itself implies that a bind-off in this method should create a tube of fabric. TECHknitter has a great description of how to do both the “real” tubular bind off as well as a “fake” tubular bind off (look a bit similar, but is easier and faster).
janvier25
It is, but it’s also known as Elizabeth Zimmerman’s sewn bind off.
Teddiegram
I like using the long tail cast on. My problem is that my cast off edge looks much different than my cast on edge. I see above how I can make it looser, but it still doesn’t match. Other than not using the long tail method, is there another solution?
Janet Guerin
So pleased to find this.Having completed both sleeves, with long-tail cast on, I realised the rib on one was too long. Could I take off the excess and cast off without it showing? With very careful unravelling and using the sewn bind-off, sleeve is now how it should be and you can’t tell the difference!