
 Hi guys! I see a lot of you have finished your cardigans already. Looking good! Don’t forget to post pictures.
[Editor’s Note: Click here to see photos in our Ravelry group, and if you’d like to leave a photo here on the blog, click in the commenting box and you’ll see a little “mountain range” icon. Click it to browse to your photo on your computer and upload it to your comment.]
I considered making the sleeves a little longer, but in the end, I decided in the end to make them the same length as in the pattern. However, if you’d like to lengthen your sleeves, it should be pretty easy to do.
The easiest way to lengthen the design is to just work the number of chains for your size and work even until your sleeve has however much longer that you’d like than the one in the pattern, then follow the pattern as set.
The pattern schematic tells us that the sleeve-to-armpit measurement is 9 inches for all sizes. Let’s say that I want my sleeve to be 16.5 inches (16 to 17 inches is a standard length for women’s sleeves). That’s 7.5 more inches. Our pattern gauge tells us that each row is 0.31 inches (4 inches ÷ 13 rows = 0.31 inches per row).
7.5 inches ÷ 0.31 inches per row = 24.19 rows
Our color repeat is ABCDED and each color is used for 2 rows, so 24 rows is two full sets of all of the colors. Therefore, I’d do 24 rows straight, before following the pattern as set. (If you want to make your sleeves longer or shorter, you may need to do a partial repeat of the color pattern, so be sure to plan for that.)
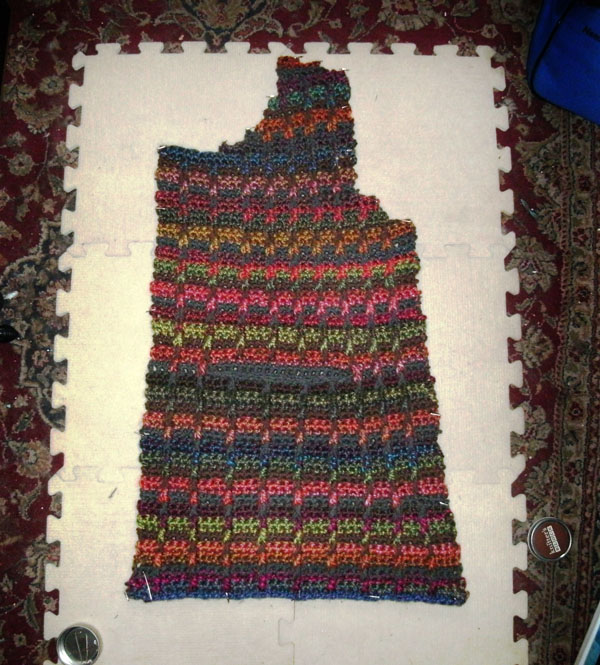
After the sleeves, I had all the pieces finished, so it was time to block. Don’t skip this step! It can make your garment look much more professionally-made and neaten up any uneven stitches. While you can block after your entire garment is done, many people find it helpful to block your garment before sewing it together, as this way you can correct the measurements of any part where your tension may have changed a little.
An easy method to block your project is wet blocking: First, wet the pieces of the garment in lukewarm water. Then wring out the excess water gently and lay your pieces out on your blocking boards. I had to block my pieces in stages, as my boards aren’t big enough for the whole sweater at the same time! Measure your pieces carefully and pin them to the boards following the measurements on the schematic. Now leave your sweater overnight to dry. Make sure it’s completely dry before you start the seaming.
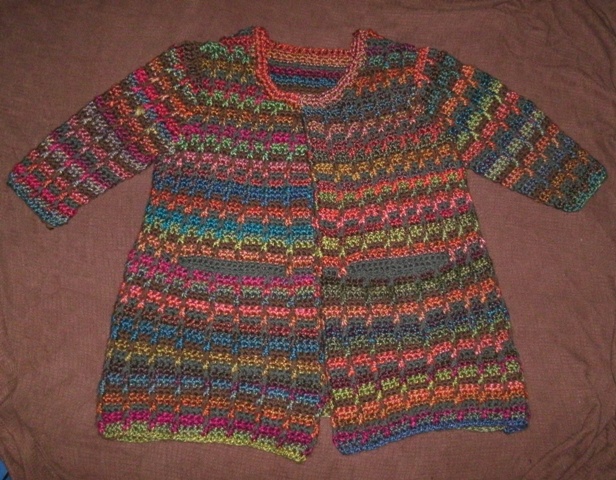
There are a few different methods of seaming crochet pieces together. Usually when seaming a garment I use the sewn seam shown here. However, as you may have noticed the finished garment is rather heavy so I felt it needed a stronger seam to hold it together, so I choice to slip stitch seam my pieces together. This works for me because I’d much rather crochet than sew!
Pro tip: You may find it helpful to use clips or pins to pin your pieces together before beginning seaming.
Next, it was time for the surface slip stitches around the edges of the garment. This may sound a little fiddly, but once you get into the swing of it, it’s super easy! It’s also one of my favorite techniques for adding embellishments to an otherwise plain garment: you can use it to write names, draw pictures, or in this case to make the edges of your garment look a little more finished.
Final step: Wear your finished garment with pride, and show it off to all your friends! I can’t wait until this heat-wave is over so I can finally wear mine!
It’s been so much fun crocheting along with you guys and seeing everyone’s garments developing, each one unique in it’s own way. Thanks for sharing this journey with me!
Please continue to share your comments, questions and answers, and photos with us! We’ll be sharing some of your finished projects in the next few weeks, here on the blog.
Related links:
While we will try to answer some questions here on the blog and on Ravelry, we do encourage participants to help each other with questions. Learning from each other’s experience, mistakes, triumphs, and “design elements” is part of the experience! If you need specific, personal help with the pattern, please feel free to email support@email.lionbrand.com and someone from our team can address your question.
Bi-crafty
Maybe I’m a bit OCD, but I can’t get past the stripes not matching up. I just received my kit, so I’m only swatching at this point, but I can see myself working at lining it all up. Hope it doesn’t require too much extra yarn!
Debbie
Someone on the Ravelry group suggested working the front parts at the same time to try to come close to the colors lining up. So, after doing two rows in each color on one side, do those same rows and color on the other. Since the Unique yarn changes so much, it won’t be perfect, but doing the sides one after the other should increase the chances of being similar. Lauren: Did you work one whole side and then move on to the other (as it is written in the pattern)?
Lauren CAL Host
Hi Debbie,
Yes I did, I actually don’t mind the stripes not matching up though. In fact you can notice that my sleeves look very different from each other, this is because I ran out of the charcoal so I used the chocolate instead. I like the mismatched look!
Debbie
Hi Lauren- Were you using the amount of yarn included in the kit? What size did you make?
Lauren CAL Host
I did use the same amount as in the kit, the only reason I ran out is that my cat attacked the grey yarn to the point where untangling it would be impossible!! Never leave the house with your knitting supplies where the cat can see them!
Debbie
Someone on the Ravelry group suggested working the front parts at the same time to try to come close to the colors lining up. So, after doing two rows in each color on one side, do those same rows and color on the other. Since the Unique yarn changes so much, it won’t be perfect, but doing the sides one after the other should increase the chances of being similar. Lauren: Did you work one whole side and then move on to the other (as it is written in the pattern)?
carmicv
You mention lengthen sleeves. How would you advise making them wider? I have flab under the arms ha ha.
kimberly537
my friend got a nice 6 month old Cadillac Escalade by working part time from the internet. here are the findings wÂwÂw.JÂAÂMÂ20.cÂoÂm
Lauren CAL Host
You could make the sleeves wider, but you will have to make the armhole depth longer as well. To make the sleeves wider you can just carry on increasing until they are wide enough, you’ll have to increase more rapidly though if you want the sleeves to remain the same length as in the pattern.
carmicv
thank you,. I will experiment.
MaryM
I bought a kit and have 6 skeins of yarn untouched as left over after making finishing all edges, etc. Did anyone else have this happen? My gauge was correct and size is fine, but this is a lot of extra yarn in addition to the generous partial skeins I also have left in each color.
ShirleyC
Hi MaryM
I have about 6 skeins leftover too!! I am thinking of a sleeve less vest or top to use it up.
Lisa Y
I have two skeins of passion fruit, two oceana, one harvest, one grey and one brown left over. And I lengthened the sleeves!
Teresa
Ok, hoping someone here can help out. When reading the instructions, the stripe sequence is 2 rows A, 2 rows B, 2 rows C, 2 rows D, 2 rows E, and then 2 rows of D again. This is the pattern sequence I followed for the back and now the Left Front. However, when I got to the instructions for joining the pocket lining in row 36 of the L Front, it states this should be my second row with C. It’s not C, it’s the repeat of D after E. This is because I’m following the stripe sequence. The only way it would be C is if I don’t repeat D after E at all. Did anyone else run into this problem? Did I not read something correctly?
Roberta Brown Nizzardo
The pocket should be brown and put in on row 34 if u look at the picture u can tell
Ruth Hall
I didn’t do the repeat of D. Not on purpose, I just didn’t read the instructions that carefully and missed that sequence, so my pockets were right on in the right color sequence.
Colorfully Modern Crochet-Along: A Few Fabulous Finished Projects! | Lion Brand Notebook
[…] Colorfully Modern Cardigan Crochet-Along #4: Blocking, Seaming, and Surface Stitches […]
Lisa A
I don’t understand what the instructions mean for folding down the front facing and sewing in place. Help?