
Technical editor and yarncrafting expert Kj Hay joins us for a series on understanding the different elements of patterns. Click here to read her earlier blog posts.
 Gauge is very important in all but the simplest designs. The gauge at which you work determines the finished size of the piece and the firmness of the fabric. If your gauge is off your afghan may barely cover a doll, or your slippers may fit the Jolly Green Giant quite comfortably. On the other hand, if your gauge is accurate but the yarn inappropriate for the gauge your sweater may be so firm you can’t lower your arms or so “holey” you could only wear it at home with the curtains drawn.
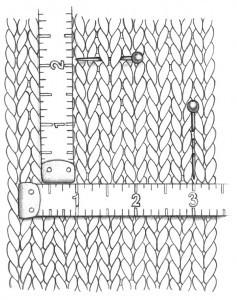
Gauge is the measure of the number of stitches and rows worked to yield a piece of fabric of a specific size. Gauge is usually given in terms of the numbers of stitches and rows worked to yield a piece of fabric that is 4 x 4 in. (10 x 10 cm) square.
If the size or drape of a finished project is important (and most of the time size and drape are important) take the time to check your gauge. To check your gauge, begin by using the size hook or needles listed. If more than one size of hook or needles is listed, the gauge statement should indicate which of the sizes is intended. Work a piece of fabric (known as a swatch) in the indicated pattern stitch that is at least 4 x 4 in. (10 x 10 cm) square or at least the size specified in the gauge statement, whichever is larger. Lay the piece flat without stretching or bunching it, place a ruler on the piece and count the number of stitches and number of rows over 4 in. (10 cm). Compare these numbers with the numbers in the gauge statement. If the number of stitches in 4 in. (10 cm) of your swatch is less than the number of stitches indicated by the gauge statement, you need to make another swatch using a smaller hook or needles. If the number of stitches in 4 in. (10 cm) of your swatch is more than the number of stitches indicated by the gauge statement, you need to try again using a larger hook or needles. Continue to make swatches using a larger or smaller hook or needles as needed until you achieve the gauge.
Once you have a swatch in the indicated gauge, study the swatch for drape. Is the resulting fabric stiff enough, too stiff, too “holey”, or just right? Checking the drape is particularly important to consider if you are selecting a substitute yarn. If the gauge is accurate but the drape is not appropriate, you should consider using a different yarn. When drape is too firm you need a softer or thinner yarn. When drape is too floppy or open, you need a firmer of thicker yarn.
The gauge listed may or may not be the same as the recommended gauge listed on the yarn ball band. The gauge listed on a ball band is based on a fabric of average drape (or firmness) made from the most basic of pattern stitches (single crochet or Stockinette st). A specific project is likely to warrant a different drape and the use of pattern stitches other than the basics, thus having a different gauge.
Related links:
Till provlappens lov | Omönstergillt
[…] En utförlig beskrivning pÃ¥ engelska hittar man här: http://blog.lionbrand.com/2013/10/28/cracking-the-pattern-code-part-5-understanding-gauge/ – lÃ¥t er inte förvirras av att mÃ¥ttbandet visar tum, i texten används allmänt accepterade […]