
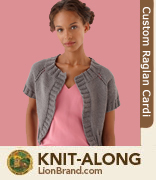
 Hi, everyone! This week we’re going to talk about adding length to your sweater and adding optional waist-shaping. But first we come to dividing for the body, which is one of the most exciting parts of a top-down raglan garment because within a few rows your piece will start to look like a wearable cardigan! I like to slip the sleeve stitches onto some waste yarn rather than regular stitch holders (which are just like big safety pins), as this will make your cardi much easier to try on. I also place a stitch marker between the two bind off sections — the bind off stitches will become the underarm seam of your sweater. This marks what would be the side seam in a regular sweater and will come in handy when I’m adding waist shaping.
If you’d like your sweater to be longer, you can just keep working in your pattern, trying on as you go, until it is as long as you’d like. I wanted my sweater to be at least hip-length, but I also wanted it to be a little more fitted. Since I’m not 35 inches all the way down, I decided to add some waist-shaping. This is not in the pattern, but can be nice for some of us making the garment longer. However, if you’re new to sweaters and prefer to keep it simple, just follow the directions as written! Feel free to adjust the length straight; the classic shape of this cardigan means that it will look great even without extra shaping.
To do this, I first need to figure out how many inches I’ll be decreasing. The smallest part of my waist is 26 inches, but I’ll just be decreasing to 28 inches to leave some breathing room. That means I’ll be decreasing 7 inches. To find out how many stitches you’ll need to decrease, you can use this easy formula: inches to decrease x stitches per inch = stitches to decrease. My gauge is 17 stitches over 4 inches or 4.25 stitches per inch, so I multiplied the number of inches I need to decrease, 7, by my per inch stitch gauge, 4.25. That gives me a total of 29.75 decrease stitches, so let’s round that up to 30.
Now I know I am going to decrease one stitch on each side of both of the side seam markers I placed, which means that I’ll be decreasing 4 stitches on each decrease row. So to work out how many decrease rounds you need to do, divide the number of stitches you will decrease by 4. In my case, 30 divided by 4 comes to 7.5, I decided to round that up to 8.
Next I needed to work out the frequency of my decrease rounds. To do this I measured vertically from the point I would start decreasing, which is where my body starts getting smaller just under my bust, to the smallest part of my waist, which came to about 6 inches. My row gauge is 6 rows per inch, so 6 inches equals 36 rows. Next, divide the number of rows in the decrease section by the amount of decrease rounds you’ll need to do. This will tell you how frequently you’ll decrease. When I divide the 36 rows by the number of decrease rounds I needed to do, 8, I get 4.5 rows. Since I can’t decrease every 4 and a half rows, the first 4 decrease rows I will do every 5 rows, and then the next 4 I will do every 4 rows.
After my decreases, I’ll work even for about an inch, and then of course I’ll need to increase again as my body gets wider. The good news is that I already did the math, so I can just start increasing at the same rate that I decreased, until my sweater is 35 inches again. Remember that if you’re making your sweater longer (like a tunic), you may need to do more increases to accommodate your hip measurements.

When your sweater is as almost as long as you’d like it to be, you can choose what style of hem you’d like to do. The cardi in the pattern has a ribbed hem. Other good choices would be seed stitch, garter stitch and moss stitch, because these stitches all lie flat and don’t curl. However, if you want a rolled edge, you can just knit a few rows in stockinette and bind off. One of my favorite hems, which I’ve used in many previous projects, is the folded picot hem. At the moment, for this particular cardigan, I’m leaning towards the ribbed hem, but the great thing about knitting a top-down sweater is that I don’t have to decide until I get there!
Related links:
Maureen R
Since the sleeves are finished on the smaller needle I completed the sleeves before deciding the length of the cardigan – now I can try it on & decide when to start the ribbing. Sticking to the pattern otherwise in Loops & Threads Impeccable BIG lavender color. Thought of doing a leaf design starting below the bust & no ribbing – having trouble figuring out the math though – we will see.
Anonymous
 I also decided to finish the sleeves first. I did not do any decreases either as I will probably use a layered look so I need to sleeves to have more ease too.
Jeanne
Can you also post an image for how you stopped at the sleeve and continued with the body? Â I’m new at this and a picture would be soooo helpful!
Zontee
 Hi Jeanne, there are some useful pictures from other participants over in our companion Ravelry group (http://www.ravelry.com/discuss/lion-brand-custom-raglan-cardi-knit-along/2041723/1-25).
Here’s one that should help: http://www.ravelry.com/attached/Andi3/22513692
Jeanne
Wow! That’s a really cool website! Â Thanks for the link. The picture is great!
Doc4dolls
I am almost done with  my short cardi. Pictures on Facebook and ravelry. thanks think I will made a second one.
Anonymous
I have decided to follow the pattern as is. I did the rib part in a contracting colour. It looks great. Now on to a bit of finish work. I like this pattern and will use it again, no doubt!
Joyce
I am going to make my cardi long sleeved and am wondering if there is a formula for decreaseing to the wrist. I dont want a “ruffle” above the ribbing.
Anonymous
 Hi joyce,
You can decrease the sleeves in the same way as the waist. just take a few measurements at different points as you go down your arm.
Karen
“Divide for body,” well this was trickier than it looks! I did end up with two front panels, two sleeves and a back so I think I’m ok. Couldn’t figure out where to place the markers for the bind off stitches under the sleeves, but since I’m not shaping the waist, I don’t think it should be a problem. Reading ahead in the directions, I think I understand what is going to happen, I do have a request though, for us less experienced knitters, when we get to finishing the front bands and picking up stitches, can you please provide step by step photos? This part has me a little nervous.
Anonymous
 Hi Karen,
if you’re not shaping the waist, you don’t need the markers, so don’t worry!
I’ll be covering how to pick up for the button bands and seaming in future posts and I’ll make sure to include some photos.
Tleonardi1
Thanks! I made my sweater a bit longer and just started the ribbing for the bottom. This will be my first sweater, and it is very exciting to see it taking shape.
Monte
I am a bit confused about the directions at the end of “Shape Yoke”. I have done the Row 4 Purl, and Row 5 knit, yo, etc until I reached the 280 (Med.) stitch count. When you start the “Divide for Body” it says to start on RS. working on right front… I ended (Row 5) with RS and even if I purl across one more row I would be on the left front of the garment. I hope this isn’t too confusing. Maybe it doesn’t matter if I’m working on the right front or left front. Can you clarify? Monte  Â
nphilli
i had same experience i did a purl row next and it seems as if it will be fine
Doc4dolls
Karen, you don’t put marks for the body once you divide, it is worked in one piece then. Monte, it doesn’t matter if it is left or right but I think if you have right side facing you it is actually the right you are starting on, but honestly doesn’t matter as long as you are working a rs row when you divide to do the body. You are binding off the 3 stitches that would make the seams for arms to body as you are working this row. Does that hellp?
Monte
Thank you so much. Yes, I figured it probably didn’t really matter since there are no button holes, etc. to consider. I am off and running and getting excited to see the actual cardi take shape with arms, front and back. I can see how helpful this “top down” knitting makes it easy to try on as needed. Thanks for your comments.
Baknitter
It is going a little slower than It should. Â Have a few other UFO’s and a baby quilt in the making. Â And my real life gets in the way. Â I Â still have about 5 increases to go before I divide. Â I think its going to be beautiful when its done. Â Where is everyone else?
Ann
at the point where I either start the ribbing or buy more yarn to make it longer….I think I want the botton to have the picot look instead of the ribbing as I messed up the ribbing on the neck…don’t ask:)….then sleeves and that pick up part….I thought I was almost done, but after reading this….lol…nope…thinking more yarn…..that is where I am….
Eileen
I’m plodding along and just about ready to do the divide too. I really appreciate everyone’s input and experiences since this is my first ‘fit’ item. Very excited….and now off to knit.
Janice Eagan
I’m a new knitter and just finished the yoke portion from week 2. I’m tickled that it is coming out so well and very excited to continue into week 3.Â
I do need a bit of help understanding the next directions for divide the body. What does (the yo,k1,yo) mean? I get the yo = yarn over but is “the yo” different? Thanks bunches in advance!Â
Becky Curlett
I believe the (yo,k1,yo) refers to the three stitches that you are binding off.
Janice Eagan
OH! “the” really is the word “the” and not some special stitch abbreviation. Hehehe, I feel so silly now. Thanks so very much Becky!
Helraymc
When I added the ribbing on the front, after the binding off, it pulled the front way shorter than the body!! What did I do wrong.
Maureenrudowicz
The same thing happened to me – what if we were to use the larger needles to do the front edge ribbing? I am thinking that because the whole sweater is knit with the larger needles that makes more sense. I await your reply.
Llogue82
What did u end up doing. I will soon be at that point and am wondering if using the same size as body worked out
KathyA
I finished my cardi down to the point where I’m supposed to switch back over to rib and finish off the body. I’ve added a single cable down each side, a panel of cabling in the back, and some gentle waist shaping. My question is, has anyone considered a knit trim instead of the rib trim? I’m looking in the stitch finder at the knit trim: umbrella trim and wonder what would be the advantages/disadvantages to using that for my trim at the waist and arms, and possibly for the center trim instead of rib.
Zontee
Hi Kathy, since this is a loose-fitting pattern (and the ribbing is decorative and not serving to “pull in” the fabric), there aren’t really any advantages or disadvantages to swapping out the ribbing for a trim pattern–just be sure that you pick up stitches in a multiple of your new trim stitch pattern (and that your stitch count is as close to the original amount for the ribbing as possible). Hope that helps!
Jems2
I’m interested in adding shaping for the waist and I understand the
math.
I’m stuck on what stitches to use to decrease and where to place them.
Thanks for any help, this is my first sweater!
Little237
Not sure if anyone will see this since just starting this part of the project. Smooth sailing until I got to the divide for body in size medium. Just finished ripping out . Can anyone offer some more detailed help on this part. I’ve tried endless video tutorials, but not are quite similar enough so I’m quite lost. First sweater attemp. For example… I went to bind off 3 after knitting first 37. Then ended with 36 on the needle. Ugh! When I do the 3 bind of should I have knitted the 38, then knitted 39 and brought 39 over? I knitted 38 and brought 37 over. I continued in this manner to end and ended with too many stitches left. Also on sleeves: do I knit the 60 and then place on waste yarn or do like 1 video and place them on waste yarn as I get to them without knitting them. So happy with my effort until i got here!! Sorry for confusion….hard to explain in type.
Zontee
Hi there–since there’s very little activity here on this knit-along’s blog posts, you may want to consider popping onto the knit-along’s group on Ravelry (linked in the blog post) if you’re a user of that site or feel free to send an email to support@lionbrand.com and one of our pattern experts will be happy to help!