
 Today I’m going to be talking about adding the front bands to your cardi and optional closures. The cardigan in the pattern is designed to be slightly open at the front, but I decided I’d like to have a closed front, which gives me an excuse to spend hours choosing just the right buttons! There are other ways as well to close your cardi — you could use a shawl pin, or if you have some basic sewing skills, sew in a zipper.
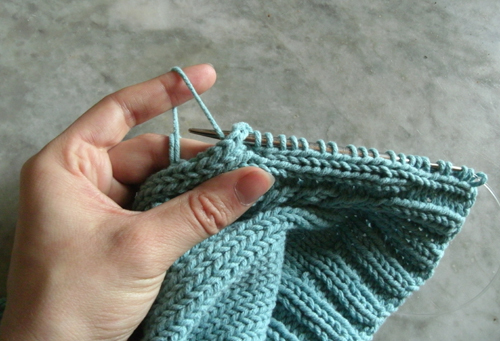
First of all, you’ll need to pick up the stitches down the edge of your left front. I decided to do the left front first, as the right front is where the buttonholes traditionally are on women’s garments. To pick up stitches for the left front, start at the neck of the garment and work down towards the hem. When you come to pick up stitches for the right front, you will start at the hem and work to the neck. With the right side facing, put your needle between the first two stitches at the edge of your cardi, so your needle goes through the fabric from front to back. Wind your yarn around the needle, the same way you would to knit a stitch. Now you can pull the loop that you just wound around the needle back through the fabric to the front. If you find it difficult to hook the loop through with a knitting needle, try using a crochet hook. Carry on in this manner until you have the required number of stitches on the needle.
If you made no changes to the length of the cardi, you can just pick up the amount of stitches specified in the pattern. But if like me, you made your sweater longer, you will need to calculate how many more stitches you will need. To work this out, I just did some very simple math. You’ll want to divide the total number of pick-up stitches for your size by the length of the garment in the pattern. For the smallest size, the pattern tells me to pick up 70 stitches, and I can see by looking at the schematic that the length of the front from the neck down to the hem is 13.5 inches.
70 stitches ÷ 13.5 inches = 5.1851 stitches per inch
So I round this down to 5 stitches per inch (alternately, you can do all your rounding at the end).
Now to find the total number of stitches I need to pick up, I need to multiply this stitches per inch measurement by my sweater’s actual length. I measure the actual length of my own sweater, which is 23 inches.
23 inches × 5 stitches per inch = 115 stitches
Because you’re working the bands in a pattern, keep in mind that you may need to adjust this number slightly. Since I’m doing the ribbed bands as in the pattern, I need to pick up a number that is a multiple of 4 plus 2. The closest number to this is 114, so that’s how many stitches I will pick up down both fronts of my sweater.
When the left band is completed, I like to use safety pins to mark where I will sew my buttons. This will help me place the buttonholes on the right band. The easiest way to make a buttonhole is to do a yarn over, which leaves a little hole in your fabric. It also increases a stitch, so you will need to follow your YO with a decrease to keep the correct number of stitches. To make my buttonholes, every time I come opposite one of my safety-pin markers, I will do a YO followed by a knit 2 together decrease.

Next week, I’ll be talking about blocking your sweater, and the ways you can add embellishments to your design, even after the knitting is complete! See you then!
Related links:
Luvali
how many yarnovers do you need to make a buttonhole? Â Does it depend on the size of the button you are going to use?
Zontee
 Hi Luvali, the single-yarnover buttonhole will only work for a smallish-button (one that can get through that single yarnover. To make a larger buttonhole for a larger button, you will actually need to bind-off one or more stitches in that row (to leave the hole) and then work the stitches on the other side. Then in the next row, you would knit to the bound-off area, cast-on the same number of stitches as you bound-off in the previous row, and then continue to knit across the fabric. Hope that helps!
Patty
The RSS feed to this blog still is not working.
Zontee
 Hi Patty, yes, we’re working hard to fix it, but it’s proving a little tricky. Sorry for the inconvenience!
Patty
Yea! It’s finally working today!
Joyce
I would likje to do this sweater again for a person with VERY sensitive skin. Can anyone tell me if the cotton/hemp yarn the pattern suggests is as soft as pure cotton?
Zontee
 Hi Joyce, the Martha Stewart Crafts Cotton Hemp is soft and will soften significantly with washing, but if you’re looking for another extremely gentle option, consider our Nature’s Choice Organic Cotton, which is the same weight and can be substituted into this pattern. Click on the link at the bottom of this blog post for the “Welcome…” blog post from our first week working on this pattern for more tips on substitution. Hope that helps!
Reta Rae
I cannot get this lesson to print any help?
Zontee
 Hi Reta, try highlight the text/photos you want to print (click with your mouse at the beginning and “drag” it across the article until you get to the end), then click on your file menu to bring up your print menu and select the option that says something like “only print selection.” Then click on the “okay” or enter button and see if that allows you to print it out. Hope that helps!
Marijan
Hello! I have been following the knit-a-long while completing the Weekend Cardi from Recycled Cotton-the tips are very helpful to me. Today when I studied the front band photo, it looks like she picked up her stitches and then added one more row of vertical stitching, before starting the rib. But I cannot tell for sure. I like the look and wondered if that was the procedure? Thank you very much!
Patty
 Marijan, no she didn’t add a vertical row after picking up stitches horizontally. That would be kinda impossible.
Zontee
 Hi Marijan, Lauren’s not adding another vertical row–she is picking up her horizontal stitches one vertical row inwards (this is pretty standard when picking up stitches, as it gives you a neater edge than picking up right at the edge of the fabric). Hope that helps!
Carolee
Thanks for this tip really scared about this pickup stiches !
Michelle Wright
I’m just starting the cardi – how long will this knit along project be going?
Zontee
 Hi Michelle, this Thursday’s blog post will be Lauren’s last one for this project, but as with all of our knit-alongs, the blog posts stay up, so that you can work at your own pace and refer back to them. Plus if you need more help as you’re working beyond the end of the knit-along, you can always email support@lionbrand.com with pattern questions. Hope that helps!
Carolee
Michelle dont worry about just starting. I have followed this since day one and I am still not done with my yoke. things just keep poping up !!!Â
mowelborn
Lauren or Zontee,
I would like to add buttons all the way down on my cardi.  I am not sure if I need to make the front bands wider (more than just the 8 rows that it calls for in pattern) to accomodate the the difference is my bust, waist, hip size.  Are you adding buttons all the way down? Also, I tried to look up older posts (just in case someone else asked the question) and I am not able to. Is there something wrong with the sight or just the user (me)? Thanks.
KathyA
Hello, all! I have just finished knitting the center bands, and just love the way my cardi turned out! I added cables front and back, waist shaping, extended the length of the body, and made the sleeves elbow length. I so wish I were more computer savvy so I could show you a picture. Just wanted to share that I tried putting an alternate edging for the bottom band, the feather and fan edging from the pattern library, but ended up ripping it out as even after blocking it twice it kept rolling up. I now have just the standard rib edging, and am tickled with how the whole project turned out. Thanks, Laureen and Zontee!
F Henricksen
I’m usually a size medium, Â but realized after trying the sweater on once I got to the armpit area, that the sweater was too small so I had to take the whole sweater out and reknit it in a large and it’s still a little tight. Â I think the pattern ran small. Â I’ll have to stretch it a bit when I block it.