
 Hi, everyone. Today I’m going to be talking about the final stages of making your sweater, and how you can keep on adding design elements even after all the knitting is complete! Once you’ve picked up the bands and sewn the sleeve seams and woven in all those ends, there’s still things you can do to change the look of your sweater.
One of my favorite ways to add some interest to a plain stockinette sweater is embroidery. I enjoy doing a method called duplicate stitch, with which you can put pictures on your garment, similar in look to intarsia, but much less fiddly! If you find an intarsia chart you like the look of, you can actually use this method to embroider it on to your sweater. It’s also a great way to use up random scraps of yarn!
With duplicate stitch, you are actually mimicking the look of stockinette stitch. You use a darning needle threaded with yarn in a different color to your base fabric, drawing over the chosen stitches so that they are covered with the different colored strand of yarn. This is a very easy method to add little motifs to your work. Be wary of covering large areas of fabric with this method, however, as it does make the fabric doubly thick in the covered areas.
Another way to embellish your sweater is to use appliqué to add a 3D design. Consider knitting or crocheting a flower to sew onto the front of your cardi. [Click here to explore the Lion Brand StitchFinder’s flower motifs.] Your imagination is the only limit!
You could also add a practical design feature, such as a pocket. The easiest ways to do this would be to knit a rectangle the size you would like your pocket to be, then sew it into place on your sweater.
Once you are satisfied with the look of your cardi, and you’ve added all the embellishments you’d like, it’s now time to block your sweater. Blocking can really improve the look of your sweater. It evens out your stitches, and you can also make your cardi a bit longer or wider (this may depend on the kind of fiber you’re working with). To block my sweater, I soaked it in lukewarm water then gently squeezed out the excess water and laid it out on my blocking boards. I then pinned it out to the correct measurements, using the schematic on the pattern as a guide. If your sweater is a little snug you can stretch it out gently, and using blocking pins, pin it to the width you’d like it to be. You can also add length to your garment in the same way. Here’s a look at my sweater on my blocking boards.
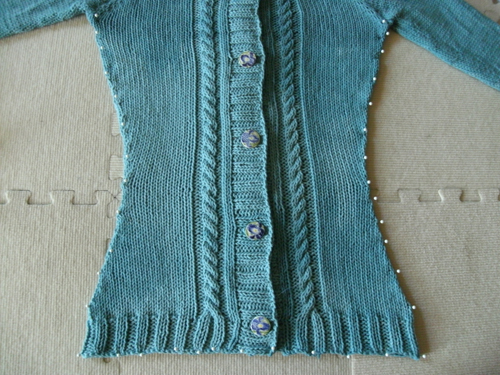
Depending on what fiber you’re using, you may not want to soak your sweater completely, as some fibers (like alpaca or 100% cotton) have more of a tendency to stretch out of shape than others. There are other ways of blocking that don’t involve soaking your sweater. You could pin out your garment and use a spray bottle to gently spritz it. If you’re not quite sure which method to use, try blocking your gauge swatch first to see how it behaves. Then you can leave your sweater to dry, and once it’s completely dry, you can wear your new sweater with pride! Here’s a look at my finished customized cardigan.
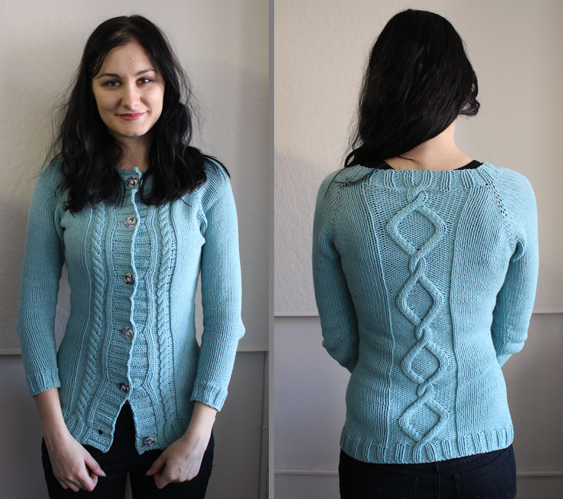
My total modifications were to add waist shaping, lengthen the body and sleeves, add cables to the fronts and back, and add buttons. It sounds like a lot, but it’s been so easy!
It’s been so much fun sharing this journey with you all, and it’s very inspiring to see all the different directions people went with their designs. I’ve even picked up some ideas for my next sweater! I hope that in the future you can see a pattern as just a starting point for your own design, and that you’ll feel confident enough to shape the sweater for your own unique body shape.
Be sure to keep sharing your comments, photos, and stories with us–we want to know how your sweater is coming along!
Related links:
Carolee
Your sweater is beautiful I like your buttons to, fun. Even tho I have a ways to go and being a newbi @ sweaters I am keeping mine simple. I what to wear the shawl pins ( of walnut ) my hubby made me for my birthday. Let them be the star. I will do this sweater again !! will take Craftygirls idea about verageated body and soild ribbing ( thanks craftygirl! ) this has REALLY been fun so many great ideas about colors and awsome encouragement to step out of the comfort zone.  Thank you Thank you – Looking forward the the CAL??
Cadence
The colour looks really good on you. I’m not a knitter, I’m a crocheter, but I think you did a really good job on it.
PJones
Wow Lauren, your sweater looks great!! You did a great job. I have been lagging behind the knit along trying to correct my mistakes. Now I am glad I did. You have given me some really good ideas to embellish my sweater.
I do have one question though. How did you align the cables with the K2-P2 ribbing? I think I am going to add some cables down the front as well.
Thanks!!
Zontee
 Hi PJones, it looks like Lauren used two 2/1 cables on the first RS (right-side) row to bring each sent of knit-stitches toward the middle by 1 purl stitch.
So on the first RS row after the ribbing, you would do a 3-stitch left cross (3-st LC) and a 3-stitch right cross (3-st RC) which are:3-st LC: Slip 2 st to cable needle and hold to front, p1, k2 from cable needle
3-st RC: Slip 1 st to cable needle and hold to back, k2, p1 from cable needle
Hope that helps!
PJones
Cool, thanks Zontee!!! That helps a lot.
Sylvia
Just finished my cardi and it’s going to my daughter in the UK for Easter. It was great to knit and so easy too. I retained the integrity of the cardi by not putting closures on it, ie., buttons, as I didn’t feel the fronts were wide enough for that and I’m glad I kept it as the original with the addition of front and back cables and with short sleeves. About to start one for myself now. Question: could any raglan sleeve pattern be knitted in the same way as long as it has a round neck?
Zontee
 Hi Sylvia, most top-down raglan patterns are roughly configured the same way. They may have different proportions, but they’ll all be built the same way with increases for the armholes and then dividing the armholes to separate them from the body, so yes, you could use this pattern as a jumping-off point for many raglan style garments!
Janice Eagan
I finished my raglan, Yippie!! Wow, did I learn so much with this KAL!! Prior to this project I’ve only knitted scarves and am so proud of how it turned out. I made it to wear over a couple summer dresses I own so I shortened the waist to more of a bolero style and kept the sleeves short. I originally added a button on the bottom but removed it because it made the sweater buckle up a bit. I’m planning to make this again with a longer waist in the next size up and with 3/4 sleeves. I’ll post a pic of my finished raglan Monday.
Just a quick question…are there any secrets to weaving in the ends? I wove mine in (used cotton ease) and little frayed pieces are sticking out here and there.Lauren, your sweater is stellar!Thanks so much for your instruction.:D
Zontee
 Hi Janice, two quick tricks I like: (1) be sure to weave your ends in at least 3 different directions–I like doing it in a C or a Z shape–which will keep the tail from popping out no matter which direction the fabric gets stretched; (2) if you’re really bothered by the frayed bit sticking out towards the right side of the fabric, tuck it into the wrong side and then use a little thread and a needle to stitch it to the wrong side with very small stitches–this will keep it in place. Hope that helps!
Marianne
When you weave in the ends, pull the yarn a little taunt. Then cut the yarn and gentle stretch the sweater. This will hide your ends.Â
Grace Jones
Very nice results! I’ve enjoyed watching this KAL especially because of the amount of modifications you made. This pattern is a great basic pattern that is perfect for customization.
Patty
I Finished two nights ago. Here is a photo.
Jphillips5
that is beautiful
Eileen
Very nice, I like your lace pattern in the front.
Michelle
I really like you lace on the front. The colors peeking through look very nice.Â
Zontee
 Great job!
Elsa in VA
Your Cardigan turned out great! it’s amazing how much you were able to customize it.
I do have a question about blocking. I used Vanna’s Choice for mine, should I block it the same way you did yours?
Thanks so much!
Zontee
 Hi Elsa, you can certainly block like Lauren did. You could also combine it with washing your sweater (toss it in the machine for a cycle) and then pin it out and let it dry for a little light blocking. Hope that helps!
Elsa in VA
Thank you Zontee, I appreciate it!
Eileen
Thanks Lauren. Your sweater is lovely. It’s been my first KAL and my first sweater. I still have a ways to go but have printed out all your posts to refer to. I have enjoyed this very much and love that I can expand my knitting experience like this. Can’t wait to make this again and try some more extras : )
chilebeen
Hi Lauren. Your sweater is great and looks gorgeous on you! I love the colour. Thanks for the ideas you gave. I am now waaaay too excited to try my hand at appliques and borders as well. The Lions site has wonderful inspirational ideas. thanks so much . looking forward to the next kal.Â
Epiplastra38
Hi Lauren. Your project turned out great! I just discovered this Knit-along yesterday!! I’d love to give this top-down cardi a try myself. My question is–How long will your instructional sessions be available online?? I’ve already downloaded the pattern but I’d like to make some changes and will need to be following some of your helpful instructions.
Zontee
 Hi there, as with all of our knit-alongs, the blog posts stay up indefinitely. You can always come to http://blog.lionbrand.com and click on “knit-along” under “Categories” in the right-hand bar to view old knit-along posts. Hope that helps!
Claire
Attached
are some pics of my cardigan that I knit during the March knit-along. Never participated before because I thought
the project was too advanced for my skills and time frame allowance. I wanted to send something hand-made to my
sister for her birthday in early April. Being up against a deadline (and
nervous about finishing in time) I stuck to the basics pretty much, only
substituting seed stitch for the sleeve and front trims. I’ve managed to finish in time for the blocking, photo shoot
and even shipping it to her for the special day, even though there was a
week I wasn’t able to knit at all due to
a turbo-knitting frenzy the night before. Â
I like your cable modifications and now I know that the YO creates such
an open, lacy detail I might change it next time to something more closed or
sturdy. And because that detail is the
only difference in the field, it was a good thing that I frogged the rows that
weren’t exactly lining up, as my better half suggested. Yippee! One Finished Object Done! Moving on to something not as dark.  Â
Carolee
Very nice
Custom Raglan Cardi Knit-Along: A Round-Up of Participant's Projects | Lion Brand Notebook
[…] Custom Raglan Cardi Knit-Along, Week 6: Embellishing and Blocking Your Finished Sweater […]
Kathynelson2200
I love the eyelet detail on the fronts of the green cardi made by miss creek . I know it’s the same as for the sleeves but I don’t want stitch increases there. How do I do the eyelet?
Thanks,
Kathy
Zontee
 Hi Kathy, misscreek paired her yarn-overs (the increase that makes the eyelet) with an immediate k2tog (a decrease) so that she was adding a stitch, but then taking a stitch away (which made the stitch-count stay the same). Hope that helps!
Kathynelson2200
Thanks, that makes sense. Would I do that yo, k2tog on each side of the middle k ? Probably not explaining very well. I’ m using a Terracotta, CottonEase & just love working with it.
Zontee
 Don’t worry, I get what you’re saying, and yes, that looks like how she did it (k2tog, yo, k, yo, k2tog).
Kathynelson2200
It’s working up nicely. Thank you so much for the help.