
 Hello everyone! For those who are following along live, this week we’re done! Please post pictures as you finish your project!
After your blocking is completed, the final step is seaming the two halves together. With crochet, seaming is very easy because you can simply crochet the two pieces together! You will first be seaming the two longer edges of the upper and lower halves. When you crochet, you will be holding the pieces with the right sides together. I laid them flat in the picture so that it is easy to see where to insert the crochet hook.
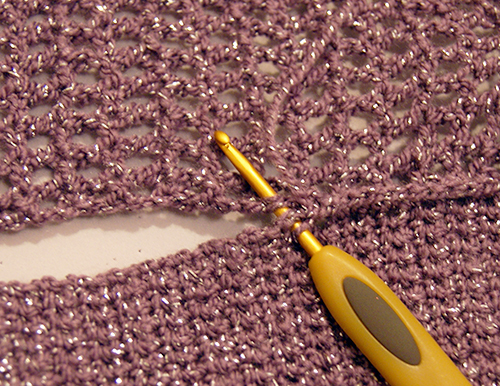
Since the two fabrics are different stitches (single crochet vs. double crochet mesh), the slipped stitch seam will not be as straightforward. Divide each edge into quarters with stitch markers, and line the markers on the upper half with those on the lower half to stay on track. For my seaming, I inserted the hook into each row of single crochet on the bottom half and went directly across to the upper half, making sure the hook is going under two strands of yarn on each edge for strength. I ended up with two or three stitches along each double crochet on the upper half, but this is not exact since you’re working along the edge of the fabric.
After the long, straight middle seam is done, it’s time for the underarm seaming. If you eliminated the slope of the underarms, this makes seaming easier since everything is straight and even. If you kept your project as per the original pattern, you’ll notice that the slopes on the upper half differ from those on the lower half. To make seaming easier, take a flexible tape measure and find the middle of each sloped underarm. Next, place a stitch marker at these points. Then, divide into quarters the same way. Line these stitch markers up when you seam in order to stay on track. Once you’re done seaming, weave in your ends and voilà! You can try your project on. If you’d like, you can steam the seams after they’re done to give them some more softness and flexibility.
The final step is the button. Buttons are totally optional, and it’s good to wait until your project is completely done before you decide on button sizes. The pattern recommends using a 3/4 inch button, but it’s really up to you what you use. The button loop length will also be based upon the size of the button you end up getting for your shrug. There are a couple things you need to think about when deciding what it right for you in terms of buttons. After all the seaming is done, try on your shrug. If you made it smaller and tighter, the fronts may not come across your chest all the way, and therefore you would not need buttons. This is totally fine as wearing it open is a fun style choice, and some people may just prefer to do it this way. Secondly, decide if you need more than one button. If your shrug is looser fitting and much of the shrug touches in the front, you may want two or three buttons instead of one to hold it together better. Start by looking at the seam where the mesh meets the single crochet. This is more than likely where your button will be placed, but it depends how the shrug fits on your body and where you want it to close. For multiple buttons, use the front seam as a guideline. For two buttons, measure equal distances away from the seam on either side to place your buttons. For three buttons, place the middle one on the seam, and then measure away from that button on either side to place the other two. Another option would be to use hook and eye closures that you can find a sewing or craft store to close your shrug.
For my shrug, I decided on one small button since I wanted it to be a subtle detail. But some of you may want a big, fun statement button! It’s really up to you. Your button loop is very simple, just chain stitches. The pattern calls for seven chains, but I only used five for my small button. Sew the button or buttons on first, and then as you work the button loop, you can try it around your button and see how the button will fit. You want the button loop just big enough to fit the button through comfortably — not so loose that the button will fall out, but not tight enough that you have to struggle to get it through. Once you have affixed your desired button or closure on the shrug, you’re all done!
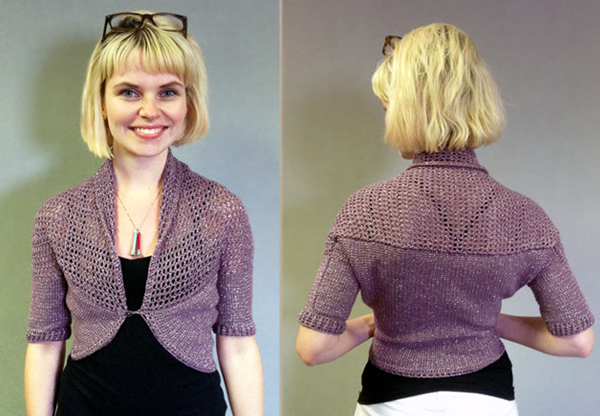
My shrug ended up being the perfect size! You can tell from the pictures that the sleeves are skinnier, since I modified the pattern to eliminate the extra fabric underneath. The sleeves ended up a good length, and purple is a great color that will go with a lot of things that I wear. If you haven’t finished your shrug here, these posts will always be here to help you along as you reach the checkpoints. Just search for “Glittery Shrug Crochet-Along” on the Lion Brand Notebook to find the posts.
It was fun getting to crochet along with you all! Feel free to ask questions in the comments below, and we’ll see you next time!
Related links:
Almamagee
Wow, that is so pretty! So nice to see the final result. I’m still working on my (using leftover cotton).
Grace Jones
Looks great on you!
Brandischoch
i did finish mine:) Of course I changed the yarn weight but it’s still the same shrug
Almamagee
Would love to see a picture!
Fatendyab
I liked it!
But i need more picture for explaining.
Thansks allt.
Dzavala
Very nice!!
Ladyg202
I would like to try and make this but, what is blocking?
Jess Hicks
Blocking is the process of stretching and shaping your fabric so that it matches the finished dimensions of the garment. It can also give the fabric a little more drape. Vanessa described blocking the shrug in her previous post, which you can read here:Â http://blog.lionbrand.com/2012/06/14/glittery-shrug-crochet-along-frontback-post-stitches-and-blocking?utm_source=blog06212012&utm_medium=blog&utm_campaign=LB Hope that helps!
Condokey
Where do I find the pattern to start this crocheted shrug
Adri
http://blog.lionbrand.com/2012/05/17/announcing-our-summer-2012-crochet-along-the-glittery-shrug/#more-12938
Go to above web page… after the instructions and just before Comments… under Related links. You will find a link to the pattern there.
Bethany
I can’t wait to see more pictures of finished projects! Mine is not nearly done :(, but I’m going to keep trucking along, and I know I’ll get it finished eventually! Thanks for sharing this project, everyone!
Patty
Where will we see photos of the finished shrugs? I’d love to see the different yarns & styles completed!
Lorraina Allen
Mine has been finished for a long time but not the sleeves as i do not understand how to deal with all the steps on the side, also think it’s too small sideways and the sleeve area is going to be too small and tight and i don’t know if i can add stitches on either side at this point so i have lost interest in even trying to finish it because i don’t even understand how it goes together; it’s basically a big square that took me over 3 months to crochet and impossible to even try it on. I’ve only made baby clothes and toys before and always just follow the pattern and they turn out perfect.  When i chose the pattern i didn’t know that now i’d be seeing other forms without the steps and all redesigned and different etc and that just confuses me more. I’m so frustrated as i’ve lost 40 lbs since i began and looks like it’s still going to be too small even though i followed size 1X . My circumferance measurment is 74 but what good is that to find out at this point. No, i didn’t make a swatch, at the time it didn’t seem necessary and i have never made one before. I do not know how to block, or why, or even have the space to lay it wet for days, probably weeks, i don’t have those wires or big pins and not going to order them as i am in Canada, way too expensive and things take too long to get here. What good would holding an iron above it do? So many mysteries with this thing. When i started this project there was no help, no forum and i was never sure if it was even being made correctly with such strange instructions. I still do not get this shrug or how to try it on without seams somewhere. Sorry if this rant displeases anyone, but practical is me. You can see what i ended up with before i sent it to the attic here: http://giveyouapieceofmymind.blogspot.ca/
Almamagee
Hi Lorraina,
Just looked at your website. Your work looks so beautiful! I think all you need to do is put it together! I find it confusing too because you can’t really try it on until it’s done. I happen to have a store bought shrug, and have that as an example. All you need to do is leave the sleeve opening on the right and left open and seam the rounded parts together and it should work. There are also some great pics on the Ravelry site (amybyoung’s Glittery Shrug) that might give you an idea of how the pieces fit together. Hope this helps. Good luck!
Jeri
Your shrug is lovely and looks beautiful on you! HOWEVER! It is nothing like the pattern picture, and neither is mine! I want the 3/4 length sleeve as pictured. Can I simply add about 6′ to that sleeve portion of the pattern to achieve this? Did anyone’s finished product turn out with 3/4 sleeves as pictured?
I’m ready to tear it all out and start afresh.
Zontee
Hi Jeri, you can certainly add length to adjust the sleeves. Since this shrug is not a super-fitted garment, how it fits on each individual is going to vary a lot. For instance, you’ll see that this participant’s shrug below (in white) was made following the pattern and the sleeves are long on her, and the other person (whose shrug is show below in gold)Â shortened her sleeves in order to get the 3/4 length.
Feel free to adjust as as needed–you can certainly make the cuffs longer and see how you like that look. Hope that helps!
Linda Heredia
I know that I am way behind in finishing this project. Oh well, story of my life! I am having trouble understanding the instructions for starting the border. The instructions refer to the short end, but that is the part that is shaped. Is that really where the border is supposed to go? As a person who learns by seeing and reading the instructions, having more pictures and diagrams would certainly make life easier. Any one out there who can offer suggestions will be greatly appreciated.
Zontee
Hi Linda, don’t forget to check one of the earlier Crochet-Along blog posts where Vanessa talks about the border:Â
http://blog.lionbrand.com/2012/06/07/glittery-shrug-crochet-along-working-the-lower-border-edging-and-the-upper-mesh/
Hope that helps!
YMM424
I just discovered this section and happy that I did…I look forward to more as I prefer to crochet than to knit. Thanks.
Sharon McIndoe
This is a beautiful piece. It is very easy just have to make sure to count the stiches.
CAN’T WAIT FOR THE NEXT CROCHET-A-LONG!!!!!!
Zontee
Hi Sharon, check back in early August for an announcement about the next crochet-along! We hope you’ll join us!
Sharon McIndoe
GREAT!!!!! I cannot wait. Thank you!!!!