
Technical editor and yarncrafting expert returns to share tips on finishing your crochet projects. Join her next month for tips on finishing your knitting project. Click here to yesterday’s blog post; click here to see Sunday’s blog post.
The final touch for many projects is an edging. Below are photos of three samplers showing a variety of edgings. Instructions for each of the edgings follow the photos. Most of the edgings are quick and easy, some require a little more patience and skill. The edgings are grouped by type.
MATERIALS
Make an adjustable ring.
Rnd 1: Ch 1, sc in ring, hdc in ring, (ch 1, 2 dc in ring) 5 times, ch 1; do not join, work in continuous rnds (spiral) – 12 sts and 6 ch-1 sps at the end of this rnd. Place marker for beg of rnd. Move marker up as each rnd is completed.
Rnd 2: (2 dc in each of next 2 dc, ch 1, sk next ch-1 sp) 6 times – 24 dc and 6 ch-1 sps (4 dc each between ch-1 sps) at the end of this rnd.
Rnds 3-8: (2 dc in first dc, dc in each dc to 1 st before next ch-1 sp, 2 dc in next dc, ch 1, sk next ch-1 sp) 6 times – 60 dc and 6 ch-1 sps (10 sts each between ch-1 sps) at the end of Rnd 8.
Rnd 9: Hdc in next st, (sc in each st to next ch-1 sp, ch 1, sk next ch-1 sp) 6 times.
Edging Rnd:
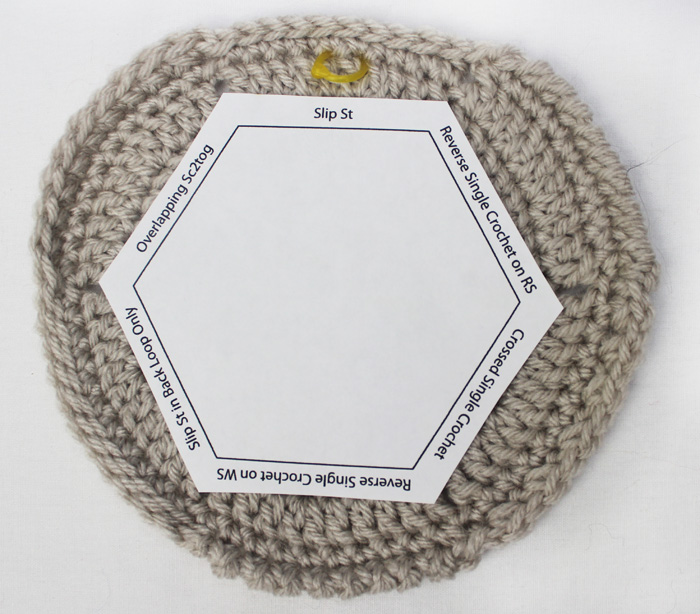
Slip St: Sl st in next 10 sts, ch 1, sk next ch-1 sp.
Overlapping Sc2tog: Sc2tog, (beg in same st as 2nd leg of last sc2tog made, sc2tog) 9 times, ch 1, sk next ch-1 sp.
Slip St in Back Loop Only: Working in back loops only, sl st in next 10 sts, ch 1, sk next ch-1 sp.
Reverse Single Crochet on WS: Turn piece so that WS is facing you, ch 1, rev sc in next 10 sts, turn piece so that RS is facing you, ch 1, sk next ch-1 sp. Note: Reverse single crochet (rev sc) is worked like single crochet (sc) except that you work in the opposite direction (from left to right if you are right-handed, and from right to left if you are left-handed).
Crossed Single Crochet: (Sk next st, sc in next st, sc in skipped st) 5 times, ch 1, sk next ch-1 sp.
Reverse Single Crochet on RS: Cut yarn, draw up a loop in last ch-1 sp, ch 1, rev sc in next 10 sts.
Fasten off.
Work same as Firm Edgings Sampler through Rnd 9.
Edging Rnd:
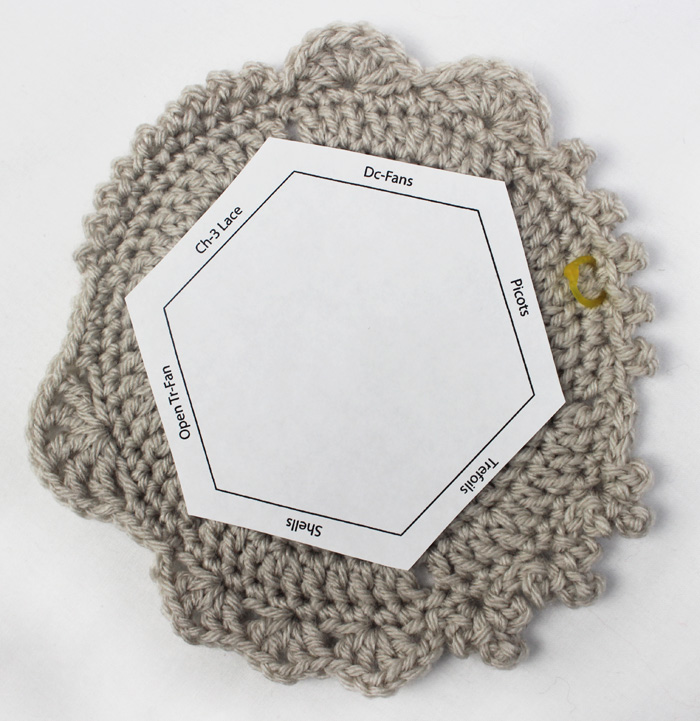
Picots: *Sl st in next st, sc in next st, ch 3, sl st in top of last sc made (picot made); rep from * 4 more times, sl st in next ch-1 sp.
Dc-Fans: Sk next 2 sts, 6 dc in next st, sk next 2 sts, sl st in next st, sk next 2 sts, 6 dc in next st, sk next st, sl st in next ch-1 sp.
Ch-3 Lace: Sl st in next st, (ch 3, sl st in next st) 9 times, sl st in next ch-1 sp.
Open Tr-Fan: Sc in next 3 sts, sk next 2 sts, (tr, [ch 1, tr] 4 times) in next st, sk next 2 sts, sc in next 2 sts, sl st in next ch-1 sp.
Shells: Ch 1, sk next 2 sts, *(2 dc, ch 2, 2 dc) in next st, sk next 2 sts; rep from * once more, (2 dc, ch 2, 2 dc) in next st, ch 1, sk next st, sl st in next ch-1 sp.
Trefoils: Sl st in next st, (sl st, ch 3, sl st, ch 5, sl st, ch 3, sl st) in next st, sl st in next 2 sts; rep from * 2 more times, sl st in last ch-1 sp.
Fasten off.
Stitch Explanation
Cl (cluster): Yarn over, insert hook in indicated st and draw up a loop, yarn over and draw through 2 loops on hook (2 loops remain on hook), yarn over, insert hook in same st and draw up a loop, yarn over and draw through 2 loops on hook, yarn over and draw through 3 loops on hook.
Instructions
Work same as Firm Edgings Sampler through Rnd 9.
Edging Rnd:
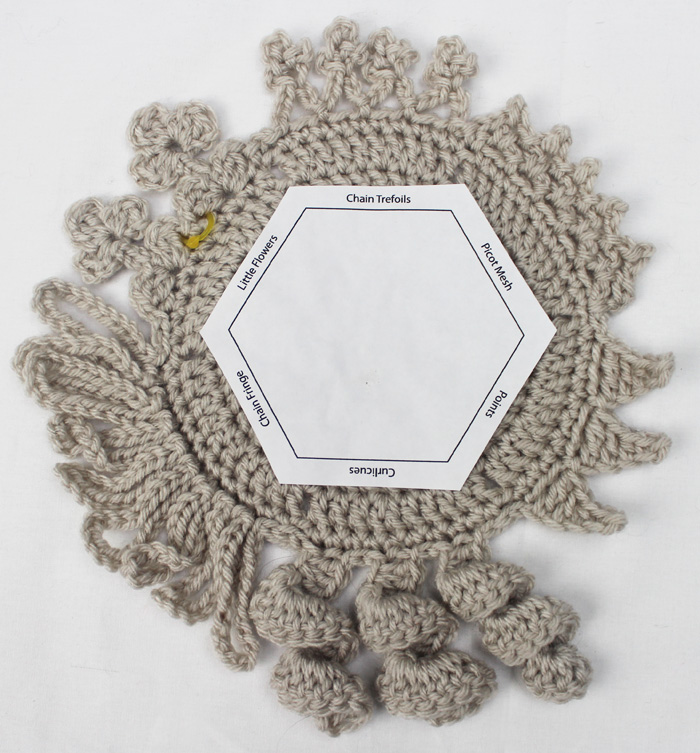
Little Flowers: Ch 1, sk next 2 sts, *(Cl, ch 2, sl st) in next st, ch 6 (for stem), Cl in 3rd ch from hook, ch 2, sl st in same ch, (ch 2, Cl in same ch, ch 2, sl st in same ch) twice; working in free loops down other side of stem ch, sl st in next 3 ch; working in sts of Rnd 9, (sl st, ch 2, Cl) in same st at base of stem, ch 1, sk next st, sl st in next st, ch 1, sk next st; rep from * once more, sl st in next ch-1 sp.
Chain Fringe: Sl st in next st, (ch 20, sl st in next st) 9 times, sl st in next ch-1 sp.
Curlicues: Sl st in next st, (ch 12, 3 dc in 4th ch from hook, 3 dc in next 8 ch, sl st in next 3 sts of Rnd 9) 3 times, sl st in next ch-1 sp.
Points: Sl st in next st, (ch 6, sc in 3rd ch from hook, hdc in next ch, dc in next ch, tr in next ch, sk next 2 sts, sl st in next st) 3 times, sl st in next ch-1 sp.
Picot Mesh: (Ch 3, sk next st, sl st in next st) 5 times, ch 3, turn, sl st in next ch-3 sp, (ch 3, sl st in next ch-3 sp) 4 times, ch 1, hdc in ch-1 sp of Rnd 9, turn, sl st in first hdc, *ch 4, sl st in 3rd ch from hook (picot made), ch 1, sl st in next ch-3 sp; rep from * 4 more times, sl st in each ch to next ch-1 sp of Rnd 9, sl st in next ch-1 sp.
Chain Trefoils: Sl st in next st, *ch 6, (sl st, ch 4, sl st, ch 2, sl st) in 3rd ch from hook, ch 3, sk next st of Rnd 9, sl st in next st; rep from * 3 more times, sl st in next st of Rnd 9, sl st in last ch-1 sp.
Fasten off.
For more articles by Kj Hay, click here.
Suzanne Broadhurst
I love how you show several edgings on one piece of crocheted *fabric*. Very helpful to compare the look/size of each. Thank you!
Suzanne
Love it! Thanks….
Sandiesan
Great article and a very helpful reference. Thanks!
Cmarie
This is very good stuff, thank you! I do have a question. If we have decided on an edging, how many sts will each one take, or what are the multiples needed for the various sts?
Zontee
Hi Cmarie, good question! I’d recommend actually counting the stitches below the trim you like so you can see how many it takes. (Generally, all of these designs were done on 9 or 10 stitches of the sampler, but you can just count the stitches below one repeat and you’ll most likely want to add one stitch to that multiple for your ending stitch.) Hope that helps!
Zaz
i wish this was charted