
This column by Barbara Breiter, author of The Complete Idiot’s Guide to Knitting & Crocheting, originally appeared in The Weekly Stitch newsletter.
Fringe can be added to just about any project: afghans, scarves, shawls, even the bottom of a sweater.
There are countless variations. It can be long or short. You can add just a few strands or a thick bundle. Fringe sections can be spaced close together or far apart. Use the same yarn you used in the project or a contrasting color; you can use an entirely different yarn as well. Or you can combine different yarns within the same section. Strands can be even or you can make them differing lengths, either within the same fringe section or alternating sections. Experiment and have fun!
Here are some examples of projects using fringe:
| Knit Croak Skull Illusion Scarf |
Loom Knit Fringe Poncho |
Knit Cabled and Fringe Hat |
Some yarn frays quickly at the end when it’s cut; some people like how this looks and others don’t. Eventually all fringe will fray at the ends with wear to some degree. If you would like to minimize this, you can either knot the ends of your fringe or apply a fabric glue or seam sealer, such as Fray Check (a liquid seam sealer used in sewing). Keep in mind that while this will minimize fraying, there will be this glue-like substance on the ends.
Here’s how to make and attach fringe:
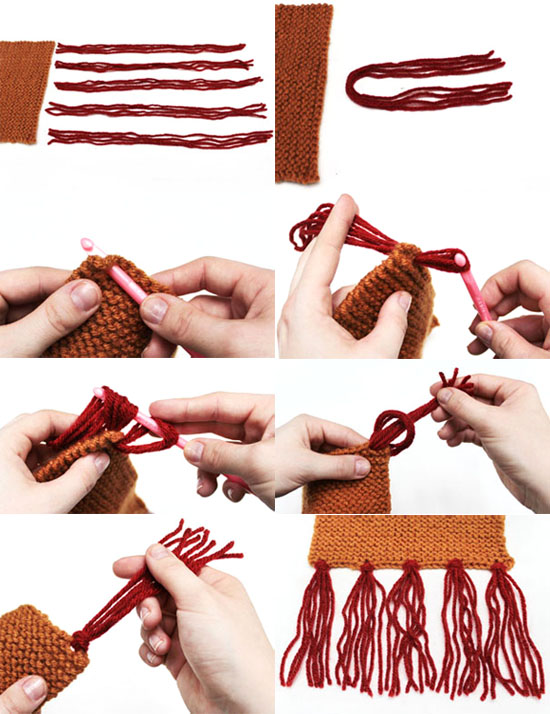
Cut lengths of yarn 1″ longer than twice the desired length. The number of pieces needed will vary depending upon many factors, including the width of the piece, how many strands per section you’ll use and how far apart they will be spaced. It really depends on your taste.
Evenly line up the desired number of strands for one section and fold them in half. Insert a crochet hook from the wrong side to the right side at the point you want the fringe. Grab the folded yarn with the hook and pull it part way through to form a loop. Make sure you pull through all the strands.
Pull the ends of the fringe through this loop with your fingers or a hook. Even it out and pull tightly to knot it. Lay the project flat and “comb” the fringe straight with your fingers. Even up straggly ends with sharp scissors.
It’s just that easy!
–-
To sign up for the Weekly Stitch and get columns like this, free patterns, how-to videos and more, click here.