
Let’s face it: weaving in ends is not nearly as fun as crocheting or knitting. My favorite way to avoid weaving in ends is the felted join. Also affectionately dubbed the spit splice, this method is the perfect way to add join a new skein to your work. Keep in mind that this will only work on feltable fibers like non-superwash wool, alpaca, mohair, and so on. Here are step-by-step instructions on this fast and easy technique. I used 2 different colors so that you can better see the technique, but this works brilliantly for attaching the same color yarn practically invisibly.
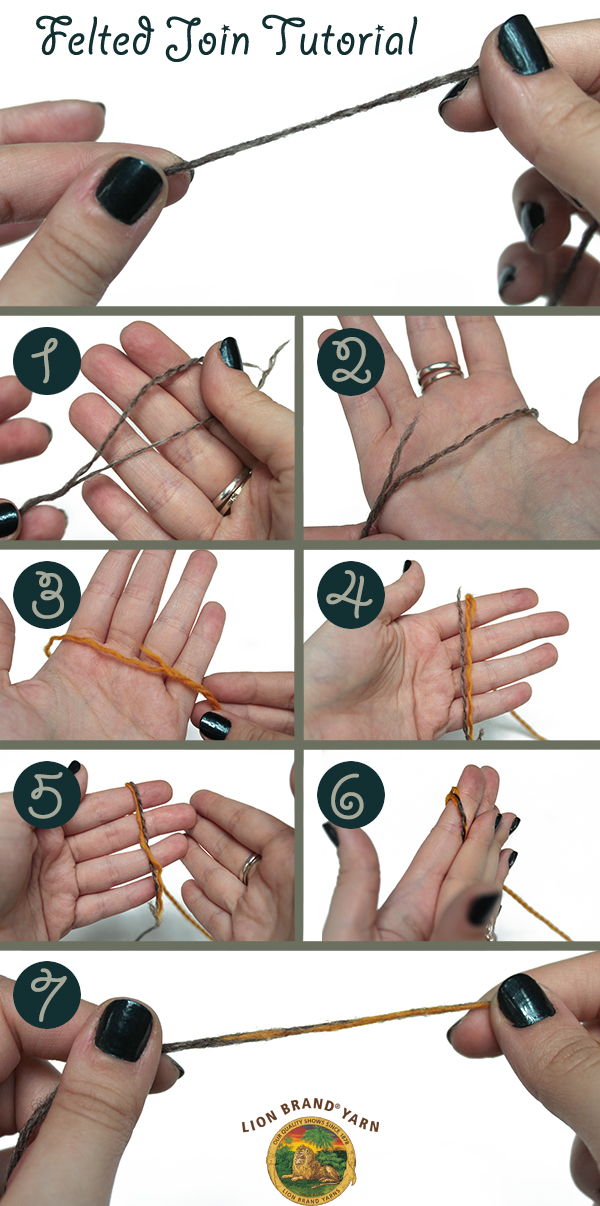
Step 1: Carefully untwist your yarn for a few inches and separate the half of the plies. This Fishermen’s Wool has 4 total plies, so I’ve divided my yarn into 2 sets of 2 plies each. 2-ply yarn would be separated into 2 sets of 1 ply each, 6-ply yarn would be 2 sets of 3 plies each, and so on.
Step 2: Take one set of your plies. A few inches down (4-5 inches, just to be safe), break these plies. Now you’ll have a set of longer plies and a set of shorter plies.
Step 3: Repeat steps 1 and 2 on the yarn you’ll be joining.
Step 4: Lay the long sets of plies next to each other. This will be the transition section of your yarn. Because each long piece of yarn only has half the plies, you’ll end up with roughly the correct thickness in your join.
Step 5: Get your yarn wet. You can dip it in water, mist with some water, add some saliva — just get it wet. Remember, felting simply requires heat, humidity, and agitation.
Step 6: Let’s felt! Rub the yarns together in your hands briskly. Continue for a few minutes until the fibers have locked together. You may need to add some more water if your yarn isn’t wet enough.
Step 7: Give both sides of the yarn a gentle tug. If they’re firmly locked, congratulations! You’ve made a felted join! If not, just continue the felting process until the yarn is secure.
Now you’ll have an easy and secure join in your yarn, so you can continue crafting with having to weave in ends.
Related links:
A Look At Wool-Ease; a Classic Worsted Weight, Easy Care Yarn 9 Fan-Favorite Patterns | Lion Brand Notebook
[…] How to do Felted Joins on Yarn Ends […]
Paige H
Thank you so much for the tip! I used it this week on a wool vest I’m crocheting, and it works like a charm! No more loose ends!!!! 🙂
A Look at the Different Properties of Wool Yarns: Facts to Know In Selecting The Right Yarn for Your Project | Lion Brand Notebook
[…] How to do a Felted Join on Yarn Ends […]
The Best Ways to Join Yarn for Knit and Crochet | Lion Brand Notebook
[…] the Felted Join (which can only be done with animal hair fibers), which you can see a tutorial for here, and the Russian Join, which you can see a tutorial for here. As you experiment in your […]
Needle lovers share your work here - Page 330 - CurlyNikki Forums
[…] Tuesday so here is a great Tip on how to join yarn __________________ Keep it curly Birthday August 2009 Rebirth December 2010 […]
Knitting project: Smoky Mountain Scarf « Jaime's Expressions
[…] one point, I was required to join the new skein to my work. I decided to try the felted join for the first time and it turned out to be a good decision and did not require me to weave in ends […]