If you’ve mastered scarves, shawls, and other rectangular objects, you may be thinking about what else you can make. Or perhaps you want to make a garment, but you like instant gratification and don’t want to think about sleeve shaping, buttonholes, etc. Luckily for you, we have a lot of basic shrug projects on LionBrand.com that are just rectangles seamed up to create “sleeves.” These shrugs come in all shapes and sizes, so be sure to browse through all of our various patterns to find the one that’s right for you.
How does a rectangle of fabric (plain or with a design) become a shrug? With a little help from Lion Brand Yarn Studio manager Michelle and the Golden Honey Shrug pattern, I’ve put together this quick guide to help you understand the construction of the shrug. (Click on the photos to enlarge.)
 |
Sew the Seams
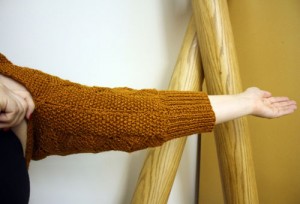
What all of the patterns highlighted in this blog post have in common is that the “sleeves” of the shrug are made by simply seaming up several inches of the edges of the rectangle, leaving a space in the middle for you to put the shrug on. It’s quick and easy, but if you need a little help with your seaming, be sure to check out our tutorials. Knitters, click here for tutorials on several seaming techniques. Crocheters, click here for our invisible sewn seam tutorial or click here for the slip stitch seam tutorial. |
 |
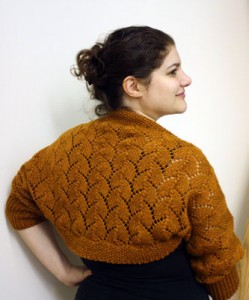
The Back of the Shrug This particular shrug is designed to be a cropped length, so it sits just above Michelle’s waist, but we do have lots of patterns for oversized shrugs too. Click here for our fan-favorite Simple Crochet Shrug. |
 |
The Front of the Shrug
Some shrug patterns, like this one, will have a very open front, in which you’ll mostly only see the sleeves when viewing it from the front. Depending on how “tall” the rectangle of the shrug is and how it’s seamed up, you’ll find that some shrugs will have more of a short-sleeved-cardigan-like look. Click here for an example, our Knit Ruffle Shrug. The taller the rectangle, the more the fabric will show at the front (and the longer the back of the shrug). The wider the rectangle, the longer the “sleeves”. |
 |
Shaping through Stitch Patterns
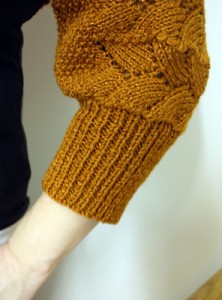
In this particular shrug, we’ve used 1×1 ribbing on the edges of the rectangle to create cuffs. Even though there’s no increasing or decreasing in this shrug’s overall stitch count, the ribbing creates an illusion of the fabric gathering. We use this in other ways on other shrugs. For instance, with our Knit Speckled Shrug, ribbing is used to create a “collar,” while in our Crochet Sequoia Shrug, the overall back-loop stitches (which create a ribbed look) add a lot of shape on their own, so no additional stitch pattern is needed. |
Customizing Your Shrug
A wider shrug will look good on someone who is tall and broader-shouldered like Michelle, but you could adjust the size of your shrug to fit your body by increasing or decreasing the width and/or seaming up more or less of the rectangle to change the length of the “sleeves” versus the “body.” For tips on adjusting rectangle-based patterns, click here for an article on this topic from LionBrand.com.
Design Your Own Shrug with Stitch Patterns
You’ll notice that with the Golden Honey Shrug that we’ve got a lace pattern in the middle, seed stitch at the top and bottom edges to create the “collar,” and the ribbing to create cuffs. (It’s easiest to see in the photo of the back.) By mixing and matching stitch patterns (check out the Stitch Finder on LionBrand.com), you can create your very own shrug pattern that’s designed just for you.
For even more rectangular shrug options, check out:
You must be <a href="https://blog.lionbrand.com/wp-login.php?redirect_to=https%3A%2F%2Fblog.lionbrand.com%2Fhow-to-turn-a-rectangle-into-a-shrug%2F">logged in</a> to post a comment.
Bliss Kara
Thank you for being inside my brain!:
“If you’ve mastered
scarves, shawls, and other rectangular objects,
you may be thinking about what else you can
make. Or perhaps you want to make a garment, but
you like instant gratification and don’t want to
think about sleeve shaping, buttonholes, etc.”That is me, to a tee! Can’t wait to try a shrug pattern 🙂 Thanks Lion Brand!
DJ Hendricks
My favorite Lion Brand Yarn shrug is made with your Homespun yarn. Check out http://www.lionbrand.com/patterns/90689B.html?noImages=0Â I've made about 6 or 7 of these for friends and family and everyone loves them! They’re so quick and easy to make and look wonderful on. I even made one in a green color that came out almost like a tweed cardigan that a male friend wears. It looks fantastic on him, too!
Anonymous
I made 3 of  your Simple Shrug patterns for Christmas 2011. They are made with your Homespun Yarn. They are very easy to make and the yarn makes them really soft. The people that I made them for really loved them.Â
DIY: turning a rectangle into a shrug | Still Dark @ Heart
[…] flu since Saturday morning. I’m better today and so I thought I’d share a cool link: How To Turn A Rectangle Into A Shrug (via Lion Brand […]
9 Patterns To Get You Ready for Spring | Lion Brand Notebook
[…] How to Turn a Rectangle Into a Shrug […]
12 Styles of Shrug Patterns to Knit & Crochet | Lion Brand Notebook
[…] For more info on designing your own shrug, see one of my older blog posts. […]
S
The shrug I want to make says chain 69. If I chain less, will the shrug be shorter or less wide? First shrug so please help