
Casting on, the foundation of knitting. For beginner knitters, we recommend learning the knitting cast-on first, it’s simple and leaves an edge that stretches well. After you learn this method, there are many more to choose from!
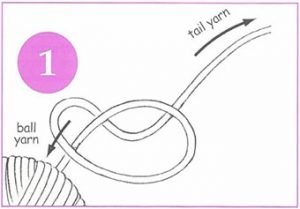
Step 1: Work on a flat surface, it will be the easiest for just starting out. Begin by placing the ball of yarn to your left and holding the free end (tail) of the yarn in your right hand. Make a loose loop in the yarn from the free end (the tail) by looping the yarn from the right to the left. The tail will be front and on top of the strand that comes from the ball of yarn. Pass the tail behind the strand, pulling the tail gently to the right so that it passes behind the loop and the end of the yarn lies to the right of the loop and the ball of yarn.
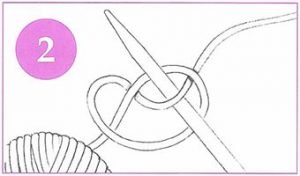
Step 2: Holding one needle in your right hand, move the needle upwards over the bottom strand, slide the tip of the needle under the strand of yarn that comes from the tail, pick it up and pull it upwards through the loop. Gently pull the tail of the yarn with your right hand so that you tighten the yarn around the needle. Congratulations! You have just made your first stitch!
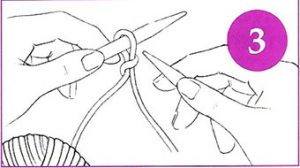
Step 3: Put the needle with the loop on it in your left hand grasping it between the thumb and your forefinger of your left hand (like you’re holding a pencil), but with the tip of the needle pointing up. The yarn from your ball will be IN BACK and on the bottom of the left needle. Pick up and hold the other needle in your right hand, as you would hold a pencil, but with the tip pointed up.
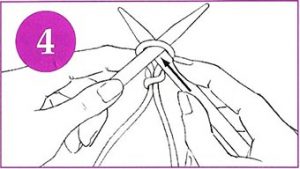
Step 4: With a motion from front to back, insert the tip of your empty right needle into the loop on the left needle, underneath the left needle. The needles will cross inside the loop with the right needle under the left one.
Step 5: Adjust your thumb so that you are gently gripping both needles between the thumb and forefinger of your left hand. The right needle is still on the bottom.
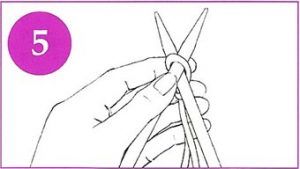
Step 6: There are two strands of yarn hanging down from the stitch. One is the tail of the yarn and the other strand is from the ball of yarn . You will be working with the strand that goes to the ball of yarn. Holding the yarn with your right hand and keeping the needles in your left, bring the strand of yarn underneath the right needle. Wrap the strand around the tip of the right needle, starting underneath from the right, going around the back to the left and bringing the yarn up and over the needle to the right so that the yarn is wrapped in a clockwise motion. the strand of yarn will be on your right when you have finished.
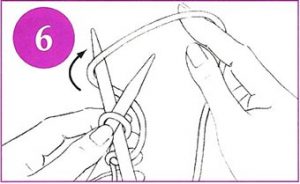
Step 7: Pull the yarn with your right pointer finger to tighten it so that it is not loose on the needle. Keeping the yarn wrapped on the right needle, pull the tip of the right needle towards you, out from below the left needle and up through the center of the stitch on the left needle. Then, slide the tip of the right needle so that it is now on top of the left needle and the yarn that is wrapped around it has been pulled through the stitch that is on the left needle. When you are finished, the tips of your needles will be crossed with the tip of the right needle on the top and the left one below. There is a loop on the right needle that has been pulled up through the stitch. Don’t get discouraged if you don’t get this on the first try!
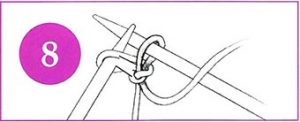
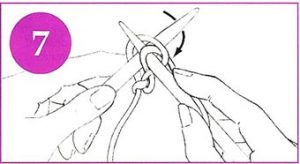
Step 8: Now you have one loop on each needle with the right needle resting on top of the left needle. Elongate the pulled-through loop on the right needle by pulling it gently. This will soon be your second cast-on stitch!
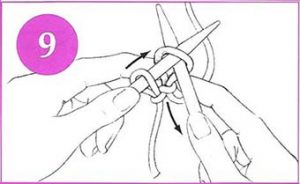
Step 9: Transfer the new cast-on stitch from the right needle to the left needle by inserting the tip of the left needle into the loop of the stitch that you have just created on the right needle and slipping the stitch from the right to the left needle.
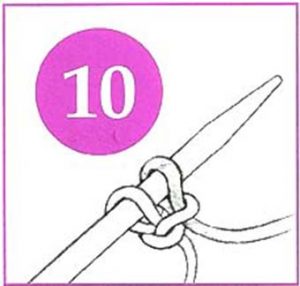
Step 10: You know have two loops (cast-on stitches) on your left needle!
Repeat steps 4-9 until you have the desired number of stitches on the left needle!
Click here for a video tutorial for casting on!
You have now learned how to cast on! Stay tuned for the next lesson, learning the garter stitch!