
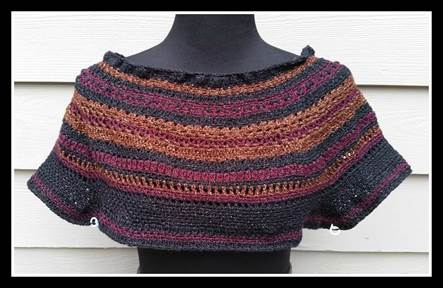
I love seeing a project come together!! Last week we made our swatches to assure our gauge was correct, joined the first row without any twists (hopefully) and worked on the first few rounds of our Sabrina Tunic!! Like I said last week… Those first few rows are the hardest part… So now we are ready to kick into gear and get our Yoke made!!
Since the Sabrina Tunic is made in one piece from the top down, this project will start shaping up quickly and we will see a hint of how it will look by the time our Yoke is complete. I love working with Vanna’s Glamour Yarn… The small amount of shimmer and sparkle will make this a perfect piece to wear this fall, and the nice bounce the yarn provides is also going to make the garment fit nicely. It’s still not too late to join us and make a Sabrina Tunic for yourself. You can even have the yarn shipped right to your doorstep… Click here to view and order your yarn kit!! If you are ready… Let’s get our hooks and get the party started!!
Here are a few tips to help you with this section…
- Be patient. Once you complete a few rounds the weight of the piece will make it much easier to see your stitching pattern.
- Make notes on your pattern any type you like; I circled the stitch count for my size in each round.
- Count your stitches at the end of every row and make sure they match what the pattern indicates.
- Crochet in good light, this will help you avoid any frustration that may happen when you use the smaller hooks and yarn.
- Make sure to use the Stitch Markers when called for. This will pay off later!
Most of all – Have fun!! Remember this is going to be a great accomplishment and you will love your finished garment when it’s done!!
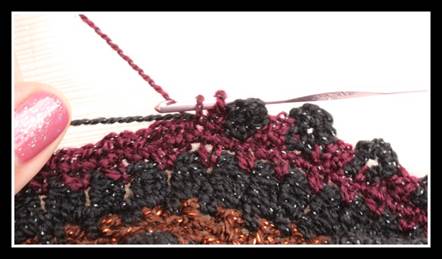
When I first started the Yoke, I thought it was going to take a lot of work just to get to round 44 (the bottom of the Yoke), I was a little nervous!! Once I got going and began working on some of rounds that had decorative stitching I started to get excited about how my tunic was looking. Rounds 11-13 were very interesting and fun – You will be carrying two colors of yarn around the row working with one color at a time (see photo below).
If you haven’t joined our Ravelry Group, make sure to stop by and check it out!! We are having a lot of fun and helping each other with any questions that may come up.
Keep up the good work!! Happy Crocheting!!!
Elena
*** About Elena Ramshaw Hunt:I’m an avid crocheter and yarn-a-holic! My Grandmother taught me the art of crochet when I was 10 and as a young woman the bug really caught me. With 40 years of crochet experience, I have taught and shared my love of crochet to many people in my community and in 2013 I began Beatrice Ryan Designs (named after my grandmother) where I design free crochet patterns including my Amazing Grace Free Crochet Pattern Series that is dedicated to Breast Cancer Awareness.I live in a small Northern California mountain community. I have 3 grown children and 2 beautiful Grandchildren! I work full-time as an Administrative Assistant for a Forest Products Company and I love to spend my time with my family, crocheting and gardening.
Betty
Did I pick the wrong colors? Mine has lots of metallic thread in it, too much. It makes the top look cheap. I picked lilac, moonstone and white. Lilac being my main color. I don’t want to get half way through with this top and have to frog it. I’m doing the yoke now and changing colors and it still seems more sparkle than color.
ElenaHunt -BeatriceRyanDesigns
That is so hard to know… If you dont like the sparkle at this point you may want to get a darker main color… Mine is perfect… but I like sparkle… It isnt to much that I cant wear it to work though
Cynthia Macintosh
I changed the colors because I can’t see the stitches to count them. When I changed colors, I could see them. I knit pretty well, but crochet is a huge challenge. Is there a difference between placing a stitch in the next stitch as opposed to the next space? I have made so many mistakes in counting! I started this at least 8 times before I switched colors. This is hours of work! I can see it better, but I am still counting the stitches wrong. I had to fudge row 3 because I got to the end with only about 6 stitches! I got tired of started over again and again, so I added stitches to make row three work. Now I am on row 6. When I follow the directions as I read them, I think I get too many stitches. Row 6 doesn’t tell how many stiches I should end up with. That’s why I want to know, is there a difference between crocheting in a stitch vs a space? This is super hard for me! I love the sparkle, but I guess at 61, my eyes can’t see the dark stitches! My grandmother warned me about this when I was younger. I love the look of your partially made tunic and would love to get there with the sparkle yarn after I figure out the stitches that I can actually see. I may need to find a human to sit by me and help me. What a challenge to my older brain! The frustration is so much worse because I get knitting. So… space vs. stitch?
ElenaHunt -BeatriceRyanDesigns
Yes… it will specify if you go in the Space vs Stitch… The first few rows were hard for me too… Now that I have the yoke done it is a breeze…
Cynthia Macintosh
OK… things are going a bit better now. I am ready to start row 11! Thank you, Elena, for your reply. Stitch vs space is a big deal.
Jen Smith
I agree that it’s a big deal. This is a fairly advanced pattern. I’ve crocheted for a long time, making intermediate-level projects for about the last year or so. I wouldn’t recommend it for a novice. It would be frustrating. Cynthia described some of the reasons well. Just knowing how to distinguish one stitch from another in a series has taken me a long time. I’ve also found in past projects that I start out crocheting slowly and loosely. As I get familiar with the pattern I speed up and crochet tightly.
babygirlga
Am i the only person that thinks the yoke is actually cute enough to wear over a camisole!!!! I am sooooooo going to try this!
ElenaHunt -BeatriceRyanDesigns
Im not sure if you mean on its own with out leggings or pants… but it would be cute if it was long enough that way
Jen Smith
I think that she means just making the yoke — no body — and wearing it like a capelet.
Marjorie Miller
After trying to unsuccessfully join the chain without twisting 3 times, I finally went to the foundation row. But I have to agree with Cynthia – so hard to count the stitches . I did as far as the second row of C but it didn’t appear to be right so out it came again. When done with the row of CI, how many clusters should there be for the M/L size. I am stubborn so I definitely will not give up.
Ellen Sowins
Took me 4 tries don’t give up!!
Marjorie Miller
I used sapphire, diamond and platinum with sapphire the main color. I tried three times to unsuccessfully join the chain without twisting and finally went to the foundation row. I got as far as the second row of my C color and ended up with too many stitches. I think this happened on the cluster row. How many clusters should there be at the end of that row for a M/L size? I am stubborn and will keep trying.
ElenaHunt -BeatriceRyanDesigns
I think you are asking about row 2 with the clusters… if so… there are 132 clusters for that row. you are putting a cluster in each stitch from Round 1 which states it has 132 stitches. Hope that helps
Jen Smith
When I make a foundation chain as long as this requires, I place a stitch marker every 20-50 stitches. If I loose count, I don’t have to go back to the beginning to start my recount. I often place a stitch marker at the beginning of a row or round, moving it up each time I start a new row or round. Even with an experienced eye, I can have difficulty isolating which stitch I need to use to attach the end of a row. This is especially so when crocheting in rounds like this because there are no extra like there are with rows.
Barbara Wojciechowski
Ugh…I’m on rnd 12 and I’m having the hardest time trying to keep the chain 4 in front of my work while making the SC into the 1st SC after the chain. Will it make a big difference if I SC into that stitch from back to front? Any tricks or techniques you can suggest to make it easier? Did anyone try turning the piece for this one rnd?
Rebbecca
I’ve never tried going from front to back. I bring my hook under the chain from the back and then crochet like normal from under that chain. It’s very awkward but by the time I was about 1/3 of the way it started getting easier. I with there was a close-up picture of what it should look like though. I’m assuming I want the chain to stick out the front of the piece?
Rebbecca
I meant I’ve never tried going from back to front…
ElenaHunt -BeatriceRyanDesigns
I dont really know how that would effect the pattern… I just held the chain 4 loop to the front with my left hand then went right into the stitches… I would try it one more time… if not go ahead and try the other way
Cynthia Macintosh
Hi everyone, still looking for the directions to rows 40, 45, and 46. Cindy
ElenaHunt -BeatriceRyanDesigns
Im not sure if you mean you dont see them?? if thats the case depending on the size… Row 40 is addressed int the comment right under Rnd 34 stating to repeat rnd 34 for 0, 6, or 12 times(Size dependant) if you are a M/L that would take you through Rd 35-40 if you are 1x that would take you through Rnd 35-46. Let me know if that doesnt help
Cynthia Macintosh
OK… so I complete row 34 and then continue with row 34 six more times (I am making a M/L). 34 plus 6 is 40, so that takes me to 40. Then I continue with rnds 41,42,43,44, but then I am missing row 45. I don’t know that I am understanding this, yet.
Sarah
Hi everyone. I don’t understand Rnd 12 or 13. In Rnd 12 it looks like I need to put in 4 sc per set of 2 sc and ch 4 made in Rnd 11. But I don’t get the “working behind†part. Where exactly do I put the sc? I get that the 2 sc from Rnd 11 each get a sc but where do the other 2 go? At the bases of the ch 4, so essential the 1st chain and the 4th chain but in the back? I do that and now the ch 4 is pokeing out. I don’t know if that’s right.
As for Rnd 13, what does working through a stitch mean? I’m sorry if these are stupid questions but I’m clearly over my head with this sweater.
ElenaHunt -BeatriceRyanDesigns
Rnd 12 you only work 1 sc per stitch in the previous row, To sc in the stitch behind the Ch4 just push it to the front and sc in each of those sc from the prev row… ignore the Ch 4 loop.
Rd 13, just put your hook through the ch 4 loop and into the st behind this will encapsulate the top of the loop.
It gets way easier… just keep up the good work… the Body is all dc’s
Amy
Do you have any images of what you are doing in Round 12 or a close up of the yoke so I can see what I am trying to do? I think I understand the directions but feel like I am working blind since there is no diagram. Thanks!
ElenaHunt -BeatriceRyanDesigns
I dont have a picture of that on its own.. but it you go to my ravelry project page you may beable to zoom in on the yoke picture to see better… http://www.ravelry.com/projects/beatriceryan/sabrina-tunic
Cynthia Macintosh
Hi Elena, after seeing the body go together, I am more anxious than ever to finish this tunic. So far… it looks pretty good, but I am still stuck at row 34. OK… so I complete row 34 and then continue with row 34 six more times (I am making a M/L). 34 plus 6 is 40, so that takes me to 40. Then I continue with rnds 41,42,43,44, but then I am missing row 45. I don’t know that I am understanding this, yet. After row 40… where do I go?
ElenaHunt -BeatriceRyanDesigns
There are only 44 rounds for M/L,,, You are ready to move on to the body : )
Ellen Sowins
I am on row 30–I have 6 extra stitches but it is still working–a little improvisation!!
ElenaHunt -BeatriceRyanDesigns
Yay,,, I have had to do a little of that too!!
Jen Smith
I just started this project last weekend. I’m on row 5. Although I’m a fairly experienced crocheter, the small hook and fine yarn (like angel hair pasta) are a new challenge. With the latter in mind, I’m not expecting it to be perfect. It’s fun to learn and maybe the next one will be perfect. ** nudge, nudge, wink, wink**
The colors here were not available at a local place, but I’m happy with the colors I picked. I’m making it for me anyway. Time for a break from gifts for others. Navy blue is the main color. White and silver are the others. Blue and white are my alma mater’s colors (Penn State).The silver makes it wintery. So, I can wear it in winter .
Marjorie Miller
I used the same colors only for the University of Memphis. Go Tigers!
Jen Smith
Cool?