
This week has been a really great week to work on the Sabrina Tunic!! We are finishing up the body and getting ready to head for the finish line. If you’re like me, summer is a very busy time! By the time the evening rolls around, I love to sit and crochet while watching a great movie. Now that we have transitioned from the fun stitching techniques of the yoke to the simple stitching on the body, I have been able to sit and crochet with our any worries. Last week we started the body and found that it was as easy as ever! Just simple double crochet, one row in front loops and the next in back loops…
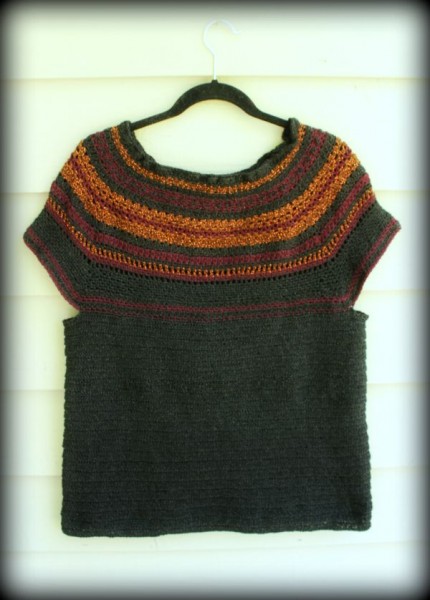
If you’re ready to finish up the body of your Sabrina Tunic, let’s get started!! You should have a few inches of the body done already… It’s fun to see how this project is taking shape!! Mine is really looking like a fashionable tunic and I can’t wait to see how the edging finishes it off!! So, this week we are continuing in the same pattern, switching to the largest hook and ending up with 17 inches of the body completed. Next week we will work on all the edgings which will add a couple more inches. Below is my progress picture of week 4 showing the yoke and 17 inches of the body complete in a size M/L.
1: Depending on how you like your tunic to fit, you can adjust the length of your body. After you get approximately 15 inches of the body complete, try on your tunic. Remember, the bottom edging will add 3-4 inches. You can make the tunic shorter by stopping at any point, If you like it longer… just keep going until you reach your desired length!
2: Don’t forget to count your stitches every few rows. It is still easy to miss a stitch and after a few rows you may be off by a few. Even a few less stitches will make your garment not fit as intended.
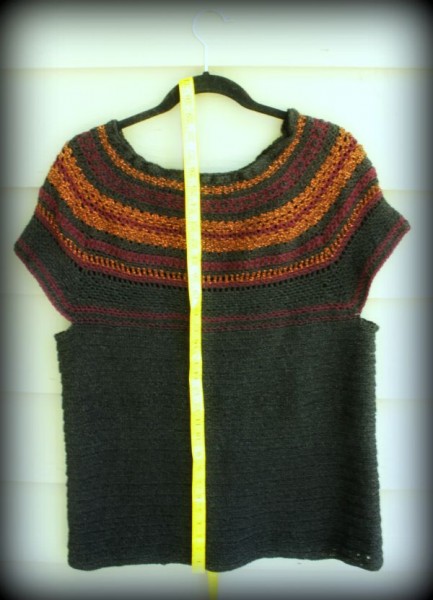
3: When measuring, start by gently shaking your garment to let it settle into place. Hang your garment on a hanger then measure while it is hanging. As you add rows, your crochet piece will get heavier and by hanging it you will get a better measurement for the length. You can see my picture below.
This week I will be attending the CGOA Knit & Crochet Show in San Diego! If you are going, make sure to say hi if you see me. I would love to meet all the Summer 2015 Crochet Along members and other crochet-aholics!!
Happy Crocheting!!
Elena
 About Elena Ramshaw Hunt:I’m an avid crocheter and yarn-a-holic! My Grandmother taught me the art of crochet when I was 10 and as a young woman the bug really caught me. With 40 years of crochet experience, I have taught and shared my love of crochet to many people in my community and in 2013 I began Beatrice Ryan Designs (named after my grandmother) where I design free crochet patterns including my Amazing Grace Free Crochet Pattern Series that is dedicated to Breast Cancer Awareness.I live in a small Northern California mountain community. I have 3 grown children and 2 beautiful Grandchildren! I work full-time as an Administrative Assistant for a Forest Products Company and I love to spend my time with my family, crocheting and gardening.
Amy
Hi again Elena. Thanks for your last helpful tip. Now I have another question about row 24 (yes I’m still on the yoke!). When it says *(sk next 2 sts, 3 dc in next st) to sc worked in 2nd dc of next… does that mean I do a set of 3 double crochet in the “sc worked in 2nd dc of next”? In other words, when I go to the stitch to I then stitch in that stitch? Hopes this makes sense.