
How making a few easy changes to a pattern gave me exactly the finished project I wanted.
 Possibly my favorite thing about Spring is finally wearing pretty skirts again. After the heavy long skirts of winter, it’s a relief to have a light little twirly skirt on. Unfortunately, the weather is not always cooperative with my idea of what a perfect Spring day should be, so I sometimes find myself either shivering in a too-cool outfit or sadly donning heavier clothes yet again. When I saw the Carnaby skirt last year on Knitty.com, I filed it away as a possible solution, and when this winter began to look like it would never give way to Spring, I decided it was the perfect time to cast on, but with a few little tweaks to make it exactly what I was looking for.
The first thing I changed was the yarn. The original pattern calls for a category 4 yarn, and one of the samples even uses Lion Wool. While I do like Lion Wool–and it comes in some really great colors–I knew I had enough LB Collection Organic Wool in my stash for the skirt and I love being able to do a little easy stash-busting. I worked up a quick swatch, and the gauge was on the large side but I really liked the feel and drape of the fabric I was getting. Because of the way this skirt is constructed, stitches per inch will affect the length and rows will affect the waist measurement. There’s no shaping other than the gores–you just work the panels until it’s long enough to wrap around you–so I wasn’t overly concerned about my row gauge.
Stitch gauge was another matter. With the larger gauge, my skirt was going to hit me right across the knees–not a great look for me. But since I really liked the way my fabric was draping I didn’t really want to go down a needle size or two to get gauge. Instead I decided to just work fewer repeats of the pattern than originally called for. To do this, I needed to calculate two things: how many stitches made up a pattern repeat, and about how many stitches I needed to get the length I wanted.
Determining how many stitches would give me the length I wanted was fairly simple: multiply desired inches by stitches per inch. I measured a skirt I already own that I like the length of and decided I wanted a finished length of about 18″. At an in-pattern gauge of 16sts = 4″, or 4sts = 1″, I needed to cast on about 72 stitches. Now it was time to look at the pattern repeat.
This is a fairly simple box stitch, and it tells me right in the pattern notes that it’s multiple of four stitches (you can find similar information in the Stitch Explanation section of Lion Brand patterns). 72 is actually a multiple of four, so I was done with the mathy bit. If 72 hadn’t been a multiple of the number of stitches needed for the pattern, I would have gone up or down as necessary. For instance, if I’d needed a multiple of 10, I’d’ve just rounded down to 70. One thing to note here about stitch multiples: you will often see something like “multiple of 4 +1”. What this means is that your total number of stitches needs to be a multiple of 4, plus one additional stitch. If you are just up- or down-sizing a pattern, you really don’t need to worry about the “plus” — just add or subtract the main multiple. In other words, if this was a multiple of 4 + 1 and the original cast on was 81, I would still only subtract 8 which would leave me with 73: a multiple of 4 + 1.
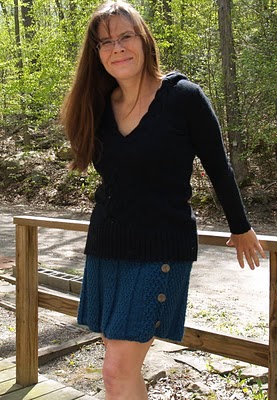
 The final change I made was to forgo the buttonholes and actually sew the final panel to the first panel. Using buttons to hold a knit skirt closed just seemed like it was asking for a wardrobe malfunction. I really liked the look of the buttons, though, so I kept the overlap when I sewed the flaps together and sewed the buttons on top. Because the slip stitch waistband has very little give, I fell back on a trick I learned from garment design: I sewed a smaller button underneath the top decorative button and left a bit of a flap open at the top so I can actually get the skirt on and off. Once I’ve got it on, the smaller button fastens to the lower flap and no one’s the wiser.
These few easy little changes gave me a skirt I absolutely love — I’m looking forward to wearing it all Spring and digging it back out again in the Fall when temperatures start dropping again!
Related links:
That third thing « Tasteful Diversions
[…] but I’ve only shown you two of them so far? Well, now you can hie yourself on over to the Lion Brand blog and read all about the third project: my finally-complete Carnaby skirt, and all of the little […]
Antoinette Gipson
 I really like your skirt i have to make me one thank you.