
![]() Welcome back everybody. Its week three, we’re halfway through the knit along and I’m sure you are all starting to see some progress. Some of you may be cruising along without a care but more likely you’ve ripped back so many times that if you have to do it again you’ll be ripping out some hair as well! This week I’ll show you how you can save the work you’ve already done, and your sanity, with a lifeline.
Welcome back everybody. Its week three, we’re halfway through the knit along and I’m sure you are all starting to see some progress. Some of you may be cruising along without a care but more likely you’ve ripped back so many times that if you have to do it again you’ll be ripping out some hair as well! This week I’ll show you how you can save the work you’ve already done, and your sanity, with a lifeline.
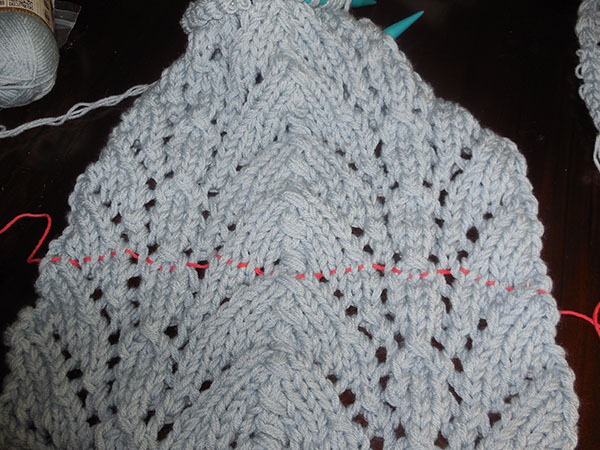
A lifeline is a piece of yarn that you thread though a row of stitches. Once it’s in place you can rip back to the lifeline if needed without disturbing any of the work below it. I like to put a lifeline in after finishing a pattern repeat or after any part that I’ve struggled with and don’t want to risk having to do it again. To put a lifeline in thread a needle with some waste yarn then thread the yarn through each stitch on your needle.

Here’s what it looks like when it’s all the way in:
One other thing to contend with, especially if using four strands, is all of those ends to weave in. Wouldn’t it be great if you could finish your project and not have to weave any in? Here’s a way that you can take care of the ends as you go so when you’re done you’re really done. It’s called the Russian Join. This is a great technique for any project but especially for lace since it can be hard to hide ends behind open work. When it’s time to add a new ball thread a darning needle with the yarn coming from your work, then weave the needle in and out of the same strand a few times and pull the end through leaving a little loop at the top:
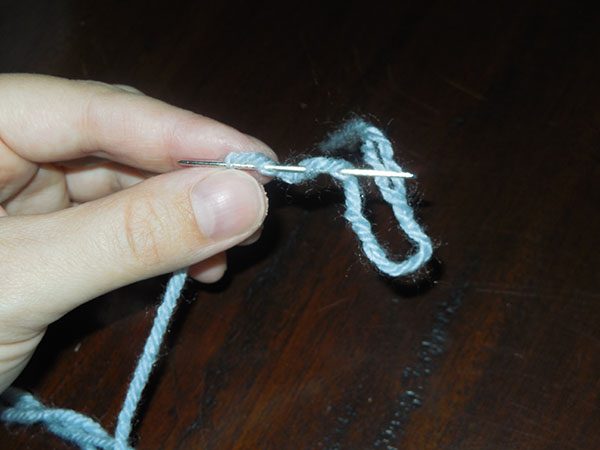
Put the end from the new ball through this loop and repeat the first step to make a loop:
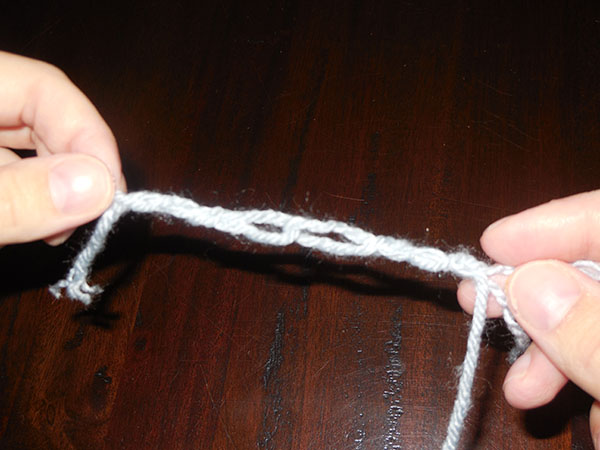
Pull on the ends to tighten up the loops then trim the ends. You will be left with one continuous strand that will be nice and secure.
That’s it for this week, I hope these tips are helping it all go smoothly. Check back in next week when I’ll be talking about some finishing touches. Happy knitting!
| About Grace: Grace DiLorenzo has been knitting for the last 10 years. What started as a hobby quickly grew into a passion. Her favorite things to make are garments and lace. As a teacher at the Lion Brand Yarn Studio in New York City she has been able to share her love of yarn crafting teaching beginning through advanced knitting and yarn dyeing classes. She has lead the first four in studio knit alongs and is excited to do it again! |  |
Mcgmeg
Brilliant!!! Yes, I have started and ripped out so many times. I always go all the way back to the beginning. This will save me now… I will restart this weekend.
VP
Grace, I’ve seen a demo on the russian join trying to embed the yarn amongst the plies as opposed to weaving it in and out like you did. Is there any difference to the methods?
Grace DiLorenzo
From what you’re describing I think it is the same. In the picture above I am using the needle to spear through the strand of yarn so it would end up embedded in the plies.
Lynn
I use this lifeline after every pattern repeat. I am not very good at unknitting and this is a great help! I would still have to rip out 8 rows but it is better than starting over. I love this pattern with the 4 strands of yarn, but, it makes it harder to correct your mistakes. I wish someone offered a class in “mistakes”!
LadyBug
This is wonderful – thank you so much for sharing because I have struggled with ends so many times. Also, the tip about the lifeline is excellent because I can’t count the times I have had to take out some of my work because of a mistake and either had to pick it all back or just take it all out and start over. What a life saver that tip is.Thank you, thank you, thank you!
Marie
I got a late start so I’m not as far along, but loving this pattern! So far I’ve only ripped out once when I ‘thought’ I had screwed up the row, but I actually hadn’t. LOL. Love the ‘lifeline’ idea. What I do is stick a post-it on my pattern and note which row of the pattern I’m on with roman numerals. Pretty old fashioned, I know. I once had a row counter but I lost it. Thank you again for running this KAL! It’s fun to knit and share with a group.
AuntieRie
I am loving this pattern. We started it at our local knitting group. There are 4 of us working on it and it is great to see how different everyone’s scarfs are. We are all using different yarn and different size needles. I ripped out a few times in the beginning but am going strong now. Mine is about 30 inches so far in a beautiful deep purple. I find on each pattern row I say the next 2 steps in my head and go along the row doing these 2 stitches before I look at the next 2. It is working out really well. I also tied a row counter to my work on the beginning tail that is hanging. This is a great help with each row. Happy knitting everyone. I hope pics will be posted of finished shawls.
Mary
Sure wish I had known about the lifeline at the beginning. Yes, I nearly tore hair out several times as I tried unsuccessfully to knit back. Thanks for the tip! It will save my hair 🙂
Teri
Finished! The site won’t let me post a photo though. Too many MB’s?
GT
Great tip on the Russian join. I am going to try that right away.