
 Pinterest user Ada(: recently pinned this nifty project on wrapping headphone cords with embroidery floss, and Apartment Therapy wrote a wonderful tutorial on making it. I love simple, clever projects like this one and knew I wanted to try it on my headphones right away! When the first packs of our new Bonbons yarn arrived, I fell in love with the sparkling colors and got started. I took step-by-step pictures as I used two colors to cover my headphones, and I’ve also included written instructions to help you re-create this project at home. One of the great things about using Bonbons instead of embroidery floss was that I didn’t have to wind the yarn onto a bobbin first, the tiny Bonbons skeins were already the perfect size to craft with.
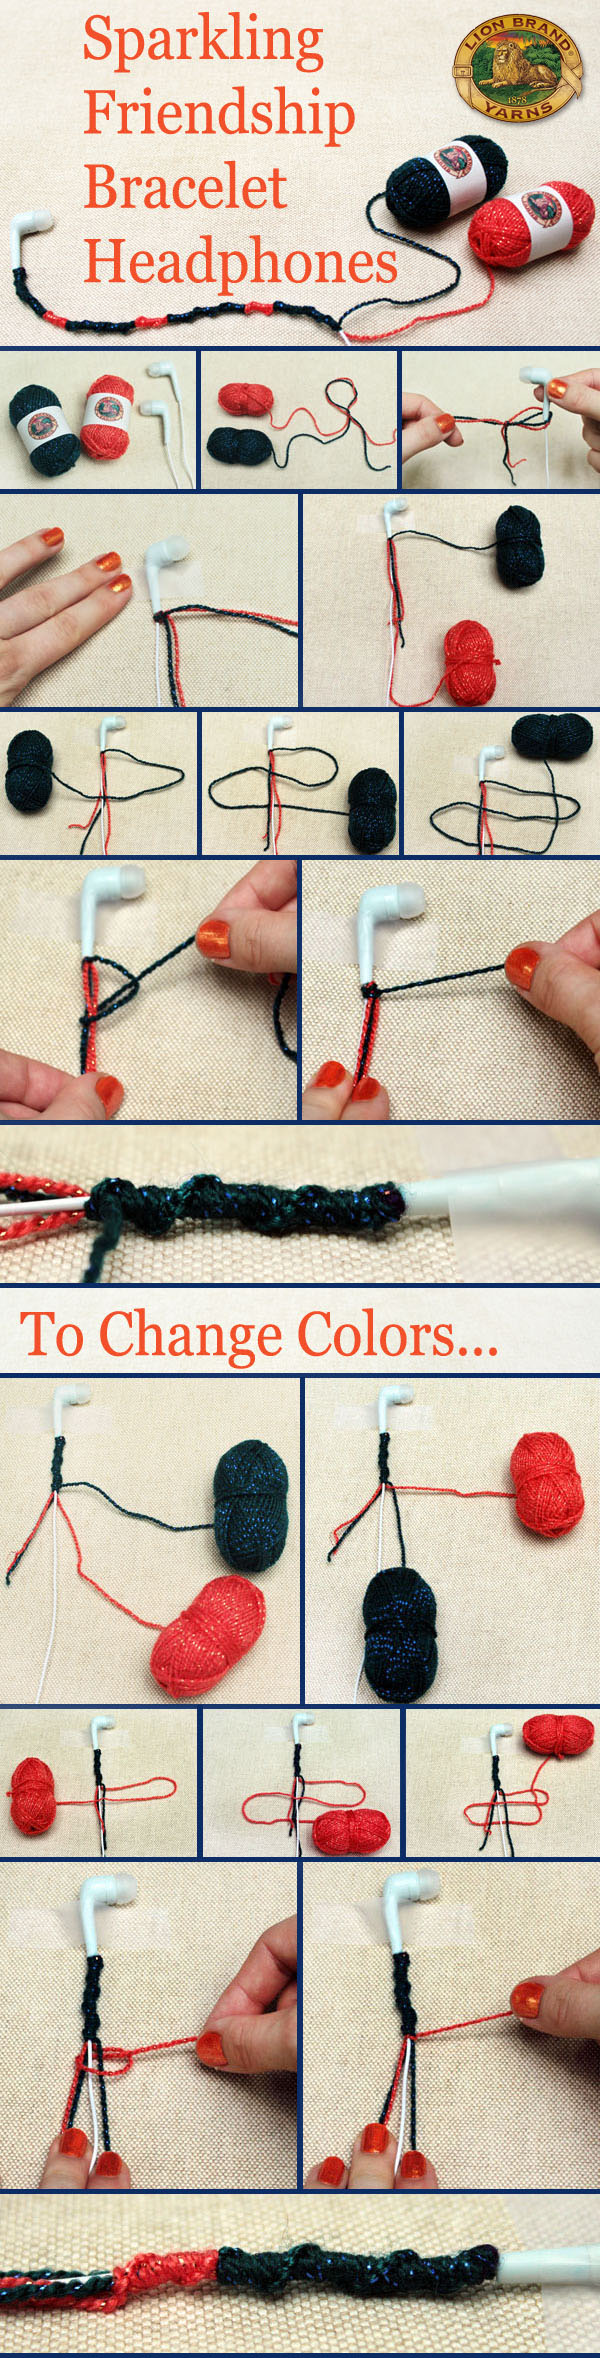
Here’s the step-by-step story of how I made my sparkling, tangle-free headphones:

1) Choose your yarn. I selected sparkling Bonbons in contrasting shades for my primary and secondary colors, but you could use any shade. If you’ like to pre-cut your yarn, these tutorials recommend that you measure out 3 times the length of the cord you’re about to cover. With the tiny Bonbons skeins, I was able to work the whole project using yarn straight from the ball.
2) Secure yarn at the base of your earbud. I looped my yarn into a slip (all colors held together) and slid the bud speaker through the loop before tightening the knot.
3) Secure your earbud to your work surface. I used a piece of tape to hold the earpiece down while I worked, and I found that it really did help with maintaining tension in the yarn.
4) Make your first knot. This knot is essentially the same as the friendship bracelet knot called Chinese Staircase, and works in the following way:
5) Continue to knot stitches, moving the knots close together before tightening them. Be sure to keep the yarn tails and your secondary color inside the loop too along with the cord itself as you work.
6) Changing colors: to change colors, simply pick up your secondary color and lay your primary color down in its place. Make sure that first knot of yarn is very snug, and continue to work in the knotting pattern. You can count stitches to make an even pattern, or change shades at random.
7) That’s all there is to it! Keep knotting till you reach the end, then knot tightly to secure in place.
What crafts would you love to use Bonbons for? Leave a comment to let us know!
NancyEH
I work in a grade 7/8 classroom as a special education educational technician. Â I always keep a couple of sets of earbuds for the students to use, but occasionally have to buy extra because they disappear throughout the year. This would be a great way of differentiating mine from everyone else’s (at least until they decide to make their own!)
Meagan
I crochet single crochets around my earbuds to keep them from tangling. I love it because it works and makes my earbuds pretty.Â
DW
This is a fun way to keep them tangle free as well:Â http://www.bclef.com/2011/03/tutorial-for-i-cord-earphone-cover.html
Cordinated
Hey! I sell kits to do this @ http://www.cordinated.com or purchase completed sets @ http://cordinated.etsy.com 🙂 Support small business!
Robin Brzozowski
Dressing up your earbuds is the topic of the day! It’s part of what I posted about on my blog!
http://crochetnirvana.weebly.com/1/post/2012/07/friday-show-and-tell-music-madness.html
RainbowRider
This is really cool! I will have to try this soon…
Minaber
I always used a safety pin through the knot and pinned it to my pants leg or the arm of the couch.
Discover New Ideas; 9 Popular Pinterest Pins | Lion Brand Notebook
[…] Untangled Forever:DIY Fix for Never-Tangle Earbuds […]
Jazz
I made some 🙂 http://sphotos-a.xx.fbcdn.net/hphotos-ash4/224523_10152242263955495_1496993252_n.jpg
abccarroll
how long did it take you to make that? like timewise
brandyce
Hi @10193e02be20e831a46a1a7029d90f48:disqus, I’m not sure how long it took @0b886cd21336a8876562479f3499e25b:disqus to make this, but I’d guess a few hours, especially if you want it to look nice and neat. Hope that helped! – Brandyce
8 Craft & Crochet Projects Made with Bonbons from Bloggers | Lion Brand Notebook
[…] Untangled Forever: DIY Fix for Never-Tangle Earbuds […]
6 Fast and Fun Projects Perfect for Summer Crafting! | Lion Brand Notebook
[…] DIY No Tangle Ear Buds in Bonbons […]
Teen Tech Week 2014 Day 1: Crafting, Experimenting, and Learning by Doing with Embroidery Floss | The Unquiet Librarian
[…] Sparkling Friendship Bracelet Headphones […]