
Technical editor and yarncrafting expert Kj Hay joins us for a series on understanding the different elements of patterns. Read the first installment here.
It is important to know whether a throw will barely cover your lap or could easily cover a compact car. It is even more important to know whether a sweater will actually fit you. Most patterns include Size and/or Finished Measurement sections to indicate the expected dimensions of the finished piece.
Sizes are specified in very general terms, such as S (small), 1X (extra large), and 0-6 months. Finished measurements are more specific and should be carefully considered. A garment could have an oversized, relaxed, standard, tight, or very tight fit. An oversized garment has a finished chest measurement 6 or more inches larger than the actual chest measurement of the wearer. For a relaxed fit, the finished chest measurement is 4 to 6 inches larger. For a standard fit, the finished chest measurement is 2 to 4 inches larger, for a tight fit the finished chest measurement is 0-2 inches larger, and for a very tight fit the finished chest measurement can be the same or less than the actual chest measurement.
The designer of a garment intends a certain fit and indicates this through the combination of size and finished measurements. The actual chest measurement for a S (small) woman is 32-34 in. and for a M (medium) woman is 36-38 in. If a designer specifies size S (small) and the finished chest measurement is 40 in., because the finished measurement is 6 in. or more larger than the actual chest measurement, the intended fit is oversized. On the other hand, if a designer specifies size M (medium) and the finished chest measurement is 40 in., the intended fit is standard.
Instructions for many items, especially garments, are given for multiple sizes. This means that the instructions including the stitch counts must be given for all sizes at the same time. To do this, parentheses and commas are used to group and separate the instructions for the different sizes. For example, if instructions are provided for the three sizes S (M, L) then whenever you see numbers within the written instructions such as 9 (12, 15) sts, the first number applies to the S size, the 2nd number applies to the M size, and the 3rd number applies to the L size. Many people find it useful to circle or highlight all the numbers for the size they are making, or if a digital version of the instructions is available the numbers for all other sizes except the size being made can be deleted.
Finished measurements or a garment are the measurements of the piece itself, NOT the measurement of your body.
You may want a fit that differs from the intended fit. For example, perhaps the designer’s intended fit is standard. You love the look of the garment, but would like it in a more relaxed “lounge around the house” fit. To do this, ignore the instructions for your usual size (e.g. S, M, L) and make the size that is 4 to 6 inches larger than your actual chest measurement.
Achieving the indicated finished measurement depends entirely on achieving the indicated gauge (the number of stitches and rows worked in a piece fabric of a certain size).
It can be surprisingly difficult to visualize a specific measurement. Get out a ruler, yard stick, or tape measure and look at the finished measurements to ensure that the teddy bear you plan to knit isn’t so large it will completely fill your baby’s crib or so small your dog could eat it in one gulp.
Related links:
msF
Thanks for this great article. I am working on my first ever sweater and wish I had read this first. I picked a size according to the measurements and it made sense in terms of the size that I usually buy. Fingers crossed it will come out okay – but I just wish I had know about the types of fit before making the size decision.
mysplendidfamily.com
Gracie
I have a pattern for child 4-10 and need to make a size 3T. How do I downsize that low.
It is for a jacket type cardi. So can be loose.
lynnmdy
What a fantastic article. I have been making sweaters for years, but it has always been hit or miss and I have fortunately been very lucky. Now I have actual guidelines. thank you so much for such valuable information
Arline B. Meyer
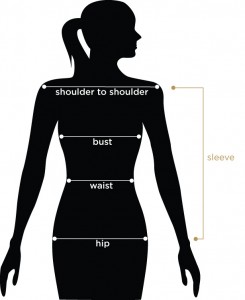
Great article. In the previous article Expert Tips on Measuring Yourself, the shoulder to shoulder measurement is shown taken from the inside edge of the shoulders. In this article the measurement appears to be from the outer edges. How does one know which measurement the designer of a pattern has chosen from the schematic?
Zontee
Hi Arline, you should measure it from shoulder joint to shoulder joint (as pictured in this blog post). Sorry for the confusion; the photo in the previous blog post was a bit misleading and I’ll add a note.
Kit
Thanks. Very useful article. Usually I can sort of guess from the picture if there is one and I am not that fussy about the fit of sweaters. But I will very much appreciate less guess work.
Socks are another matter. I would love an article about getting to make socks fit the way you want. Socks was the thing I most hoped to learn and still have not mastered. Most articles I read talk about how to make a heel, which is tricky, but I can do that part. Fitting the correct length and width and shape of the toes is much harder for me. My toes are all about the same length, big toe only a little longer than my littlest toe and all toes reasonably wide and straight but most socks are designed with an almost pointy front, so they never fit any better than the store bought ones which I haven’t worn for years because they are so uncomfortable. I wish someone would write a book or an article about designing the toe section of socks to fit different shaped toe area, including hammer toes and bunions. Or does that information already exist?
Jeannine
I too hate “pointy-toed” socks as I do not have pointy toes. My toes are rounded. However, think of the construction of a pointy toe vs a rounded or even square toe. The easy solution (one I have done with success) is to do fewer decrease rows (assuming you are doing top down socks). So, if you are supposed to decrease every other row, try every third or fourth row (which will give you a more rounded toe) and stop decreasing when it’s the right width to fit your toes/foot.
For example, you don’t have to decrease down to 8 stitches like a pattern tells you if you only want/need to decrease down to 16 to actually fit your foot. It’s your sock. You won’t go to knitting jail for adjusting a pattern (if you did, I’d be serving multiple life sentences!)
I will say, you will likely need to go through some trial and error and have to rip back a few rows (maybe a few times) until you get it “right”, unless you guess lucky the first time. Don’t be afraid to try it on before it’s cast off/bound off with the yarn cut so you can adjust as needed.
Hope that helps and good luck knitting a sock that fits!!
ETA: I knew I just read of a toe-up square toe cast on…it was on the Knitting Daily blog just the other day. http://www.knittingdaily.com/blogs/daily/archive/2013/10/18/on-your-toes-a-new-cast-on.aspx Good luck!
Kit
Jeannine – Thank you. That makes sense I think. Do you ever make socks differently for the left and right foot? My feet are pretty much mirror image of each other but the outside edge of my foot is a little shorter than the inside, big toe edge, and I may someday try to take that into account as well.
For now your suggestion is all I am willing to attempt but someday I hope to be really good at socks. I live in North Dakota, and not wearing socks is a bit of a problem in winter. So I am highly motivated to learn to make myself at least, and possibly friends, awesome socks.