
 Welcome all to the 2014 Fall Crochet Along! I’m Grace and I will be guiding you through the Top Down Crochet Jacket. This is a great project that should give most a little challenge. Throughout the next 5 weeks we will explore swatching, raglan shaping, working with multiple colors and much more. If you are a beginner don’t let the skill level discourage you. We are all here to support each other. Throughout the project post your questions and I’ll be here to help. I also invite other experienced crocheters to share their knowledge so we can all learn from each other.
There are so many things that excite me about this project. I love wooly yarns like Fisherman’s Wool®. While at first is may seem a little rough it softens up wonderfully with wear, the longer you wear it the cozier it gets, perfect to cuddle up with this coming winter! The self-striping colors of Amazing® are beautiful and add so much interest without the extra work. For those of you who don’t need such a warm wooly sweater there are plenty of yarns that you could substitute. For something wool-free and machine-washable I would suggest substituting Vanna’s Choice® for the Fisherman’s Wool® and Landscapes® for the Amazing®. For my project I will be using Fisherman’s Wool® in Nature’s Brown and Amazing® in Strawberry Fields .
The first step for any project I do is always swatching. Not only does this help us find the right size hook to use, it also allows us to practice some of the techniques that we will encounter in the pattern. Looking at the gauge information it says that we will need 12 double crochets in 4 inches. To start the swatch chain 14, the last 3 chains count as the first double crochet. As you work pay close attention to the stripe pattern. You will only turn your work every other row, this allows you to carry both colors up along the edge as you work.
Here are a couple tips: when switching strands of yarn avoid loosing stitches by securing the last loop with a stitch marker. To carry the contrasting color up the edge simply use both strands of yarn to chain 3 before changing to the next color. This keeps even tension on the edges. At the end of the project your edging will cover up these chains so you won’t see the other color peeking out.
After you complete 11 rows its time to measure. If your swatch is 4 inches across, you’re using the right hook for you. If your swatch is bigger use a smaller hook, if it’s smaller use a larger one. I’m a loose crocheter so I’m using an H instead of the J that is recommended in the pattern. Don’t worry too much about matching the row gauge. One of the wonderful things about a top down raglan is that you can try it on as you go so adjustments depending on row gauge are easy, but more on that next week! Until then go get your swatch on!
Post your comments and questions below – even pictures of your Top Down Crochet Jacket WIP! This CAL also has an active Ravelry group too.
| About Grace: Grace DiLorenzo has been crocheting and knitting for the last 10 years. What started as a hobby quickly grew into a passion. Her favorite things to make are garments and lace. As a teacher at the Lion Brand Yarn Studio in New York City she has been able to share her love of yarn crafting teaching beginning through advanced knitting, crochet, and yarn dyeing classes. She has lead the first four in studio knit alongs and is excited to lead her first crochet along! |  |
WEEK ONE: Top Down Crochet Jacket Crochet-Along: Swatching
WEEK TWO: Top Down Crochet Jacket Crochet-Along: Raglan
WEEK THREE: Top Down Crochet Jacket: Sleeve Construction
WEEK FOUR: Top Down Crochet Jacket: Edging
WEEK FIVE: Top Down Crochet Jacket: Finishing
Linda
I’m lost…is there a video on this particular striping technique?
Debra
I don’t know if there is a video … Have you joined the Ravelry group? (It’s free to join Ravelry.) It would be a good place to ask questions about this. Have you started trying to make the swatch? I’ll admit I took three tries at it before I figured out how to get it going.
Grace
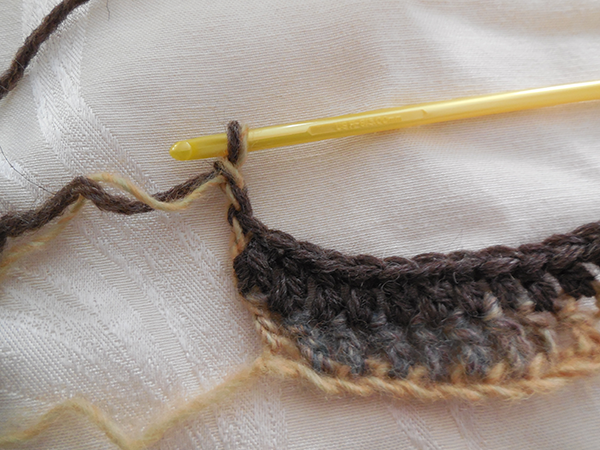
This photo may help to answer a couple of questions. For the striping technique work row 1 as you normally would. At the end of the row take your hook out of the loop and secure it with a stitch marker. This look will be just hanging out while you work with the other color so the stitch marker helps avoid unraveling. For row 2 take color B and join it in the top of the chain 3 from row 1(pictured). Chain 3 with B and continue across the row. When you get to the end of the row put the loop that is on the stitch marker back on the hook and chain 3, turn, put color B on the stitch marker and do row 3 with color A. At the end of row 3 do not turn, pick up color B and work row 4.
Grace
Picture
Grace
Hmm. not sure if the picture posted, but hopefully the description is helpful.
Grace
ah there it is
Keesha Turner
Thank you thank you thank you! That is EXACTLY what I needed! Your photos are perfect but your written description is absolutely spot-on. I completely understand now what to do and am not lost any longer. I appreciate your taking the time to share this information!
Linda
This is exactly what I wanted…thank you 🙂 !
Danielle Holke
Linda, hope this video will help! http://youtu.be/qvQVALT7ssc
Debbie
What do you mean by using a stitch marker to avoid losing a stitch? What do you do with the other color after you chain 3 when changing colors?
Debra
This is what I did … When you finish the first row of double crochet you put the stitch marker on the last loop made to hold it (so you don’t lose it). Then you go to the beginning of the row to join the second yarn and work the row of double crochet in each stitch of the first row. When you reach the end of the second row pick up the loop held by the stitch marker and chain 3 holding both yarns. Then you use the stitch marker to hold the loop for the second color while you work the row with the first color. The stitch marker is holding the loop for the color you are not working until you need it. I hope that helps … it looks confusing to me when I read it back.
Grace
Yes! This is correct.
Debbie
I did figure it out after I tried it. Thanks!
Fillyfiber
I have decided to make my sweater in Vanna’s Choice in purple prints with an oatmeal fleck yarn in my stash. I like the dark and light value in the sweater pictured on the pattern.
Karen
I am using 100% acrylic yarn. I will try to post a picture but if it does not work, I am using jewel tone colors for A and gray shades for B.
Karen
I can’t seem to get my picture to download. I will have get some help for next time.
Inge Schultz
Can someone show me how you finish the last stitch. Do I do the last dc and then do change three at the stitch marker? I’m not sure how you are doing the change in color.
Danielle Holke
Hi Inge, could this video help? http://youtu.be/qvQVALT7ssc
Inge Schultz
I tried to post the picture so I’m trying again.
Inge Schultz
Can someone put a picture up on the last step here on what it looks like.
Grace
If you look at the picture in the blog post it actually shows this step completed. Work a double crochet in the next stitch then get the loop that is on the stitch marker on your hook and chain 3. Turn your work and in the next row work with the darker color and put the loop of the lighter color on the stitch marker.
Inge Schultz
Thanks Grace,
It was hard to see on the blog post since one could not count the stitches and it looks like you did a hdc at the end with the dark color. On the last chain 3 do you chain 1 with the white color and then chain 2 with both colors? If we can get this part of how the colors are blended it will be a great new learning tip on crochet. I have been crocheting since the 80’s and have never seen this way of changing colors. Also, just to clarify with the chain 3 at the end makes 13, but I understand that this is a running stitch to move up the latter to the next row.
Inge Schultz
I was just on Ravelry and got my answer from Debbist. She said to, ” pick up the loop from the 1st color, yo with both colors and ch-3. So I did my last dc and picked up the 2nd loop on the hook [ as shown in the picture the yo and I’m ready to pull through both loops] and yarn over with both colors and pull through the two loops and then did the chain 3.
Guest
Not sure why the picture is a thumbnail.
Andrea Forbes
Okay up to this point. Then I have the same questions as Inge Schultz.
Danielle Holke
Andrea, Grace made a video: http://youtu.be/qvQVALT7ssc
Michelle Wohlgemuth
Good day all, I am unable to use the wool. I found a soft acrylic to use. In making my swatch used a 5.5 hook listed for the yarn, the 12 dc is four inches across however 12 rows are 7 inches (my first swatch). I really want to make this sweater. I do hope there is a video as am horrible with understanding the written pattern. Please let me know how to fix this I am also going to try a different yarn as well.
Karen
Don’t worry about the measurement of the rows. We were told that you can adjust the length because the jacket is worked top down.
Michelle Wohlgemuth
Thank you very much!
Grace
That’s right! We’ll be talking about this more next week!
PMB
Grace thanks for the pictures and directions. Both were so helpful.
Phyllis
Grace, thanks for the pictures and instructions. Both are very helpful.
Gayle MacDonald
Will this pattern and the week by week instructions be available in the future? I would like to make the sweater but have several big projects on the go for Christmas presents. Thank you
Debra
You should be able to search for it in the future by name in the search box at the top right of the blog page. I just tested the search function by searching “raglan mesh pullover CAL” which was the first LB CAL I participated in in 2011. The blog posts came up in a list. Click on one and it expands so you can read it.
Also, you can join the Ravelry group for this CAL (there’s a link to Ravelry above in the blog post) then you go back to that group in the future as well. There’s links to the blog posts in the Ravelry group. I checked, the old Raglan Mesh Pullover CAL group is still there and the blog post links are still working from 2011.
Debbist on Ravelry
Andrea Forbes
Just to clarify: does the ch 3 made when changing colors count as a stitch or not? Thank you.
Grace
The Chain 3 counts as the first double crochet in the next row.
Andrea Forbes
Thank you. That makes sense to me.
Phyllis
When counting dc in the row, do the dc in the chain 2 space count in the total? In rows 2 and 3 I had 1 more dc, in the front sections, than the instructions specified. I can work a decrease, but I see that in row 4 there is an increase in the front sections again that will make 1 more dc than specified in the instructions if counting the dc in the chain 2 space.
I’d like to make corrections before I continue. Thanks.
Grace
The dc in the chain 2 space does count in the total. If you haven’t gone too far past where the extra stitch was made I would suggest ripping back and giving it another try. I often still count my stitches as I go to make sure I’m not sneaking extra ones in. While fudging it is okay (and I certainly do from time to time) if it’s not too much of a pain to go back it’s best to get it right!
Phyllis
Thanks, Grace. I count the stitches in my work, but missed something. I am using lovely, soft yarn (lLandscapes-Mountain Range & Heartland-Acadia). They don’t lend themselves to ripping out, but I may give it a try.
Grace
That sounds like a great color combo! Can’t wait to hear how it comes out!
MIC
There is a video in YouTube that was very helpful for this technique. It is on Garnstudio DROPS Designs http://youtu.be/kB1ABURKyd8
Audrey
The dc in ch-2 sp are included in total count. It’s best to follow instructions exactly. I had to pull out a row and do it over because count was over the number of dc’s required.
Michelle Wohlgemuth
Thank you.
Audrey
Has anyone completed the swatch and started the jacket yet? I’m in row 6 of jacket. Just trying to get idea where everyone is.
Michelle Wohlgemuth
Did my swatch, my first. Working on row 6 now, going to go to row 14 and wait to do the sleeves.
Andrea Forbes
I have finished row 7 of the jacket and moving right along. I made a chart to keep track of where I am and where I’m going. I have row numbers 1-10 on the horizontal lines and the # of sts for each section of the jacket in vertical columns. This is much easier to see than picking the numbers out of the written instructions. I expect to get through row 10 in no time – haven’t yet studied the instructions beyond row 10.
Phyllis
I too am using a chart. After I had to pull out rows 4-8, due to a misunderstanding of the increases at the beginning of the color B rows, I had to make the chart to see what the stitch count was suppose to be for rows 5-10.
Michelle Wohlgemuth
Well I must be the only one who can’t get row 2 right I just do not understand the written pattern can you let me know if there will be a video. I work better by seeing other wise I will chicken out of trying as I just do not understand! Thank you in advance for your help
Grace
There have been several requests for a video so I’ll be putting something together that will hopefully be available by the end of the week. Hang in there, the striping technique is one of the more challenging aspects of this project, once you get it down you’ll cruise right through!
Michelle Wohlgemuth
I figured out the stripping, I am having issues with adding the stitches I have a problem of with written pattern a diagram or seeing how its done in a video. This would be helpful. Thank you very much
Michelle Wohlgemuth
Ok, went to mom’s and now I am on to row 6. My problem is the terminology, and seeing the pictures of one of WIP and then the light bulb came on. Now doing the project in sections is going to be real cool. I am so excited. Thank you! Chat with you tommorrow. 🙂
Danielle Holke
Here it is Grace! http://youtu.be/qvQVALT7ssc
Danielle Holke
Michelle, here’s the video Grace made: http://youtu.be/qvQVALT7ssc
Michelle Wohlgemuth
Thank you Danielle Holke, I like the way of the ends. I am at row 9 going to 14 I am interested on how I work on the sleeves. Good luck, everyone. I hope I can figure it out. I do love all counts that makes it easy to see where you are, I had to do some frogging. Thank you.
Paula
I too, am having some difficulty with the swatch. I cast on 14 chains. After my first row, should I end up with 12, 13, or 14 “stitches” on the row? I also, am finding the directions on striping confusing. I think I have it figured out, but I am not sure. A new video on this would be very helpful
Grace
You should end up with 12 stitches. The first 3 chains count as a DC. When doing the first row, skip these first 3 chains and DC into the 4th. There will be a video coming in the next couple days to clarify.
Karen
I will try to post my picture of this first lesson. I was not sure how the colors of the two yarns would look together but I think, now that I have crocheted the yoke, that they look good together. I am using 100% acrylic yarn.
Debbie
Is there a picture of what the swatch looks like after the second row? While I like the idea of crocheting the 2 colors together to carry the yarn, mine looks very messy.
Danielle Holke
Here Debbie, take a look at this video: http://youtu.be/qvQVALT7ssc
Barbara Hankins
I am using a single color (green) for this jacket. I have made the assumption that I can turn at the end of of each row. Since the pattern is symetrical, so far it seems to be working. If I should not be doing this or if I will encounter a problem up ahead, please let me know.
asma
hello, thanks for this pattern which I loved so much and decided to make
it to mom.my problem is that this is my first sweatr in crochet and I
stopped on 5th row..i made 4th rows nicely but couldnt understand what
do you want us to do exactly in row 5? it is not clear for me