
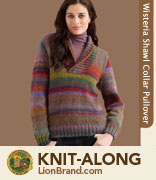
 Welcome back to the Wisteria KAL! I hope your swatching efforts went well and you are ready to get started on this sweater! As I’ve mentioned before, this pullover is worked in pieces and it starts with the back. Start the back by casting on the indicated number of stitches, then work in 2×2 ribbing (K2, P2) for 3 inches. Next, continue in stockinette stitch (knit on the right side, purl on the wrong side) for 14 inches, or until your desired length to the underarms. Make a note of the length you decide to work because it will be important when it comes time for the front. Time to shape the armholes!
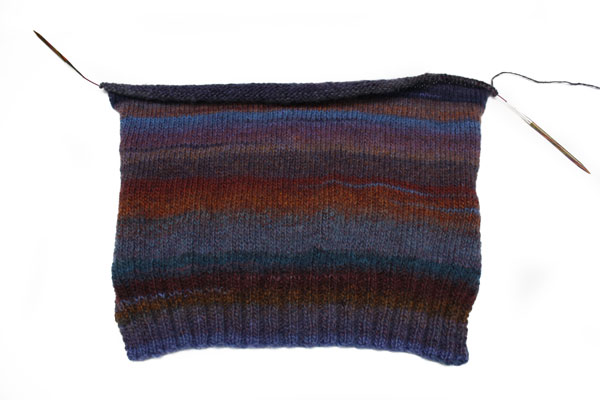
Armholes are generally shaped with a large decrease worked by binding off stitches on each side, then working decreases for a number of rows for shaping. Depending on the size you are making, you will bind off 5 or 6 stitches at the beginning of each row; this is because you can only bind off at the beginning or in the middle of a row, but not at the end of a row. To follow this instruction, begin your row by knitting 2 stitches, then pass the first stitch on the right-hand needle over the second and off the needle. This is the same way you would normally bind off when finishing a project, but only do this process 5 (6) times. After binding off the indicated number of stitches, knit across the rest of the row. Repeat this process at the beginning of the next row as well. For more information about how to work a bind off, click here. The result is that you have 10 (12) fewer stitches and a notch at each side of your sweater for the underarms.
Following the bind off rows are a series of decrease rows. The decreases, as described in the pattern, are worked one stitch in from edge, making seaming easier because the edge stitch is worked normally. Two different kinds of decreases are used because each of these decreases has a slant or lean to it; using them on their appropriate sides creates nicely shaped armholes. A k2tog (knit 2 together – right slanting) is used for the left side and an ssk (slip, slip, knit – left slanting) is used on the right side of the sweater. You can see more about how to work these decreases here. Once you have worked the decrease row on the knit side, follow it with a purl row and repeat the indicated number of times for your size.
Once these decreases are finished, you’re home free! Just “work even” until you have reached the indicated length, creating the depth of the armhole. “Work even” means go back to working in stockinette stitch with no decreasing, as you did for most of the back. Done! Bind that piece off and admire your work – one piece down!
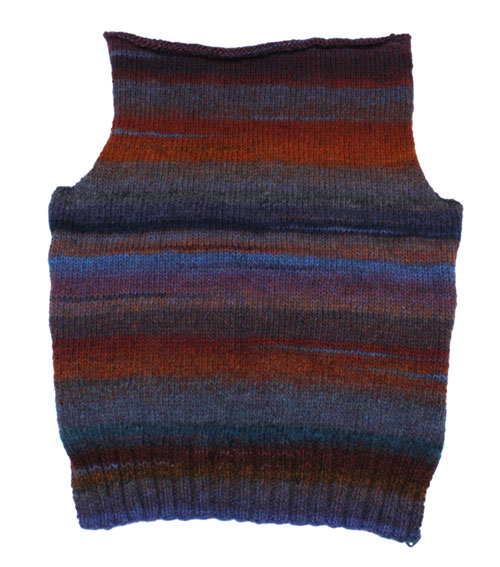
Once you have completed the back, feel free to start on the front; it starts the same as the back, but the neck shaping starts 2.5 inches before the armholes. If you are working as written, this means the neck shaping will start at about 11.5 inches, but if you worked the back for 16 inches for example, you would work the front to 13.5 inches. We’ll pick up there next week by continuing the front with both neck and armhole shaping!
Related links:
Amy
I’m really happy with my sweater..I was wondering if I should bind off purlwise on the second row or do you mean to knit on the second row as well?Â
Thank you for the post:-)
Amy
Darkhorse06
Amy, I did it purlwise and it turned out well. Just my two cents!
Amy
that’s what I thought..I decided to go ahead and do it purlwise. thanks:-)Â
Mowelborn4
Kendra,
The photo of your sweater doesn’t seem to have “curled” sides like mine does. Should I have ” slipped the first stitch”?
Anonymous
Don’t worry about it; this won’t be an issue after you seam the sweater. I photographed Kendra’s sweater, and I can tell you that the sides curled in, too. 🙂
Kelly Halley
I gotta tell ya, I’m loving this “Amazing” yarn!! The colors are so pretty. It’s the only thing that’s keeping me knitting. Too much stockinette bores me crazy without interesting color. I save the solid colors for more interesting stitches. I’ve been showing the girls at work my progress, thus far, and everyone loves the colors. I think I’ll be going to this yarn, in different colorways, later on. Yay!!
Susan Koutnik
 I am ahead of the game on this one. Last time I had to wait for my yarn. I have finished the back and front and am working on both sleeves at the same time. I have posted pics on the customer gallery. Here is the link. Oct 2011 KAL Wisteria Shawl Collar Pullover. I wish the color showed better in the pictures. It is so pretty.
Halley_Kelly
How do u do both sleeves at the same time?
Susan Koutnik
Using one skein of yarn I cast on for one sleeve, then with another skein of yarn I cast on for the second sleeve. Keeping them on the same needles but each using its own yarn I do one row of each at a time. That way the ribbing, and shaping are the same for both and it makes it easier to make sure they are the same length.
Halley_Kelly
Ahhhhh! I see. Thank you!
nobodyssister
That’s a great idea! I think I’ll try that when I get to the sleeves.
Grace Jones
I think I’m going to try this when I get to the sleeves.
Debbie Vanditmars
This also works well when knitting the 2 front pieces of a cardigan except the shaping is opposite on each, of course.
Susan Koutnik
Just about had a panic attack. Please go back and read your final paragraph regarding beginning the front piece. The blog says…
” it starts the same as the back, but it is 2.5 inches shorter than the back to the armholes. If you are working as written, this means to about 11.5 inches,” …
I think it should say the neck shaping begins 2.5 inches before the arm shaping. The arm holes actually start 2.5 inches beyond that which takes it right to the same measurement as the back. Am I right? I was really worried for a bit there and went back to reread the pattern.
Jen in VT
I just did the same thing Susan! I was a little confused too. Thanks for pointing that out!
Anonymous
Hi, Jen. Susan was absolutely right. We’ve updated the blog post to correct the paragraph.
Anonymous
Hi, Susan. Kendra meant that the neck shaping starts 2.5 inches before the armholes. We’ve updated the post to reflect that information. Thanks for catching the error!
Anonymous
Sorry! Typo… It’s all better now and sorry to have caused you confusion!
Susan Koutnik
Whew! wasn’t quite sure how the sleeve was going to fit in there. Ha, ha. By the way, this is a great pattern. I am flying right along. I am working both sleeves at the same time and am about halfway through them.
Grace Jones
I finally cast on last night after much swatching. My 3rd swatch on sz 9s gave me the correct gauge, but the fabric is very loose and open. I took the swatches to my knit group and they all liked the one on sz 8s better ( I agree) so I’m going with those. The gauge is slightly tighter, but the fabric is more stable and I’ve chosen a size with plenty of positive ease. Can anyone comment on the density/stability of their gauge swatch?Â
Jill
Grace, I had some swatching issues as well. On one size of needles, the swatch was the right width but not the right height, in the 2nd size needles, it was the right height, but not the right width. I went with the needles that gave me the right width because I want the sweater to fit around me, but the height was less important because the pattern mostly calls for just knitting til you reach a certain number of inches. I didn’t need to go as high as sz 9 needles (I’m using Wool-Ease yarn on this sweater), I can imagine that would make it seem like a much more open weave! I’m either on 7 or 8s, can’t remember which, and am getting a fairly tight weave.
One thing I definitely noticed, though, is that the two color Wool Ease seems much scratchier than the single color I used in the past for another project. Don’t like it as much, though I do like the color! (Pines) I’ll likely want to wear some kind of shirt under the sweater when I’m finished.
Deborah Outland
I’m a bit unclear on the length before the armholes… I thought that the entire lenght of the sweater (including the 3 inch ribbing) was 14 inches (by the pattern). Is this not correct? If I want the “standard length”, should the piece measure in total 14 or 17 inches before starting the armholes? I’m still thinking 14, but please clarify!
I’ve opted to do some shaping (for size considerations) in the body of the sweater. Do you reccomend that I do the decreases/increases one stitch before the edge, like for the armhole shaping?
Finally, an observation–I’m using Cotton-Ease for this sweater, and I was a bit leery when I first got it–I had a fantasy it would be more like a wool or wool blend in its stretchiness, but it really “felt” like cotton. But when I started knitting with it, it has a much more forgiving texture than pure cotton! I’m really enjoying knitting with it! I hope it wears as nice as it knits!
Anonymous
Hi there! It’s 14 inches to the armholes if you are following the Wisteria pattern (in Amazing) but 17 inches to the armholes for the Newcastle version (in Wool Ease). If you are following the pattern it’s 14 inches to the armholes for the back, then 11.5 inches to the neck shaping for the front, which I’ll talk about next week!
As far as shaping, it’s always a good idea to work decreases and increases one stitch in from the edge so you have normal edge stitches for seaming. Enjoy!
Yesika
I am pretty new to knitting and this is my first sweater…im loving the basic pattern…I have one question though…
I am just finishing up my ribbing and I am not sure which side is right side or wrong side…is that up to me and what is the difference??
Anonymous
Hi! Looking at the ribbing, from one side there will be two knits at each end and from the other two purls at each end. The right side is the one that has the two knit stitches at each end. Hope this helps!
Shari
Hi, I wish I had asked the question about which side being the right side of the ribbing, as I think I made the back with the wrong side of the ribbing. Now that I know, should I make the front with the same (wrong) side of the ribbing or should I make it the correct way?
Anonymous
I would say do it that way for the back as well – it’ll make the ribbing line up when you seam it as you’ll see in a few weeks. Not a big deal!
Jill
Yesika, my easy way of telling which is right/wrong is usually to look at where the tail is from my original cast on (assuming you used a long tail cast on). Â Generally speaking, if the string is hanging off the bottom right, you’re looking at the right side. Â Â
Of course, some patterns mix things up a bit, but for the most part…
Paul Haskins
Well I got the first sweater finished using using Wool Ease and 100% machine knitting. I ended up with a 36 inch sweater using the 38 inch pattern ………. Hmmmmmm. Since my machine is limited to 114 needles, the collar done on the machine was no fun and is very hard to explain in words causing my machine pattern to be delayed a bit – otherwise finished for all sizes. Note the left sleeve …… I think there is some inconsistancy in color and I just noticed the yarn dye lots are not the same – my bad. Next one will look much better for sure………
Cherylrubner
Paul,
I’d be interested in knowing how you did it on the machine as I have a knitting machine I’m thinking about dragging out and making something on. It is a very basic machine though.
Thanks,
Cheryl
Paul Haskins
I am almost finished with a written machine pattern. Collar has to be done in two pieces and is delaying me to get it right. Ribbing can be a real pain on a basic machine but with patients can be done.
Amy
Hi Kendra, I’m also finished with the back, but I noticed that it’s five or six stitches (rows) longer than it should be. I think it’ll be ok when I wash and block it, though. My gauge on my swatch came out right after I washed it–six rows to the inch. So I knitted the piece as six rows to the inch instead of measuring as I went. Is this okay?
Anonymous
I’m a bit confused, but it is fine to work to your finished gauge (are you counting rows, that’s how you know?) or to physically measure when you get to the indicated length. The more important thing is that the front and back match so you can seam them.
Amy
well, I meant to say that I’m counting rows, so it would be 11 inches after the ribbing to make 14 inches…11 inches would equal 66 rows. So I am counting rows.  I decided to take the sweater to a local yarn shop to have the woman there help me a little more.
Amy
I was going to say that the stitches across are correct–17 stitches for 4 inches.Â
Newbery66
Hi, I just tuned in and was wondering where the sizing chart is, I`d like to join in but don`t know how many stitches to cast on. Many thanks
Anonymous
The full pattern, with the sizing options, needles, yarn and instructions is available here:
http://www.lionbrand.com/patterns/L0033AD.html?noImages=
You can also reference the first blog post for the KAL all about yarn options by going here:
http://blog.lionbrand.com/2011/09/21/announcing-our-fall-knit-along-featuring-the-wisteria-shawl-collar-pullover/
As well as the second post about gauge:
http://blog.lionbrand.com/2011/09/28/wisteria-shawl-collar-pullover-knit-along-gauge-swatch-and-casting-on/
Enjoy!
Rstein485
I am using Lion Brand Amazing. I suppose I should not worry about aligning the stripes of the back to the stripes on the front. I wanted to align the ribbing at least but it seems a lost cause. I’m just committing to whatever the outcome.Â
LM
My sister-in-law, sister and I all decided to join the KAL. I’m looking forward to seeing their finished products as they are both much more experienced knitters than I am. I purchased the Amazing in Jacob’s Ladder. The colors are beautiful but the feel of the yarn is much scratchier than anticipated. I’ll be looking for tips when it comes to working the collar and seaming the sweater (neither of my strong suits).
LM
Opps, not Jacob’s Ladder, Joshua Tree!
Jeannebeans
I just got this info today, but would like to knit along with the group. Is it too late to get on board? Is there a pattern somewhere with size and gauge specs, plus needle and yarns needed?
Anonymous
Never too late – all of the posts remain up forever so you can refer to the weekly information as you get to it. The pattern is one of our over 3,500 free patterns on lionbrand.com, and you can access it here:
http://www.lionbrand.com/patterns/L0033AD.html?noImages=
Heidi Newbery
Can someone direct Jeannebeans and me to the pattern for this so we can get started. Thanks if you can that would be great.
Kathy
At the bottom of the October 5th blog post, there’s a heading “Related Links”. Under that is the heading, “Announcing the Fall Knit-Along….” If you open that link, the pattern, called “Wisteria Shawl Collar Pullover” is highlighted, and if you click on that, the pattern pops open, with a sizing chart.
I am keeping up, and like how my Ruby Amazing is striping. Thanks, everyone, for asking the questions I’d ask!
Heidi Newbery
Many thanks Kathy, I`ve found it, printed it and will get started in the morning. Very nice of you to help out, Thanks again. (Heidi Newbery In Australia)
Tjcoll
I’m making my wisteria sweater in Wool Ease and wodered what you meant by “Newcastle”. I knitted the back and adjusted the length from 14″ to 16 1/2″ and started on the front which I will adjust to 14. Did I adjust properly or do I have to frog???
Anonymous
Nope, sounds perfect to me. There is just also a version of the Wisteria pattern made in Wool Ease that is 17″ to the armholes on the back, but the length is completely customizable. No worries!
Shari
 Hi Kendra, several days ago, Ann N from Florida asked about putting the 38 stitches of the back neck on a stitch holder so she wouldn’t have to “pick up” the stitches for the collar. I am ready to bind off the back of my sweater. I cannot find a reply to the question, so I don’t know if the stitch holder is a good or bad ideal. Could you please let me know?
Bonniecand
Hi, Shari,
I replied a couple of days ago. You really need to cast off to give stability to the neck edge or it will stretch out of shape.
Ann N from Florida
What makes it more stable? I don’t understand and always have a hard time picking up stitches?? Is there a trick to it that you will be showing?
Ann N from FL
Bonniecand
Hi, Ann,
The casting off is what gives stability to the back neck. I cast off with a needle a couple of sizes larger than the one I knitted the piece with. When I pick up, I make sure that I insert the needle tip into the stitch, not between them. If I stretch out the cast off edge I can see that the gap between my stitches is larger than the gap in the stitch. Then I wrap the yarn around the needle tip and pull through. I always hold the yarn as if I am going to knit with it and the stitches are nice and even. They look like they grow out of the stitches of the piece.
Hope this helps.
Harmony from Ontario, Canada
Hi Ann. I use a crochet hook rather than my knitting needle to to pick up the new stitches and simply slide a group of stitches off the crochet hook onto my knitting needle to proceed with my knitting. I find the hook much easier to pick up the yarn than a knitting needle:)
Harmony from Ontario, Canada
Vivramirez
I am basically new to knitting, I am not familiar to “frog”, what does that mean?
Anonymous
Ripping back your work to fix it….”rip it, rip it” kind of sounds like a frog. Just a cute expression 🙂
Darlene
I’m new to knitting and don’t fully understand how to add the 2nd ball of yarn for the collar. Will that be explained in next week’s blog? Thanks!
PS. I’m enjoying this project so far, and I really appreciate the comment posts about doing the sleeves at the same time.
Anonymous
Yep! You mean after the neck bind off right? Tune in next Wednesday!
karen
I am almost finished with the back, only a few more rows to go, does it matter if I bind off on a knit row or purl row? Another question I have is about matching the stripes once I start the front. I’m using Lion Brand Amazing in Ruby. I started the back after finishing my swatch for the gauge, (not at the beginnng of a ball of yarn)Â do I start the front with a new ball of yarn or should I try to find the color variation to match the ribbing on the back ?
Anonymous
Hi there. Generally I think you finish after a wrong side (purl row) but I don’t think it matters very much in this case. As far as matching the colors, each ball is unique and starting from the middle or a little ways into the ball isn’t going to make it match. Although I generally like my stripes to match, I think of Amazing as an all-over color patterning yarn so matching stripes isn’t really necessary. I found myself just enjoying the colors as they came and not worrying about making it match. Enjoy!
karen
Thanks Kendra, I’ll enjoy the colors as they come! Looking forward to starting the front this evening.
Shari
Thank you for answering my question. The need for stability makes sense, I will bind off right now and be on to the front of my beautiful “Strawberry Fields” sweater.
Bonniecand
Glad the info was useful. Go, go go!
Today, I knit « the many facets of donna
[…] I’ve been knitting. I am participating in the Lion Brand Blog’s Knit-a-long (KAL) We (people from across the globe) are making a sweater together with the help of an […]
Grace Jones
I’m into my second skein of Amazing now. I was tempted to try to force the colors to be similar at the join, but quickly saw that this is unnecesaary due to the random striping in the yarn. It’s very freeing to not have to worry about stripe matching.
Anonymous
I know right? Let the yarn do the work and just enjoy it! 🙂
D
I could not find enough yarn of the same color in the store so I just bought 1 ball and ordered the rest. I was going to buy the Ruby in Amazing but decided on Aurora based on what the balls looked like in the store. Too bad Lion Brand does not post swatches or likes to an item made with each color on the multi colored yarn as the description and final colors are frequently hard to tell. I think the yarn is due to arrive today or tomorrow.
I made the swatch and with washing it did change size and now matches the gage. I had never heard that before. Â
I really like the feel of the yarn and like the colors will look interesting. I had planned on doing it in the round but after reading Kendra’s comment on the colors decided to do 1 piece at a time except for the sleeves. I think I am going to make it a little longer, but not as long as the longest.Â
So I need to catch up to the rest of you
Zontee
Hi D, glad you were able to pick a color you like, and don’t worry about catching up–we welcome you to work at you own pace, since the blog posts will remain available online even after the knit-along is finished.
For next time, there is a link on the Amazing yarn info page that takes you to large swatches in each colorway, which you can also go to directly here: http://cache.lionbrand.com/faq/513.html?language=
Hope that helps!
Kimberly McKenna Junkins
After reading so many comments from people using the Amazing yarn I really wish I’d used it. I’m hoping my sweater comes out as good as I think it will, then maybe I’ll splurge. I was nervous spending that much, more than I’d pay for a sweater already made (lol), and not knowing if it would come out okay. I’ve knit baby sweaters but never one for myself. Excited about this project, so far so good!
allison
I, too wished i had ‘splurged’ and used the amazing yarn! Near me in IL the yarn is on sale at Michaels arts and crafts for $5 a skein instead of 8! Which is great but seeing as i have two projects going at the present, my husband did not feel it necessary to make the plunge and purchase the yarn (which still would have been more than $50). Hmmm, maybe I will get it for a scarf or cowl after these current projects are done! 🙂
Harmony
Hi Kimberly. I just received my Amazing yarn in Acadia yesterday. I did my swatch and started the back last night. I am glad I spludged for the Amazing yarn. It makes the stocking stitch more interesting as I see the beautiful colours combinations work up. If you have made baby sweaters you will have no problem making a sweater for yourself…same concepts in a larger version. Good luck:)
Harmony
Rstein485
I knitted my back to 16″. When I knit the front how far should I go before I start the neck shaping.Â
Anonymous
2.5 inches less then start the neck shaping, so 13.5 inches in your case.
Wisteria Shawl Collar Pullover Knit-Along: Working the Front! | Lion Brand Notebook
[…] Wisteria Shawl Collar Pullover: Working the Back and Armholes […]
Heather Griffin
I’m almost done the armhole shaping on the back and I’m loving the Amazing yarn. It is knitting up really quick too, I’ve never made so much progress on a sweater in so little time (I just started last weekend). I’m actually using a different pattern from the LionBrand site (Shapely Stripes) since the sizing works better for my tiny mother, but I’m adding a few inches to the bottom since she likes her sweaters long. I was a little disappointed that I won’t get to do the shawl collar, but I’m enjoying following along and hearing everyone’s tips and tricks to making these. Since I got the yarn when it was on a great sale at Joann’s I picked up extra in 2 different colorways so I could make another sweater for myself as well as an entrelac scarf when I’m done. So glad I bought the extra because I love this yarn and it would be too sad to have to give it all away.
Anonymous
Sounds great! Glad you are enjoying the yarn so much!
Wisteria Shawl Collar Pullover KAL: Time for Sleeves and Blocking | Lion Brand Notebook
[…] Wisteria Shawl Collar Pullover: Working the Back and Armholes […]
Wisteria Shawl Collar Pullover KAL: Working the Collar | Lion Brand Notebook
[…] Wisteria Shawl Collar Pullover: Working the Back and Armholes […]