
 Welcome back to the Wisteria KAL! I hope your progress has been going well and your pullovers are coming along nicely. I know I’ve been enjoying seeing the colors change in Amazing. Now that we’ve tackled the back (the largest piece by the way – congratulate yourself on completing it!) it’s time to move on to the front. As I mentioned last week, the front is worked much like the back for the first 11.5 inches, if you are following the pattern as written. Alternatively, if you have altered the size of the sweater, work the front as for the back until the length is 2.5 inches shorter than the back was to the armhole shaping. Time for neck shaping!
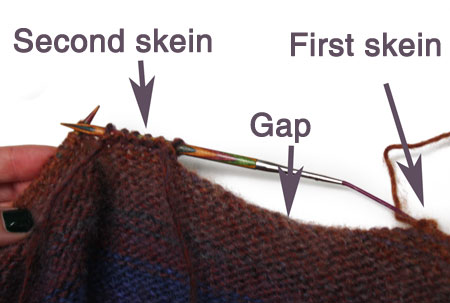
The initial shaping for the neck opening is achieved by binding off 18 stitches in the middle of the row, leaving an equal number of stitches on either side to continue working. However, in order to work both fronts at the same time, you will need to attach another piece of yarn to one of the sides to keep working. After the bind-off row you will work back on the wrong side with the yarn still attached, but once you reach the bind-off gap you will notice there is no yarn to work with!
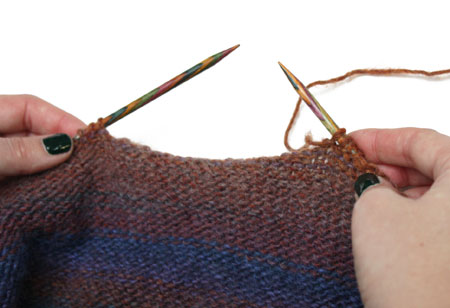
To remedy this, simply join a new strand of yarn by using it to purl the first stitch after the gap and continue across, just as you do to join a new ball when your yarn runs out.
Now the fun begins – if you look ahead in your pattern, you’ll notice 2 things: one is the description of how to proceed with the neck shaping, and the other are those four little words we all should be hunting for when working a pattern: AT THE SAME TIME. What this means is that while you are keeping track of decreasing at the neck edges every 8 rows, you also need to notice when your piece measures the same as the back to the armholes (14 inches or your desired length) and simultaneously work the same armhole shaping as we worked for the back. Knowing your row gauge is also very useful at this point – I knew that I was getting 6 rows/inch and I had started my neck shaping 2.5 inches before I needed to worry about the armholes. After 12 rows past the neck bind off (about 2 inches), I measured after every row to be sure I wouldn’t miss the 14 inch length point. When I was sure I was there, I pulled out my completed back piece to measure against so I was sure they would match.
Now comes keeping track of two sets of instructions at the same time. This is why it’s nice we already did the back with just armhole shaping because you already have a sense of how to work the armholes. At this point I’m keeping notes so I know where I’m at: I make a hash mark for every row I complete so when I get to the 8th row, I do my neck decreases then start a new set of hash marks for the next row. By doing so, when I have 6 (7, 7, 8, 10) groups of marks I know my neck decreases are complete! While this is going on I am also referring to armhole shaping instructions from the back section of the pattern, which is worked over a total of 8 (12, 16, 18, 20) rows. My best advice is to make whatever notes you need to in order to keep track of what is going on so you don’t miss any of the decreases.
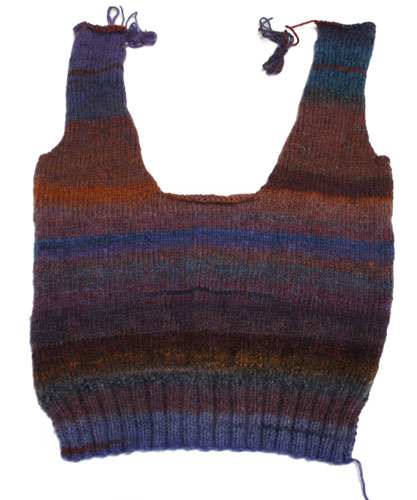
Once you have completed your decreases, count the number of stitches remaining on each side of the neck to make sure they match what the pattern says you should have left for binding off – 17 (18, 20, 21, 22), then do a happy dance – the shaping is over and you have the stitches you should! If for some reason your numbers don’t match, see if you can determine where the mistake was made and rip back to correct it, keeping track of how many rows you rip out so you know where you are in the pattern. Once you’re all set with the decreases, work even until the armhole depth matches that of the back (this may be quite soon after the neck decreases are completed) and bind-off both sides. Another piece done!
Next week we’ll move onto the sleeves and talk about blocking your pieces for seaming. Have a great week and enjoy!
Related links:
Mia Svensson
I´m done! Phew! That was not the easiest thing I´ve ever done. It came out a little wonkey, but that´s ok. 😉
Grace Jones
Very cute! What scale is that?
Mia Svensson
Thanks! Scale is 1/4, and I must be nuts, cause I just started another one! Eeek!
 This time though, I´m going off-pattern and gonna follow a drawn template so the fit is better…
Lorriehero
Did you add the second ball of yarn on the knit row as per the pattern or the purl row as per the knit along instructions?
Mia Svensson
I didn´t add a second ball at all since I only have one! X) But when I do go back to make the second front shoulder-piece, I start on the purl row since I end on a knit row.
Christie
I bought my yarn, and IÂ am following along with the reading and planning part… but I have a boatload of crocheting to do for Christmas, so I plan to work on the sweater after those projects are done….. will I be able to access the blog entries for this, all in a row? and how can I do that?
thanks!!
Christie
Virdrgndem
if you click on the ‘Knit-along’ in the categories list below, it should bring up all the tagged posts
Connie
Ahh did the armhole shaping wrong…guess I am going back once I finish my sleeves I already started. This post explained it much better than the patterns directions.
Cynthia
What length did everyone go with? I’m dithering over the length and it’s keeping me from finishing the back! I’m long torsoed so thought I’d add an inch. It’s driving me nuts! Please help! What’s everyone doing?
Cynthia
Kathy
I’m planning on wearing my sweater as more of a hoodie-style pullover, so made it 17 inches long. It should almost completely cover my tush at that length…and what’s not to love about that!
nobodyssister
I meant to make mine 17 inches long, but got distracted and when I went to measure, it was 17.5 inches. But too long is better than too short, IMO. BTW, I am pretty short-waisted, so I’d go ahead and add that inch if you are long-waisted.
Nancymcculley
I made mine 18 inches long after measuring a favorite tee shirt. Really long but it should cover “it”. I lengthened it from under arm holes. 😀
Stammisfam
I’m 6 feet and can never find sweaters that fit, so mine is super-long.Â
Grace Jones
I’m tall as well (5’10”), but most of my length is in my lower torso and legs.. and arms. So I added only 1″ to the body length. I’m hoping the arms will be long enough as is, but I’ll be keeping a close watch when I get to that part.
Susan Koutnik
Can’t believe I am finished already. This one went so quickly.
Susan Koutnik
ooops here is the picture.
Kelly Halley
That looks nice, Susan. Gosh, you’re fast!!
Anonymous
Wow! Looks great speedster! 🙂
Susan Koutnik
Thanks, this is a really soft sweater which is good because it is so warm I wouldnt be able to wear anything underneath. I really like how the seaming turns out. The seams practically disappear!
Kelly Halley
I hope I can say the same thing.
Kimberly McKenna Junkins
Finished all the shaping on the front of my sweater last night AND missed something and have 19 stitches instead of 18. Arrrrgh! So, I know I should rip it out and redo but I really don’t want to. I believe I missed one dec on the arm shaping. Can I reduce now with about 1 1/2 inches to go before it’s done?
Kimberly McKenna Junkins
Not necessarily dec but get rid of the extra stitch.
Anonymous
If you don’t see a noticeable difference, I’m in support of decreasing the extra stitch and calling it good. Close enough right?
Kimberly McKenna Junkins
Thanks Kendra, I’ll double check to make sure there’s no difference, if there is I’ll bite the bullet and rip it out. I really don’t want to but want my sweater to look right. I was keeping track but clearly marked down a row when it hadn’t been done it.
Jen in VT
Hi all!!
Ok, so I think I have a handle on how to keep track of the the simulations decreases. Now I realized that the length between the armhole and the neck opening is more like 3in. Can I just add some stitches (in a multiple of 4) to the collar?? Otherwise I think I might need to rip it back to before the neck bind off. TIA for your advice!!
Anonymous
Did you bind off extra stitches or because of your gauge? Keep in mind it may change when you block it so you might be just fine. If you are working to the pattern gauge and your stitch count is correct I’d be inclined to get it to size while blocking but it’s up to you.
Jen in VT
I increased the length on the sweater so that it is an even 24″ (I’m making the 1x). I thought all the measurements were right.. The back length from bottom to the armhole is 14 1/2 in. So I increased the length from neck bind off to bottom to 12 in. But when I was working the two sides, and got to where I thought the armhole should start, it was too short when compared to my back piece. So maybe during the blocking it will all measure OK. I might be over thinking things. 🙂
Stammisfam
Hi Kendra!
What kinda needles do you have there? Â They look so fun!
LdyM
Nearing top of front, with only two more neck decreases to go. However, I have an extra stitch on one side. In fact it almost looks like one side is longer than the other! What to do?? I won’t frog (eyes don’t allow); can I hide or adjust it somehow?
This was so much fun to do the “double” instructions at once. Thanks.. M
LdyM
One side is longer than the other! I’m going to “jimmy” it around the hairline (to be hidden by my hair?) by adding a couple of rows to the short side and decreasing that extra stitch, which is on the same side, in my last decrease. We will see!Â
Expert knitters are probably horrified at my sloppy fix, but my eyesight on this Forest Green I’m using is already making me crosseyed! I can barely use my one pair of Harmony size 6 on the ribbing, because I can’t see it well. My Clover size 8 for the body stand out. Chio..
LdyM
Well that didn’t work! I hear you chuckling. :) The entire front ended up SO much longer than the back!Â
Think I got lost way back when we started working with the two balls of yarn.. so yes.. rip-it, rip-it, I did indeed, back to that point. On stitch holders now.Â
Over and out, LdyM
Anonymous
Sorry for your troubles, but it will be for the best – the armhole depth definitely should be the same on the fronts and backs – best of luck on the next try!
Lorriehero
I’m just about to start the front shaping, and I noticed that the pattern says to add another ball of yarn at the beginning of the bind off section during the knit row while the knit along instructions say to add the second ball of yarn on the next row. Does it matter?
Anonymous
Nope! Just my personal preference to add the second ball on the next row but do as you choose!
Wisteria Shawl Collar Pullover KAL: Time for Sleeves and Blocking | Lion Brand Notebook
[…] Wisteria Shawl Collar Pullover Knit-Along: Working the Front! […]
Wisteria Shawl Collar Pullover KAL: Time for Sleeves and Blocking | Lion Brand Notebook
[…] Wisteria Shawl Collar Pullover Knit-Along: Working the Front! […]
Williams Sharon
Does anyone have any ideas to make the two sleeves to match in the colour pattern? I just finished a turtleneck sweater in one of the self patterning yarns and worked very hard to make the side seams line up and the sleeves be the same. Suggestions?
Anonymous
Hi! You could try to examine the balls you have left and see which look like they have similar patterning from the colors in the ball, but Amazing has so many different colors that I wouldn’t make yourself crazy trying to get the sleeves to be the same. I think this sweater has more of an all-over color effect so I didn’t worry too much about matching stripes. Enjoy!
Amy
How do you decrease for the neck? Does it mean to make decreases in the middle or are the decreases on the armholes?
a little confused
Amy
oh I think I understand now…the sides are the sides of the neck, not rows…
wendy
I am sooooo confused. I am working on the front of the sweater and I have gotten to the part where we are decreasing. I did the first decrease on the neck side. And then I did the decrease for the arm holes. I need to do 8 more decreases on the neck side. The way I have it figured I will still have 29 stitches left instead of the 21 I am supposed to have.  44 – 1 = 43 (first decrease) 43 – 6 = 37 (arm decrease) 37 - 1 (8 remaining decreases) = 29. Am I reading the pattern wrong or is their a mistake. HELP
Â
Nancyssister
You forgot the additional decreases along the armhole. After binding off the first 6 stitches, you decrease one stitch (armhole side) every knit row 8 times. When you finish the neck decreases you will end up with 21 stitches.
Karen
I’m almost finished with the front, just one more decrease, when I noticed that I have 17 stitches on one side and 18 stitches on the other. How should I proceed ?
Anonymous
Which size are you making? How many should you have? As long as the neckline shaping looks ok, I’d say just increase/decrease as needed to have the correct number. If you can tell that one side is not shaped correctly then it is probably worth it to rip back and redo it. Good luck!
Karen
Thanks Kendra. I’m making a size small, and should 17 stitches when the decreasing is finished. I did go ahead and finish the front,and at this point the neck shaping looks ok.
Wisteria Shawl Collar Pullover KAL: Working the Collar | Lion Brand Notebook
[…] Wisteria Shawl Collar Pullover: Working the Front! […]
Eileen_pritch
I am sure many are long past finished this sweater bit I am just starting- waiting to find the perfect yarn at a perfect price. Â Wool Eze was recommended- which I bought for a fabulous color and washability/ problem is without a scematic chart there is no way to work the proper gauge. Â Going on smaller and smaller needles justs gets to the point of looking like a felted piece. Â I can figure out the gauge for casting on from my sample but things get complicated knowing how much to cast on and off for neckline and of course the collar- HELP