
 Welcome back to the Wisteria KAL! I hope working the front of your sweater went well and working through the “at the same time” was a success. Now that the body of the sweater is done, it’s time to give it some sleeves! When working sleeves I find it helpful to work them both at the same time for two reasons: it helps ensure they turn out the same shape and length, and they are both done at the same time! Personally I’m not a big fan of knitting the same exact thing twice, so it’s really nice to get them done all in one go. After working the top of the front piece at the same time, working on both sleeves is a snap!
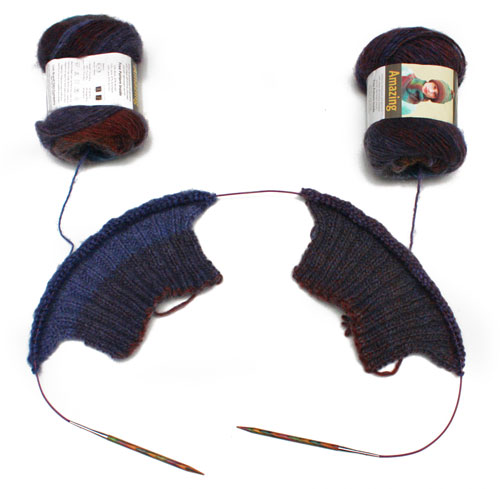
To set up for knitting both sleeves at once, you’ll need two separate balls of yarn and a long needle, preferably a circular needle at least 29″ long. Using one ball, cast on the instructed number of stitches for one sleeve, then drop that yarn. Now using your second ball, cast on the same number of stitches for the second sleeve. Now start knitting across both sleeves — just be sure to use the yarn attached to each sleeve and not carry the same strand all the way across both! Here’s a shot of my sleeves in progress:
The sleeves begin with 3 inches of ribbing, just like the body pieces, then increases begin immediately in the stockinette section and continue for most of the sleeve. The increase used for the sleeves is the knit into the front and back (kfb), and you can learn more about how to work this stitch by clicking here. There are many repeats of the increase row as you work your way up the sleeve, so it’s important to keep track of how many you have done. The nice thing about the kfb increase is that it makes what looks kind of like a purl bump (a little bar) on the right side of your work so you can count your increases if you lose track. Once the increases are completed, work even until the indicated length (or your desired length, measured from wrist to underarm). Afterward it’s on to the sleeve cap!
Sleeve caps can be a bit tricky, but we’ll make it through with the help of our row gauge. Remember back in the post about gauge when I told you to go with the needle size that gives you stitch gauge but to know what your row gauge is? This is when it comes into play: the instructions for shaping the sleeve cap are based on the row gauge of the pattern (6 rows/inch) so that the finished cap will fit into the armhole depth we already knit. If your row gauge is off, you may end up with a sleeve cap that is too tall or too short to properly fit into the armhole. But don’t despair! It takes a bit of math so bear with me, but we can figure out how to make your sleeve cap fit based on your own row gauge.
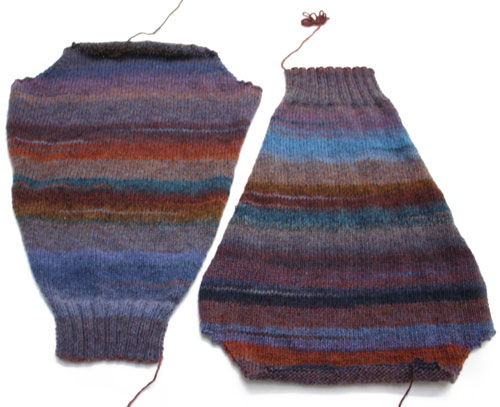
After the initial bind-offs every row, the pattern says to repeat the decrease row every other row (every right-side row), which is the same as saying every 1/3 inch (2 rows at 6 rows/inch gauge, 2 rows divided by 6 rows/inch equals 1/3 inch). To calculate when you should work your decreases, multiply your row gauge by 1/3 inch to find out how often you should increase. However, from your comments in the gauge post, it sounds like that most of you are getting a row gauge of just slightly over 6 rows/inch – somewhere in the range of 26-30 rows over 4 inches, which will give you an increase every 2.5 rows or so. In that case, I would advise that you throw in a regular knit row (with no increase) a few times along the way (and purl back) to make your cap a bit taller, then you can block it to the exact shape later. If your row gauge is looser (less than 6 rows/inch), you may need to make a few decreases on the purl rows so your cap doesn’t get too tall before you complete your decreases. My best advice is just to keep an eye on how tall the cap is getting and refer to the schematic in the pattern to make sure you are on track for the right size. Your sleeves should end up looking roughly like this:
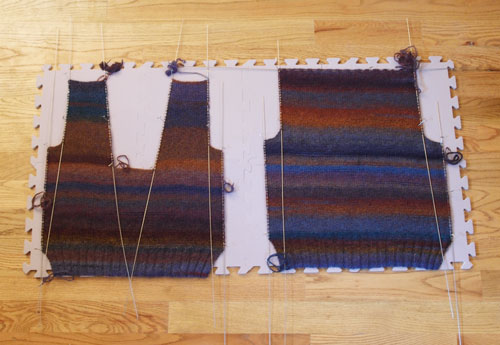
As you are working on your sleeves, it’s a good time to block the front and back of your sweater so they can dry while you keep knitting. To block my pieces, I fill my bathroom sink with lukewarm water and a cap-full of wool wash (why not clean it while I’m at it, right?). I leave it for 10-15 minutes then drain the water and gently squish the pieces to remove excess water. I carefully transfer my knitting to a towel, scooping them up so they don’t stretch out of shape when wet, and then roll them in the towel to get out more of the excess water. I lay out my blocking boards (a yoga mat or layered towels work, too!) then get my blocking wires, pins, a measuring tape and the pattern schematic. Being careful to follow the schematic measurements, I pin out both pieces of the sweater to the size indicated, measuring each part as I pin and adjusting as necessary. I personally don’t block out the ribbing and instead start my pins and wires above the ribbing because I want it to retain its natural tendency to pull in. If you want to the bottom of your sweater to be less shaped, you can also pin out your ribbing, but keep in mind that it will have less elasticity. This is how it looked once I was done:
Now let the pieces air dry. Repeat this process with your sleeves once they are knit as well, and next week we’ll be ready to seam the pullover and knit the collar! A finished sweater is soooo close! Have a great week!
Related links:
Stammisfam
I will be lengthening these sleeves and I’m thinking of distributing the increases over the adjusted measurement. Would you recommend that, or should I just work even after the increases are made?
nobodyssister
Advice I’ve read on the Ravelry group says, make your length adjustments in the work even portion of the sleeve, after the increases but before the shaping of the sleeve cap. The instructions say, work even till sleeve measures 19″, but you could work till 20 or 21 or what have you. I’ll be stopping at 16″.
Anonymous
I think you could do either – if you want to recalculate the increases over a longer length I think that would be fine, just make it so you finish the increases before your desired length so you still have a little work-even length. Hope this helps!
Grace Jones
I’m a step behind the posts which is nice because I can benefit from the advise. I’m keeping pace nicely. I am just about to start the center front bind off. I’ll work on the rest of the front tonight at my knit group and start the sleeves in a day or two.
I’m starting to think that these simple, mostly stockinette sweaters might be my prefered type of project becusue they practically knit themselves.
Anonymous
Glad you are enjoying it! I like simple sweaters too 🙂
Sarah Sarina Reiss
I have to thank you so much for making this so easy to follow.  I did the sleeves one at a time since I am usually working on my bed after a hip replacement and was worried about doing the front but you made it so easy. Congratulations for a job well done.
Anonymous
You are so sweet! Thanks for the feedback and I’m glad you are enjoying the sweater. Can’t wait to see your finished product!
Nancyssister
I have never heard of blocking wires. What are they? Where can you get them or do you just make them? Thanks.
Anonymous
Hi there! Blocking wires are sold by a variety of vendors so try a search online to find ones you like. They are generally sold in sets with different lengths, sturdy and/or flexible, in a rust-proof metal so you can thread them through the sides of your pieces then secure with a few pins, instead of having to use a ton of pins all along the sides. They are great for blocking especially when paired with blocking boards, which are available for sale from LionBrand.com, shown here:Â http://www.lionbrand.com/6030/PictPage/1922244111.html
Although there are alternative methods, I’ve found that the combination of blocking wires and boards has made my life much easier!
Harmony from Ontario, Canada
Hi,
I am working on my second sleeve and won’t be long before I am doing the collar. I made the neck opening up higher on the sweater than the was suggested in the pattern. I imagine I will have to alter the number of stitiches for the collar. How do I figure this out?
Thanks,
Harmony of Ontario, Canada
Anonymous
Hi! I’ll be talking about the collar in the post next week, but I would suggest doing fewer cast-on segments, stopping when it looks like it will fit into the neck opening that you created.
Kimberly McKenna Junkins
I’ve never made an adult size sweater and the baby sweaters I’ve made never called for blocking. So here’s my question, are you blocking because the yarn is wool, do I block if my yarn is acrylic? I’m working on my sleeves, one at a time, so I’ll go through the directions above as I get closer. I did my gauge before the Knit Along started so did it following the direction on the pattern. Hopefully that works when I start the cap.
Anonymous
Hi! I block just about everything I make, even if it is acrylic. It evens out your tension and allows you to shape the pieces to the correct measurements before seaming. I find it just makes it look polished, plus the way I wet block it also cleans the pieces!
Harmony from Ontario, Canada
Thank you Kendra. I am really enjoying the knit along. It’s the first one I have participated in. I look forward to the next blog on doing the collar. Your instructions are quite user friendly, so I am sure I will be able to figure out the correct number of stitches for my altered opening.
Thanks again:)
Harmony
Jilljanssen1
I too am really enjoying the knit along. It has kept me on schedule so I can keep focus on knitting something for myself. I usually put it off to start something for someone else. It’s nice ” me time” if you will. Just finishing up the front tonight and on to the sleeves tomorrow. A little behind, but it has been nice to read everyone’s questions. It has answered a lot of mine.
Kelly Halley
I’m running behind, as I figured I would. I just finished the ribbing on the front part. I almost allowed myself to get stressed over being behind but that would ruin the fun. I’ll keep knitting along, in the time I have, and enjoy and learn from everyone’s comments and pics along the way.
Denisej
I’m glad I’m not the only one behind! I’m going to start the sleeves tonight.
Janice Eagan
I am so looking forward to getting started on this sweater. I’ve never used circular needles and think it’s a wonderful way to work the sleeves together. So many great tips in this KAL!
Ann N from Florida
I noticed that there was a comment at the beginning of this about a person who did her neck decreases at the same level as sleeve decreases and wondered how she figured her decreases to come out right if she was 3 inches higher? I usually like a higher collar also and would like to try it but don’t want to mess up the decreases.
ScrapCynthia
Finally finished the front! That was a lot of info to keep track of, I’m glad we are past that!
My blocking squares should arrive any day, but I hadn’t heard of blocking wires either. In your picture, did you use rigid or flexible wires? Or did you (gasp) pin them to your hardwood desk/floor?
I can see why rust proof wires would be preferred, but I really don’t want to wait even longer. What else does anybody use?
By the way, I was annoyed with Lion brand, when I had knit through about 75% of my ball, and came across a KNOT tie. Shame on them! At $8 a skein, I would expect one continuous piece of yarn. I was really bummed, because if not for that knot, I could have finished the piece with that skein.
Another question….I finished the front and back, increasing 2″ in length, and have only used up 3 skeins. Will it really take another 7 to finish the sleeves and collar?
I do have lots of extra, I bought 10 wildflower skeins at Michaels using a 20% off coupon, then decided I liked the Glacier Bay better, so bought the only 5 I could find in the Michaels near me (San Diego) Then, last week we were in the inland valley (rancho cucamonga) and they had 10 in glacier bay, so I bought those. I had 2 shockers: 1. The yarn at that Michaels was $1.50 less per skein full price, then in San diego. I actually bought the yarn for less than my sale price here. 2. I was resigned to not using the same dye lot, but the die lots were the Same! That store in 2 hours from me too! I’m glad now that I stuck to Glacier Bay.
Cynthia
Lucy
I just received this email. Â So I’m getting a late start. Â But I know I’m going to love it. Â But frist I’ll have to buy some of that beautiful yarn. I love the way its stripping. Any sugestions?????
Anonymous
Welcome! It’s never too late to get going, the posts will always be here.
Wisteria Shawl Collar Pullover KAL: Working the Collar | Lion Brand Notebook
[…] Wisteria Shawl Collar Pullover: Time for Sleeves and Blocking […]
Amy
I think the wildflowers (purple/blue/red) color is beautiful or rainforest–it has a nice bright green accent and a hint of orange/red. Have fun with your sweater:-)
Amy
Serena Mei
Still trucking along on my sleeves. Â I sometimes feel like I don’t get enough time to just sit in front of the tv and veg while working on this sweater. Â I’m making mine in Vineyard (purple/magenta/greyish-green) and I like it.
Amy
Is it ok if the sleeves are a little shorter? I knitted to 17 inches instead of 18 inches to the cap. I was wondering if I should go back and tear it out to that part.
Anonymous
It’s up to you – you’ll just have shorter sleeves, but the cap won’t be affected so you’ll be able to seam it in just fine.
ehap
OK I may be blind- but where are the instructions on how many stitches to cast on for the sleeves/ am I missing a blog post- HELP
Anonymous
Hi there – it starts under the heading SLEEVES, then in the first sentence below that is has the instructions for the number to cast on and on which needle:
SLEEVE (make 2)With smaller needles, cast on 42 (42, 46, 46, 50) sts.Work in K2, p2 Rib until piece measures about 3 in. (7.5 cm) from beg, end with a WS row.Change to larger needles.
Hope this helps!
online tv
online tv…
[…]Wisteria Shawl Collar Pullover KAL: Time for Sleeves and Blocking | Lion Brand Notebook[…]…
allison
Not sure if anyone will read this since it is on such a former post but i was wondering if anyone had problem with their sleeves being too big. . . . .i noticed on Ravelry that one knitter re-did them for this reason. As i begin to start my sleeves i was trying to figure out if this was a unique problem or if it was for all and that i should maybe knit them a smaller size? (i hate frogging -but will if necessary).
Zontee
Hi Allison, the sleeve is designed to be relatively wide because of the casual style of the sweater (and also so there’s room for you to wear it over another layer or two of shirts). You could possibly decrease the sleeve faster after the sleeve cap, but remember that your sleeve cap has to be the specific size designed so that it will fit correctly into the body of the sweater. Don’t forget to check the Ravelry group for this specific knit-along and its message boards for more input from other knitters and crocheters, and if you need additional help, please feel free to email support@lionbrand.com!
allison
thanks for your input. . . . we shall see how it comes out :)Â