
 Welcome back to the finale of our knit-along! We’re finishing these beautiful sweaters today, and I for one can’t wait! Now that your collars are finished and in place, it’s time to set in the sleeves and sew the final side seams.
As I’m sure you can tell by now, I’m a planner. This is especially true when it comes to setting in sleeves. The first step is to pin the sleeve in place, matching the strange shape of the sleeve cap into the armhole opening of the sweater. To do so, I fold the sleeve cap in half to find the center of the top bind off and pin this point to the shoulder seam, which is the top center of the armhole. Next move to the outside edges, pinning the initial armhole bind-off notch to the bind-off notch of the sleeve cap (both are the same number of stitches and pin directly together). Then pin the center point of these two areas, and then the center of those resulting sections. Now can you see how the sleeve cap fits in?
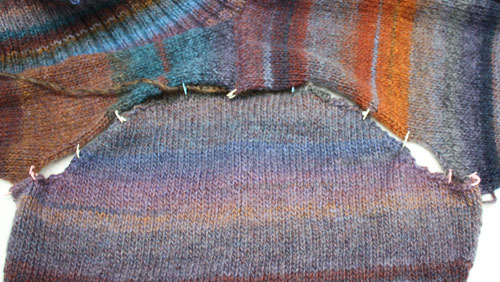
Time to sew it in! I’ve chosen to use a different yarn to sew in the sleeve because the mattress stitch seaming will not show through the sweater. Part of the softness and appeal of Amazing is that it is constructed of one single strand of yarn instead of multiply plies, but I chose to sew the sweater with a slightly stronger plied yarn, Vanna’s Choice, which can handle the wear and tear of the seaming we’re about to do. I like to set in my sleeves with one long strand of yarn which I join at the top shoulder seam then pull to the center of the yarn. I work down one side of the sleeve cap to the underarm, then return to the shoulder seam and repeat down the other side of the cap. This makes the seam consistent on the front and back because both were worked from the top down.

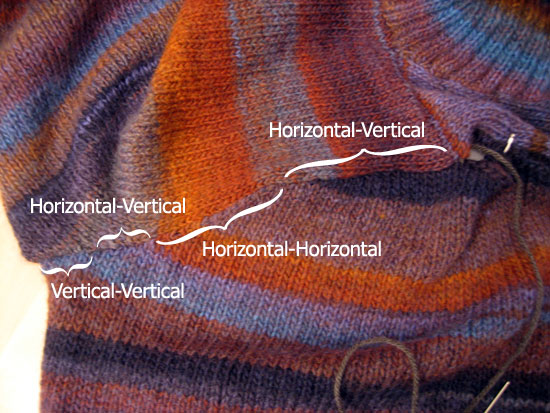
To set in the sleeve cap, I utilize all three types of mattress stitch that I discussed last week, each applied in different seaming zones. For the top bind-off sections you will work the horizontal-vertical type, then you will hit a section of horizontal-horizontal along the gentle slope of the sleeve cap. After that it’s back to horizontal-vertical for the next section of bind-offs, and finally end with the vertical-vertical seam to join the two bind-off notch portions together. Phew! See the following photo for what I mean as far as the seaming zones. I also work to ease the pieces together, skipping stitches occasionally to make the pieces fit together smoothly.
Once the sleeve is set in, it’s time for the final seams: sewing the sleeves closed and sweater sides together. This home stretch is the simplest seam – it’s all the basic mattress stitch working under the horizontal bars one stitch in from the edge of both pieces. Again, I like to pin first so that I can ease the pieces together as I go, pinning the bottom edges, the top of the ribbing, and then some midway points between.

Start seaming–the finished sweater is so close! Work carefully to make sure you can line up the sides of the body without any bunching. After the seams are done, I weave in all of my ends and give the collar and seams a light steaming to soften them. I finally have a finished pullover!
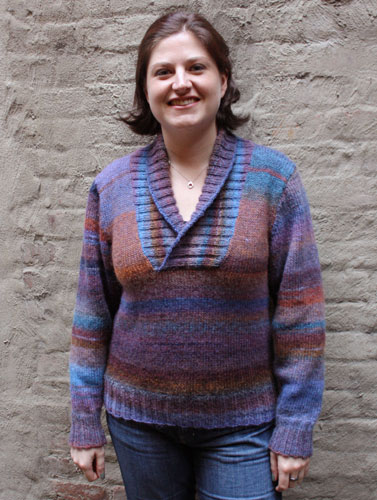
I know this sweater has been a journey, and I hope you all have finished sweaters you are proud of. Although I love how this sweater fits me, the intended recipient is actually my mom. She taught me to knit as a child, and I owe her for my love of yarn crafting. She contacted me weeks ago when she got her Lion Brand newsletter and found out I was hosting this KAL and asked me about joining in. While I would have loved to have her knit along as well, I made her a different offer instead: “Do you want mine when I finish it?” Having only knit her small things in the past, I really wanted to make her this pullover to give her something special to keep her warm in the Utah winter. So now that this gorgeous sweater is done, it’s time to send it off to her. I’ll post a photo when she gets it so you can all see how it looks!
Thanks for joining me in this KAL–it has been great talking to you, helping each other through the process, and seeing all of your success. Please continue to comment and share your progress and finished sweaters–I can’t wait to see them!
Related links:
Grace Jones
Nicely illustrated seaming details. Thank you so much for the guidance and encouragement. I’m still on my sleeve caps (it’s been a busy week with the run up to Halloween) but I’m sure I’ll catch up in the next week or two.
Anonymous
No problem, it’s my pleasure. Keep it up and share your progress!
Maryann
Thanks for the tips on how to sew set-in sleeves. I’ve avoided them in patterns before because they looked hard to sew.
Anonymous
You are very welcome! Just take it a step at a time and they really aren’t as scary as they look. Good luck!
Anonymous
No problem, it’s my pleasure. Keep it up and share your progress!
Shari
Well, I’ve just finished my collar and am ready to bind off. When you bind off a K2,P2 rib, do you bind off following the rib pattern or do you just do a knit bind off? If anyone can answer for me, I would greatly appreciate it. I love the color of my strawberry fields sweater.
Anonymous
I like to bind off in K2, P2 rib as well, just to keep the look of ribbing in the bind off. Hope this helps!
Grace Jones
I’m about half way through my shawl collar. My steam has slowed down (as it always does near the end of a project) but I have resolved to get it done by Thanksgiving which is only a week (!)Â away now. Wish me luck.
Anonymous
Good luck! You can do it! The end is near, I promise 🙂
Ana Lewis83
Thanks for all your tips. I finished my sweater in time for Thanksgiving. All the compliments made the day even more special!
Anonymous
Congrats!!
Karen
I fell behind, first with Halloween, then Thanksgiving, now Christmas. I’m still working on the sleeves but decided to put it away until afer the holidays. I feel I would be too distracted now and would not enjoy the “process.” Come January I’ll enjoy finishing my sweater, knitting by the fire on cold, wintery nights.
williams.sharon
I finished my sweater after Christmas and must say I am very disappointed with the results! I took the yarn advice of Lion Brand and used Vanna’s Choice instead of the Amazing as I am allergic to wool. What a mistake!!! If I was a more experienced knitter, I would have known better. The way the 2 knitted swatches felt in the yarn store should have told me that it would not work, but I figured if Lion Brand said it was a substitute, then it must be good. The Vanna’s Choice makes a much stiffer fabric that isn’t light and drappy the way the Amazing is. I was very careful about swatching, blocking the pieces to the correct sizes etc, but in my finished sweater, the give in the sleeves does not fall well -consequently the wide sleeves around the bicep area just look too big and the fabric ends up hanging in big rolls. The collar is really tight due to the stiffer wool in the rib. The rest of the sweater looks good though, although it is a very warm sweater.Â
Any suggestions on how I can fix these problems? I seamed it really well according to the excellent directions, and am not looking forward to trying to rip all the seaming out…but there is little point in throwing the whole thing away, after all that time and expense. Any help that you can give would be gratefully received!
Zontee
Hi Sharon, sorry for the delay in getting back to you. Since this is an older knit-along, it’s less well-trafficked by participants. However, you can always email our pattern support team at support@lionbrand.com to get some extra advice on any project.
The sleeves in this particular pattern are designed to on the loose side, since it’s meant to be a bit oversized. They would be a bit tricky to redo, since both the sleeve holes in the body and the sleeve cap in the sleeves would have to be changed, but you may find that with some clever seaming (using the standard invisible seaming technique) you can sew the sleeve seam in such a way that you can make the sleeves narrower to suit your needs.
If you’d like to redo the collar, I’d recommend using larger needles (which will give you a looser, drapier fabric) and therefore picking up slightly fewer stitches for the back of the collar than recommended in the pattern. By working the collar at a looser, larger gauge, the fabric will be looser. You can work fewer repeats of the pattern to get the collar to be the size you need for your garment.
I’d also recommend giving the entire sweater a wash and dry in the machine with a little fabric softener. Often, it’s amazing how much a wash will help to soften the fabric. You can also carefully steam the sweater (making sure not to touch the fabric with your steam iron) to help soften the fabric. Hope that helps!
williams.sharon
IS THERE ANYBODY HERE WHO CAN ANSWER MY QUESTION ABOVE???
williams.sharon
I think I need to rip out the sleeves on the sweater and redesign them so that they have a less baggy fit, but am not sure just how to do that -can you please help?
Zontee
Hi Sharon, you may also want to check out the Group on Ravelry.com, where people have posted about their sweaters. I think Rav user Wzrdreams, that’s @google-634c98b932025b3594f04564b2a75afd:disqus, modified her sleeves, so perhaps looking at her project with the new sleeve diagram she drew would help you redo them.
Finished: Wisteria Shall Collar Pullover | Nat's Distractions
[…] five months, I finally finished my Wisteria Shall Collar Pullover sweater. Lion Brand Yarn sponsored a knit-along this fall featuring this pattern and providing helpful tips for putting it all together. Wisteria Shall Collar […]
Charli Chapan
I certainly think this is a great article. I have been reading stuff like this for quite sometime but haven’t found such an engaing piece till now.
Cuckrooo
I have been looking at articles on this topic for quite some time now and I have loved the post you have shared here. Bloggers like you are keeping the blogging experience alive.